751.5 Structural Detailing Guidelines
751.5.1 Vertical and Horizontal Clearance
751.5.1.1 Vertical Clearance
Highway Grade Separation
The minimum vertical clearance for highway grade separations shall be the distance from the lowest point (including splice plate and bolt heads) on the bridge superstructure (including deflection from dead load and live load plus impact) to the highest point on existing lane or shoulder. The actual minimum vertical clearance for each roadway underneath the bridge shall be shown on the front sheet of the bridge plans.
Railroad Grade Separation
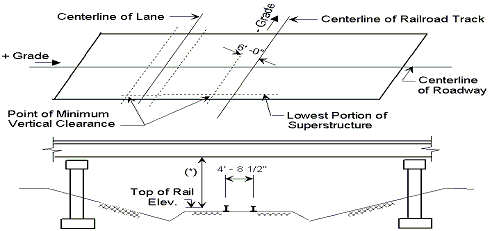
The minimum vertical clearance for railroad grade separations shall be the distance from the lowest point (including splice plate and bolt heads) on the bridge superstructure (including deflection from dead load and live load plus impact) to the elevation of the top of the highest rail at a point on a line 6'-0" from and parallel to the centerline of the track. If the track is superelevated, the superelevation slope shall continue to the point 6'-0" from the track centerline. An elevation shall be given on the design plans at the top of the highest rail directly on line with the point of minimum vertical clearance.
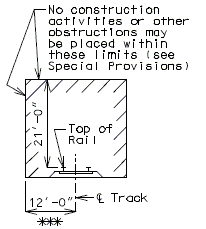
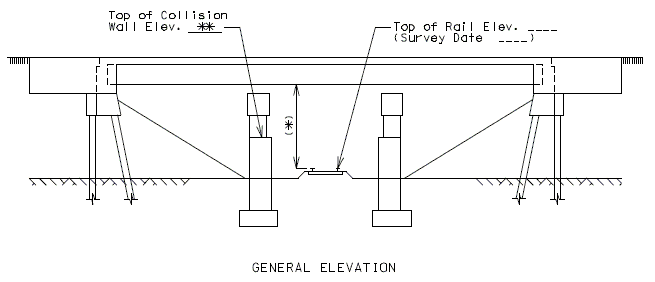
Use an asterisk and the corresponding note (*), to designate the vertical clearance for a railroad grade separation. Detail vertical clearance as shown below and place the following note on the plans near the elevation on the front sheet.
(*) Final Vertical clearance from top of rails to bottom of superstructure to be at least 23'-0”.
For traffic maintained under the structure during construction, see Office Notes Section for proper clearance notes.
See the Design Layout for minimum clearance.
Minimum Vertical Clearances for Grade Separation Structures
751.5.1.2 Horizontal Clearance
Minimum Horizontal Clearances for Grade Separation Structures
See the Design Layout for minimum clearance.
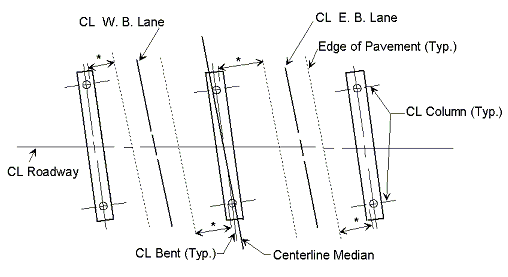
(*) Indicates horizontal clearance dimension to be shown on the front sheet of the bridge plans. (See the Design Layout for minimum clearance.)
Horizontal clearance for railroads shall be measured from the centerline of the tracks.
751.5.2 Boring Data
751.5.2.1 Front Sheet
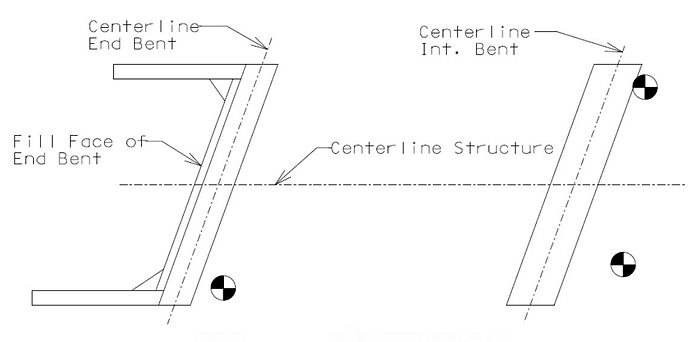
All available boring data locations shall be shown with the boring symbol in the plan view on the front sheet. Boring locations shall not be numbered. This applies equally to coring locations. No distinction should be made between boring and coring locations.
Add boring data disclaimer note to the front sheet of the plans.
751.5.2.2 Boring Data Sheet
Place the boring data sheet(s) at the end of the plans set. These shall be the last plan sheets on the jobs that have boring data. For example, on jobs that utilize piles, the boring data sheet(s) shall be placed just after the pile data sheet. If boring logs are in landscape format then rotate sheet and scale down as needed to fit in 8.5” x 11”; all boring logs shall be shown in portrait format and reprinted without modifying any information. Show two boring logs per sheet as shown below. This applies equally to coring and SPT logs. No distinction should be made regarding boring and coring logs on the boring data sheets or any other sheets.
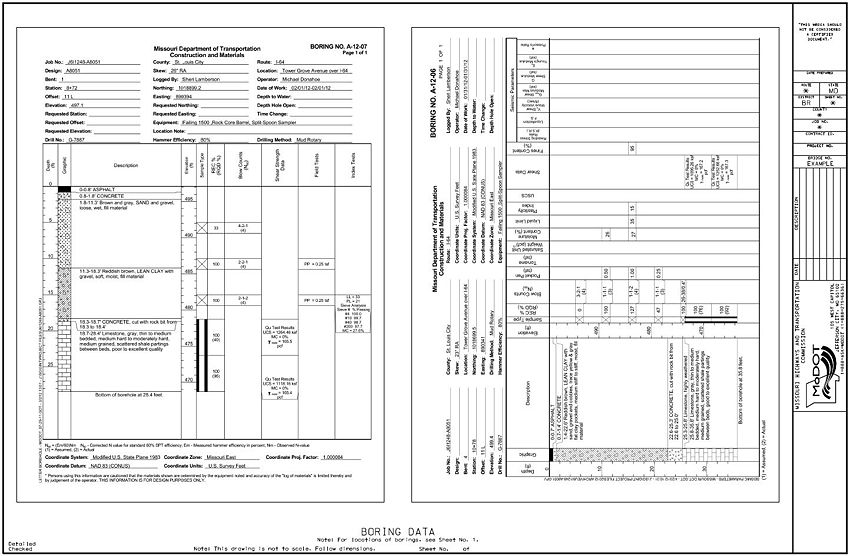
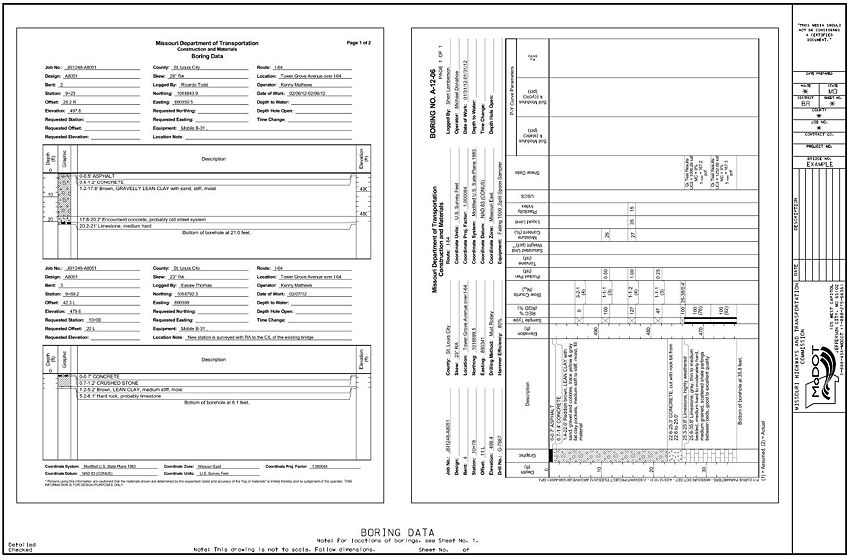
Add boring location note to the boring data sheet:
For location of borings, see Sheet(s) No._____.
751.5.3 Hydraulics
The following Tables for hydrologic and basic flood data are required on all bridge structures (stream crossings) and all standard box culverts. The hydrologic and basic flood data shall be given on the Design Layout.
See Structural Project Manager to determine which of the following tables to be placed near the Location Sketch.
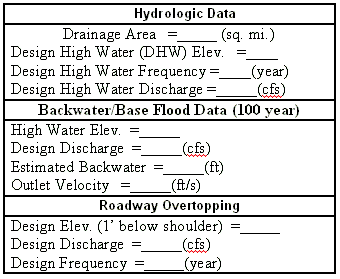
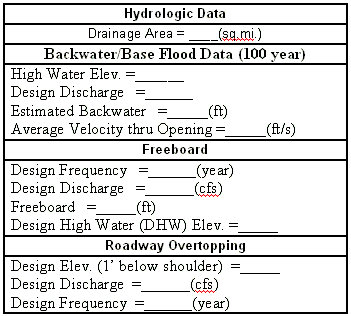
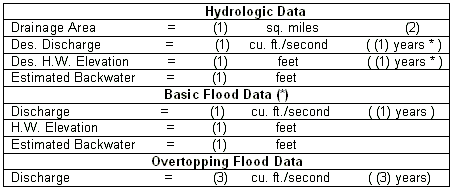
- (1) If specified on the Design Layout. *
- (2) Indicate the character of the drainage area as specified on the Design Layout or the Bridge Survey Report.
- (3) Indicate the overtopping discharge and frequency if the frequency is less than 500-year. Indicate “Greater than 500 year” if the frequency is greater than 500-year.
(*) If the design discharge is for 100-year flood, omit Basic Flood Data Table and insert 100 years for ((1) years).
The frequency of the design discharge and the design high water elevation shall be indicated after their respective values.
The frequency is often shown on the Design Layout as a subscript to the particular item, or given in parenthesis behind the item.
Example:
- Q10 - 10-year frequency for discharge.
- H.W. Elev. (25 Yr. Freq.) - 25-year frequency for high water elevation.
751.5.4 Substructure Layout
Tangent Alignment
The following information should be used in conjunction with figure below.
- (1) Lengths parallel to the centerline of the roadway
- (2) Column spacing along the centerline of the bent
- (3) The side parallel to the centerline of the bents in skew diagram
- (4) The side parallel to the centerline of the roadway in skew diagram
- (5) The acute angle between the centerline of bents and the centerline of the roadway in skew diagram
- (6) The angle between the centerline of the bents and a line normal to the centerline of the roadway in skew diagram
The span lengths for steel and prestressed structures given in the Design Layout are horizontal dimensions. For prestressed girders, the actual girder length should be adjusted accordingly for grade.
Horizontally Curved Alignment
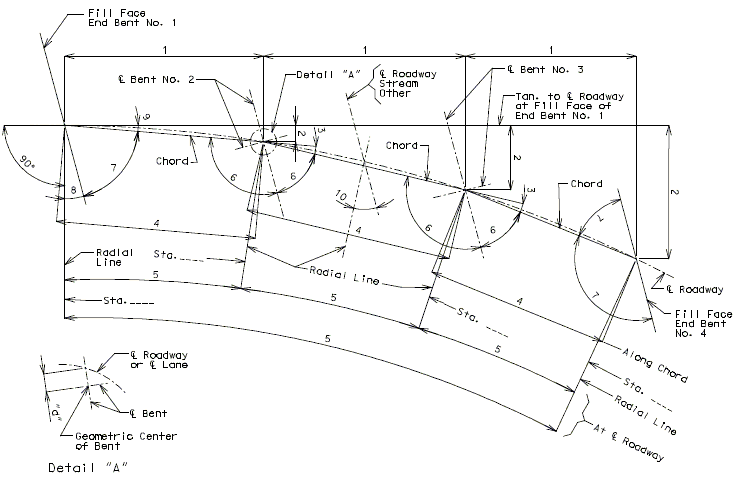
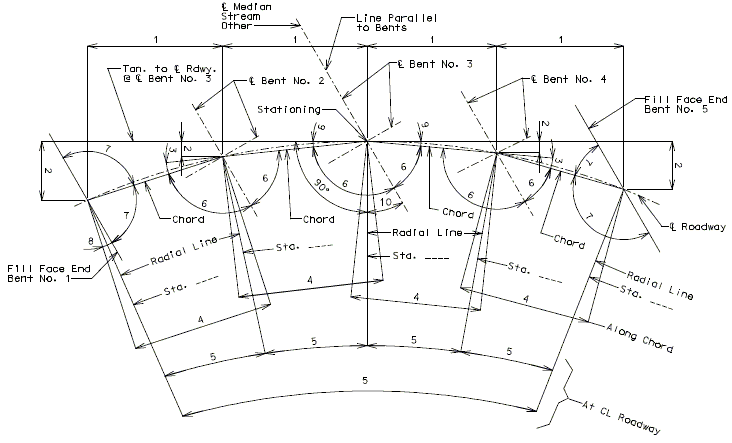
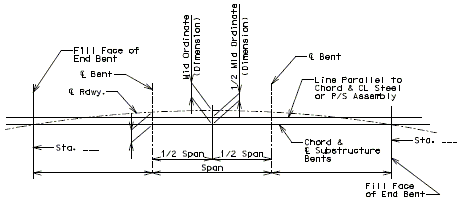
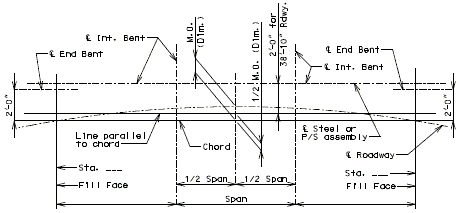
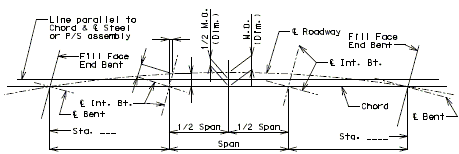
The following sketches show the form and content to be used in detailing the substructure layout for some of the most common horizontal curve situations. When situations arise where modification of these sketches becomes necessary, the sketches should be used as a guide with regards to the form and content of the modified layout.
Attention should be given to the fact that in all cases illustrated here, the centerline of the roadway passes through the geometric center of the intermediate bents. On occasion, particularly in the case of continuous I-Beam spans, or where the slab is not symmetrical about the centerline of the roadway, this will not happen. In these and any other cases which may cause a similar situation, dimension "d", from the intersection of the centerline of the roadway with the longitudinal centerline of the bent, to the geometric center of the bent, must be shown. All bents will be parallel unless otherwise noted on the Design Layout.
The following key describes the dimensions marked on the following figures in this article:
- 1 Dimension along tangent
- 2 Offset from the tangent
- 3 Angle between chords of adjacent spans
- 4 Chord length
- 5 Dimension along the centerline of the median or roadway
- 6 Angle between the centerline of the bent and the chord
- 7 Angle between the fill face and the chord
- 8 Angle between the fill face and a radial line
- 9 Angle between the tangent and a chord
- 10 Skew angle
- 11 Dimension from the centerline of the median to the centerline of the lane in the direction of the centerline intermediate bent
- 12 Dimension from the centerline of the median to the centerline of the lane at the fill face
Short Bridges on Long Chords
Bridge Placed Parallel to the Long Chord
When noted on the Design Layout, short bridges on small horizontal curve alignments may be detailed on a line parallel to the long chord. The intent is to simplify the bridge geometry by placing the centerline of steel or P/S beam assembly on or parallel to the long chord to the centerline of roadway curve between fill faces of end bents. In order to avoid excessive slab overhangs, the line parallel to the long chord is usually placed at one-half the mid ordinate between curve and long chord. For this situation, the outside faces of the slab, barrier, rails, and wings shall be detailed concentrically with the roadway curvature, and curb ordinates shall be furnished on the plans.
It is to be noted that even for symmetrical width bridges, the location of bearings will not be symmetrical about the centerline of bents. Also, the intermediate bent caps shall be built to sufficient length on each end to accommodate the bearing offsets toward either end. See Figure below.
Bridges Placed on the Long Chord
For wide roadways and very small degrees of curvature for which the mid ordinates are 3" or less, the Design Layout may occasionally direct that the entire bridge be detailed as a tangent bridge along the long chord. For this situation, no parts of the bridge are to be curved. Details for the plan view on the front sheet of the bridge plans will be similar to examples given on the following sheets except that the centerline of bridge roadway will be on the long chord.
Coordinating Superstructure - Curve Offsets
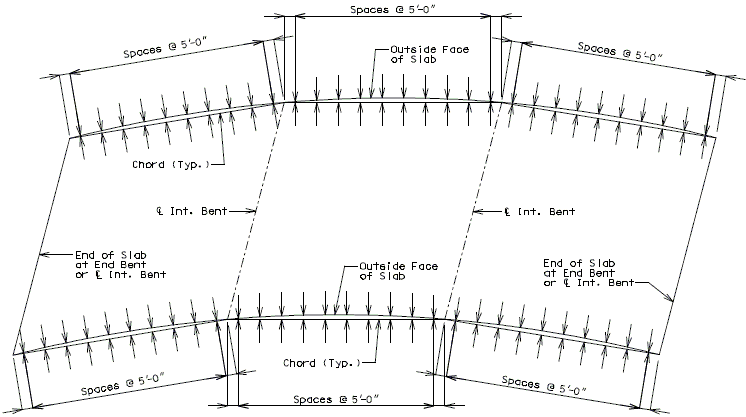
Plans for horizontally curved bridges shall contain the slab offset detail shown in Figure below.
Slab offsets from chords, between the centerline of bents, shall be detailed at every 5'-0” along the chord. On circular curves, these offsets shall be spaced from the center of the chord to ensure that the largest offset is recorded.
Substructure on Tangent Alignment

NOTE:The span lengths for steel and prestressed structures as given in the Design Layout are horizontal dimensions. The actual girder length should be adjusted accordingly for grade.
Horizontal Curved Alignment


Short Bridges on Long Chords
Slab Offsets for Curved Bridges
751.5.5 Front Sheet Misc. Details
Bench Mark
A bench mark in the vicinity of the bridge shall be provided on the front sheet and shall be located just above the title block as shown below in the following figure.

Location Sketch
A location sketch shall be provided on the front sheet of all bridge structures including box culverts and retaining walls. The location sketch may be eliminated on grade separation structures except where payment is made for removal of an existing structure or a congested area is involved such as a series of ramps, extended slope protection etc. When the location sketch is eliminated, place the north arrow near the plan view on the front sheet.
The location sketch for stream crossings should show the outline of the stream channel at the bridge site. The name of the stream should be given and the direction of flow indicated by an arrow on which is written the word "Flow". Any required channel change should be shown and labeled "Proposed Channel Change" and reference made to the road plans.
The centerline of the roadway should be shown and noted. The beginning station and outline of the new bridge should be shown and the new bridge labeled "Proposed Structure". The existing bridge, if any, should be shown and labeled "Existing Structure", and if it is a state bridge that is to be removed the bridge number shall be indicated in the location sketch. Place the north arrow near the Location Sketch.
Where structures are located on or within 150 feet of horizontal curves show complete curve data in the Location Sketch.
Standard Plan Sheets
Missouri Standard Plans (English Version) drawings applicable to a structure shall be made reference to on the front sheet of the bridge plans. The standard plan number(s) shall be located above the bridge number in the title block as shown in the following figure.

Information Block
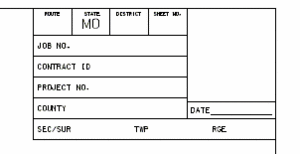
The figure below shows the SEC. / SUR. (Section or Survey number), TWP. (Township) and RGE. (Range) that is included in the information block in the upper right corner of the front sheet.
Construction Change Details
When the plans require changing after the bridge has been let the existing information must be kept on the plans. The changes shall be shown with details similar to the following figure.

Curve Data
All curve data of roadways that are going over or under the bridge shall be provided on the front sheet.
Filled Joint Detail
When joint filler is indicated on the plans, include Section number of Missouri Standard Specifications indicated below.
- Sec 1057 Preformed Sponge Rubber Expansion and Partition Joint Filler:
- Superstructure
- Pedestrian Structures
- Retaining Walls
- Sec 1057 Preformed Fiber Expansion Joint Material:
- Culverts
- Slope Protection
- P/S Panels

Rock Blanket - Revetment
When a rock blanket is specified on the Profile Sheet of layout file it should be shown in the General Elevation of the front sheet. Permanent Erosion Control Geotextile shall also be noted if they are needed. The following figure shows common rock blanket details. See EPG 751.1.2.14 Bridges over Railroad for criteria specific to bridges over railroads.
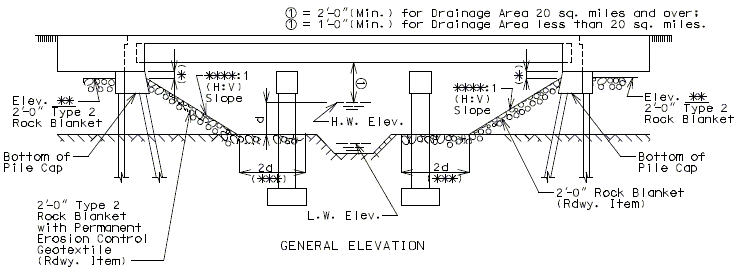
Upper Elev. of Rock Blanket on spill slope need not be higher than that for the side slope.
| Note: | When Permanent Erosion Control Geotextile is specified on profile sheet it should be noted in the GENERAL ELEVATION. Outlets may be used over Permanent Erosion Control Geotextile material. See Bridge Plans for type of curb to be used. |
| (*) | 12" between top of spill slope and lowest beam depth for Girder Bridges and 24" for Concrete Slab Bridges. |
| (**) | Elev. at top of Rock Blanket for side slopes shall be the highest of the following: |
| 12" above High Water Elevation (For 500-Yr. Freq.) or | |
| 24" above High Water Elevation (For 100-yr. Freq.) | |
| (***) | A Rock Blanket Apron should extend from the toe of the Spill Slope into the bridge waterway a distance equal to twice the Flow Depth in the overbank area near the embankment, but need not exceed 25 feet. |
| (****) | See Design Layout for maximum slope of spill fill (Maximum allowable spill fill slope is determined by Construction and Materials Division as specified in the Soils Survey for each project). |
Railroad Crossings
The following figure shows common railroad crossing details.
751.5.6 General Detailing
Levels
All Cadd drawings shall be drawn in MicroStation and shall have the following levels, colors and line weights.
- Concrete object lines (color 1 gray, weight 5)
- Reinforcing steel (color 4 green, weight 4)
- Structural steel object lines (color 4 green, weight 4)
- Hidden lines (dashed 2, color 4 green, weight 4)
- Centerlines (centerline 4, color 5 yellow, weight 2)
- Dimensions (color 5 yellow, weight 2)
- Leadered notes (color 5 yellow, weight 2)
- Small text (color 5 yellow, weight 2)
- Medium text (color 1 gray, weight 5)
- Large text (color 2 red, weight 7)
- Existing structure (lt. dash 1, color 5 yellow, weight 2)
- Cells (variable colors and weights)
- Area fill (color 7 magenta, weight 1)
- Section lines (color 2 red, weight 7)
- Quantity boxes and tables (variable colors and weights)
- Ground line (color 1 gray, weight 5)
- Annotations (No color or weight required)
- Break and match lines (color 5 yellow, weight 2)
- Misc. object lines (color 5 yellow, weight 2)
- Points (color 7 magenta, weight 8)
Conventions
Reinforcing steel, except when sectioned, is shown by a single line. Centerlines are represented by a single dot between dashes. Hidden surfaces are represented by short dashed lines.
Construction joints are represented using the miscellaneous object lines level as shown below:
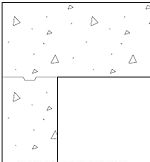
Water surfaces will be shown by broken or dashed lines as shown below.
The hatching of ground lines shall be shown as follows:

|
|||
| Water Line | Natural Ground Line | Finished Ground Line | Rock or Shale |
Miscellaneous
Lines used to indicate the magnitude of angle between two straight lines shall be an arc drawn with the center at point of intersection of the two lines. Arrows and dimension lines shall touch the items or extension lines they point to. Dimension lines shall be normal to extension lines whenever possible.
Dimensions and Leadered Notes
Dimensions and leadered notes shall be placed as close to the detail as possible and shall cross a minimum number of lines and details.
A bracket is normally not required for a multi-line note. The leader line should originate from the beginning or end of the note.
When designating a structural steel member, the leg the arrow points to should be the first value mentioned in the note.
When designating a number of parallel lines (such as reinforcing bars), a dimension line shall be used between the outside lines of the group. If the desired text will not fit clearly on the dimension line, the text may be placed away from the dimension line, and attached to the dimension line's center by an arrow. Arrowheads placed inside the extension lines should have a minimum clearance of 3/8" between the arrows.
Sections, Breaks and Curved Surfaces
Locating Sections
In general, the location of all sections shall be shown by use of heavy lines placed just outside the limits of the detail or portion of detail sectioned. Where, for the sake of clarity, it is necessary to show the direction of the view taken, arrows may be used at the ends of these lines and at right angles thereto. A reference letter shall be placed at these lines or arrows and the same letters used in the titles under sectional views. Views are normally shown looking in the direction of stationing, with the exception of End Bent No.1, which is reversed.
Hatching
Sectional views cutting through concrete shall be hatched with the conventional dot and triangle or oval hatching. Care shall be taken to avoid dense or crowded hatching, particularly for sections showing reinforcing steel.
Sectional views through reinforcing steel shall be shown solid. Sectional views through structural steel shall be shown as parallel sloping line hatching. In special cases, for the sake of clarity, the sections through structural steel may be left open or shown solid.
Except for special cases, all miscellaneous materials such as joint filler, castings, lead plate, etc. shall have sectional views shown hatched with light parallel lines, evenly spaced and sloped 45 degrees to the horizontal.
Breaks may be used in views for sake of clarity. All breaks should be drawn without excessive waving or zig-zag movements. A loop may be used in showing breaks in round objects such as columns.
Sloped or curved surfaces shall not be shaded except for special cases.
Lettering
All lettering shall be upper and lower case except titles, which shall be all capital letters in bold print.
Text Height
Body text shall be 0.0104 ft. (1/8 in.) tall, titles shall be 0.0156 ft. (3/16 in.) tall and the county name shall be 0.0208 ft. (1/4 in.) tall.
Dimensions
All details should be in English units only. No dual dimensioning will be used. Print unit name in lower case, even those derived from a proper name except for Fahrenheit (F.).
Use only feet and inches for length measurements. Dimensions under 2'-0" shall be detailed as inches.
In general, detail dimensions shall be given to the nearest 1/8". Where close work is required, dimensions for metals may be given to the nearest 1/16", 1/32" or 1/64". Deflections and haunches shall be reported to the nearest 1/16". Substructure layout for horizontally curved bridges shall be dimensioned to the nearest 1/16".
Nominal span lengths at the top of the front sheet shall be reported in feet and inches only.
The term or abbreviation for "about" shall not be used in the dimensioning of structural steel.
Stationing
Stations are one hundred feet. All stationing should be carried to the nearest hundredth foot as follows: 251+50.14.
Elevations
All elevations will be reported in feet. All elevations will be carried to the nearest hundredth foot as follows: 1234.98.
PLAN and GENERAL ELEVATION for a skewed bridge shall be shown on Sheet 1 of a set of plans:
The “Plan” should be drawn to scale. The “General Elevation” should be drawn as a section through centerline of structure but showing the side elevation of the end bent wing walls and safety barrier curbs. Only one pier column will be shown (No isometric views of the structure). The centerline of bents should “line up” on the Plan and Elevation.
Pluralization
For consistency, when referring to a group of items, the name is pluralized and not the indicator. See the examples below.
| Correct | Incorrect |
|---|---|
| Sheets No. 1, 2 & 3 | Sheet Nos. 1, 2 & 3 |
| Walls No. 1, 2 & 3 | Wall Nos. 1, 2 & 3 |
| Bents No. 1, 2 & 3 | Bent Nos. 1, 2 & 3 |
751.5.7 Numbers and Symbols
Rules for Writing Numbers & Slopes
Use feet and inches for length measurements. Make inch and foot marks of medium lengths (about 1/16") and place them to the upper right of numbers to which they refer.
Use fractions, not decimals for inches (3/4", not 0.75"; 2 1/2", not 2.5").
Common fractions shall be written with a vinculum separating the numerator from the denominator. These bars shall be placed horizontally except for rare cases where lack of space makes this impractical or when placed within a note. Common fractions shall always be given on the basis of architects' scale.
Some examples of fractions used in a note are:
- two 3/4" dia. coil tie rods
- 2 1/2" x 1 1/4" plate
- 2'-0 3/8" long bar
The decimal marker shall be a period.
Slope is expressed in non-dimensional ratios. The horizontal component will be shown first followed by the vertical component (H:V). The horizontal component is unitary for slopes greater than 45° and the vertical component is unitary for slopes less than 45°. The components in a slope ratio must be of identical units.
Rules for Writing Symbols
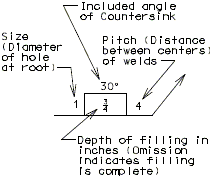
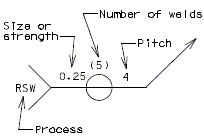
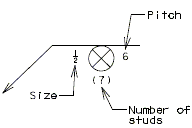
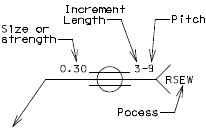
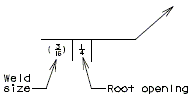
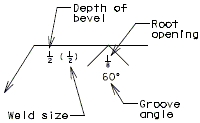
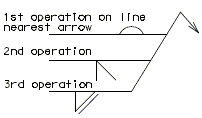
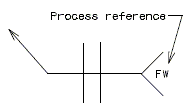
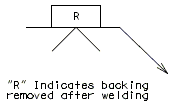
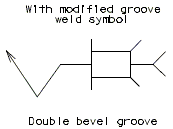
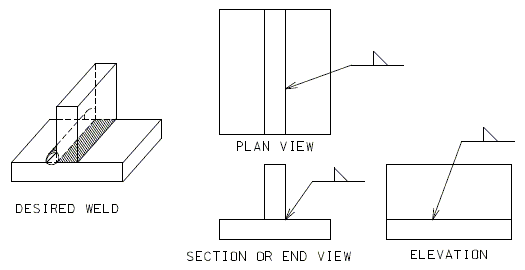
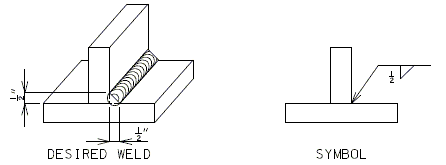
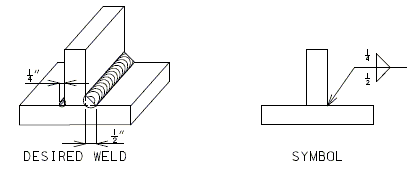
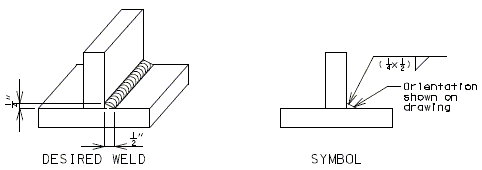
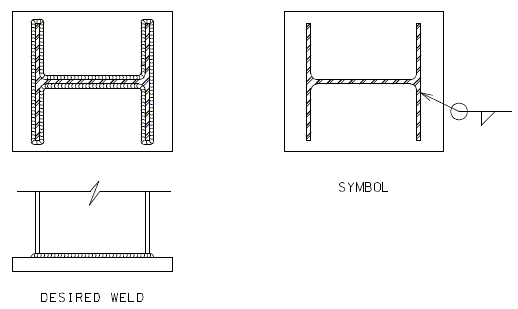
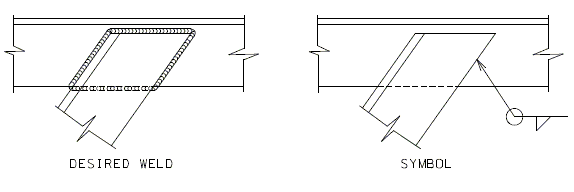
Only approved symbols shall be used for noting reinforcing bars, structural steel shapes, bolts, welding, dimensions, angles, etc. Symbols shall not be omitted where they apply except in authorized designation of structural steel shapes. Welding symbols shall be in accordance with American Welding Society (AWS).
751.5.8 Abbreviations
In general, abbreviations shall not be used in notes or drawings except for short notes located where space is very limited. Care shall be taken to avoid the extravagant use of abbreviations for any purpose. However, approved abbreviations may be conservatively used for noting and labeling the various items and details of the plans and of the tabulated data. Titles may be abbreviated where required by lack of space.
The following is a partial list of approved abbreviations and should be observed where applicable.
| American Association of State Highway and Transportation Officials | AASHTO |
| About | Abt. |
| Abutment | Abut. |
| And | & |
| Angle | Ang. |
| Approach | Appr. |
| Approximately | Approx. |
| Approved | Appv. |
| Alternate, Alternately | Alt. |
| Area | Ar. |
| Asphalt | Asph. |
| American Society for Testing and Materials | ASTM |
| Avenue | Ave. |
| Average | Avg |
| Baluster | Bal. |
| Backfill | Bkfl. |
| Beam | Bm. |
| Bench Mark | B.M. |
| Bearing | Brg. |
| Bent | Bt. |
| Bevel | Bev. |
| Bituminous | Bit. |
| Bottom | Bott. |
| Bracket | Brkt. |
| Bridge | Br. |
| Building | Bldg. |
| Cantilever | Cant. |
| Cast Iron | C.I. |
| Centers | Cts. or Ctrs. |
| Center to Center | Ctr. to Ctr. |
| Channel (Stream) | Chan. |
| Clear or Clearing | Cl. |
| Collision (Wall) | Coll. |
| Column | Col. |
| Concrete | Conc. |
| Concrete Reinforcing Steel Institute | CRSI |
| Connection | Conn. |
| Construction | Const. |
| Continuous | Cont. |
| Corrugated | Corr. |
| Counterfort | Ctft. |
| Countersunk | Ctsk. |
| County | Co. |
| Creek | Cr. |
| Creosoted | Creo. |
| Cubic (Yd., Ft., In.) | Cu. |
| Cubic feet per second | cfs. |
| Culvert | Culv. |
| Dead Load | D.L. |
| Deck Girder | D.G. |
| Department | Dept. |
| Design | Des. |
| Detail | Det. |
| Diagram | Diag. |
| Diameter | Dia. |
| Ditto (Steel Details) | Do. |
| Division | Div. |
| Double | Dbl. |
| Drawing | Dwg. |
| East | E. |
| Elevation | Elev. or El. |
| Engineer | Engr. |
| Estimate | Est. |
| Excavation | Exc. |
| Existing | Exist. |
| Expansion | Exp. |
| Fabricated | Fab. |
| Far Side (Steel Details) | F.S. |
| Federal | Fed. |
| Feet or Foot | Ft. |
| Fixed | Fix. |
| Flange | Flg. |
| Floor | Fl. |
| Galvanize | Galv. |
| Gauge | Ga. |
| Grade | Gr. |
| Head | Hd. |
| Hexagonal | Hex. |
| High Water | H.W. |
| Highway | Hwy. |
| Horizontal | Hor. |
| Impact | I. |
| Inch or Inches | In. |
| Include | Incl. |
| Joint | Jt. |
| Lateral (Steel Details) | Lat. |
| Left | Lt. |
| Length | Lgth. |
| Linear, Lineal (Ft., In.) | Lin. |
| Live Load | L.L. |
| Longitudinal | Long. |
| Low Water | L.W. |
| Maximum | Max. |
| Miles | Mi. |
| Minimum | Min. |
| Miscellaneous | Misc. |
| Missouri Department of Transportation | MoDOT |
| Near Side (Steel Details) | N.S. |
| North | N. |
| Number | No. |
| Octagonal | Oct. |
| Ordinate | Ord. |
| Overflow | O.F. |
| Overhead | O.H. |
| Paragraph | Par. |
| Perpendicular | Perp. |
| Plate | Pl. |
| Point | Pt. |
| Pound | Lb |
| Project | Proj. |
| Radius | Rad. (or R.) |
| Railroad | R.R. |
| Railway | Rlwy. |
| Reinforcing | Reinf. |
| Retaining (Wall) | Ret. |
| Right | Rt. |
| River | R. |
| Roadway | Rdwy. |
| Route | Rte. |
| Rubber Compound | Rub. Comp. |
| Section | Sec. |
| Sheet | Sht. |
| Shoulder | Sh. |
| South | S. |
| Space | Spa. |
| Specification | Spec. |
| Square | Sq. |
| Standard | Std. |
| Station | Sta. |
| Street | St. |
| Stringer | Str. |
| Structural | Struc. |
| Substructure | Substr. |
| Superelevation | Superelev. or S.E. |
| Superstructure | Superstr. |
| Symmetrical | Symm. |
| Tangent | Tan. |
| Thread | Thd. |
| Transverse | Trans. |
| Truss | Tr. |
| Typical | Typ. |
| Variable | Var. |
| Vertical | Vert. |
| West | W. |
| Widen or Widening | Wid. |
| Wrought Iron | W.I. |
| Yard | Yd. |
The following shall be used for units for pay items in Quantity Tables (No abbreviations shall be used unless indicated):
- each
- cu. yard
- gallon
- linear foot
- lump sum
- pound
- sq. foot
- sq. yard
- ton
751.5.9 Welding Details
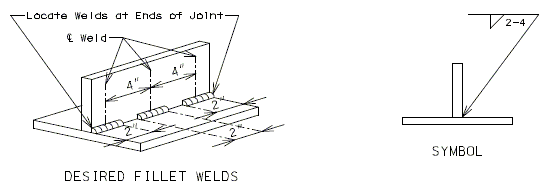
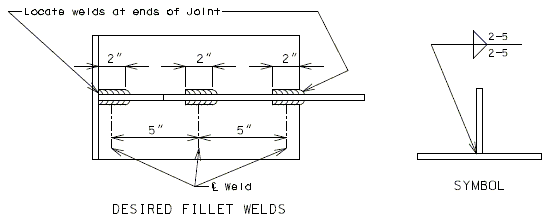
All welding shall be detailed in accordance with ANSI / AASHTO / AWS D1.5, Bridge Welding Code.
The following chart is the suggested minimum weld sizes based on past history; however, these may be increased to satisfy design requirements.
| Minimum Fillet Weld | Material thickness of thicker part joined |
|---|---|
| 1/4" | t 3/4" |
| 5/16" | 3/4" t 2 1/2" |
| 1/2" | t 2 1/2" |
The factored resistance of a welded connection is governed by the resistance of the base metal or the deposited weld metal.
The factored resistance of the base metal is:
- Where:
- = 1.0 (Resistance factor for shear)
- = gross area of smaller connection element
- = specified minimum yield strength of connection element
- Allowable shear load of the base metal =
The factored resistance of the deposited weld metal is:
- Where:
- = 0.8 (Resistance factor for fillet weld material)
- = tensile strength of electrode classification.
Allowable Shear Loads for Fillet Welds =
| Size of Fillet Weld (Inch) | Allowable Factored Shear Loads For Fillet Welds *(kips per linear inch) |
|---|---|
| 1/4 | 5.939 |
| 5/16 | 7.424 |
| 3/8 | 8.908 |
| 1/2 | 11.878 |
| 5/8 | 14.847 |
| 3/4 | 17.816 |
| 7/8 | 20.786 |
| 1 | 23.755 |
Minimum Length of Fillet Weld
The minimum effective length of a fillet weld shall be four times its size and in no case less than 1 1/2”.
Maximum Sizes of Fillet Welds
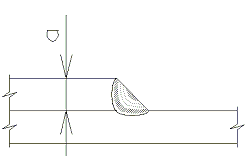 |
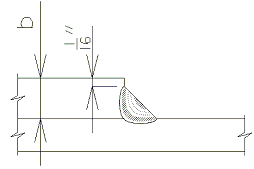
|
| 1/4" | 1/4" |
(*) Normally not used except for flush or upset welds
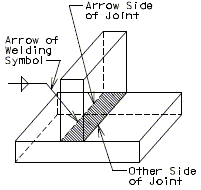
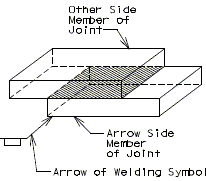
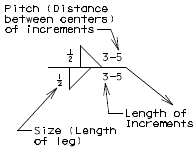
| Location of Elements of a Welding Symbol |
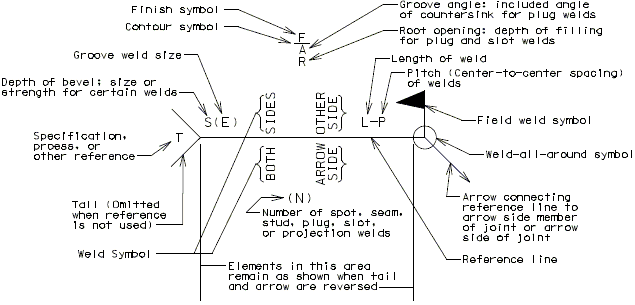
|
751.5.10 Reinforcing Steel Detailing
General
Unless otherwise specified, reinforcement shall be Grade 60, deformed bar * meeting the requirement of AASHTO M31. Details for dimensioning reinforcing steel shall be in accordance with the CRSI Manual of Standard Practice.
(*) Except that plain bars or plain wire may be used for spirals, hoops and wire fabric.
Reinforcement Sizes
For general use, reinforcement may range from #4 through #11 bars with restrictions as described for individual structural components. #14 and #18 bars shall not be used without the permission of the Structural Project Manager.
Reinforcement Length
Minimum length: Minimum reinforcement length shall be 2'-0" except for dowel bars and anchor bars.
Maximum length: Maximum reinforcement length shall be as follows:
| Uncoated Reinforcement | |
|---|---|
| #4 bars and larger | 60'-0" |
| Epoxy Coated Reinforcement | |
| #4 bars and larger | 60'-0" |
Bar Length Calculation
Reinforcing bar lengths shall be calculated to the nearest 1/8" for individual dimensions and rounded to the nearest 1" for the nominal and actual lengths.
Use tables below for figuring reinforcing bar lengths with stirrup hooks or end hooks.
Reinforcement Spacing
Reinforcement spacing shall be in accordance with LRFD 5.10.3 unless modified by the following criteria or elsewhere shown in Bridge Manuals.
| Minimum Spacing - Moment Reinforcement | |
|---|---|
| Preferred Min. - Footings | 6" centers |
| Preferred Min. - Slabs, Culvert Walls and Retaining Walls | 6" centers |
| Absolute Min. - Slabs, Culvert Walls and Retaining Walls | 5” centers |
| Preferred Min. - All Other | 4” centers |
| Absolute Min. | 2 1/2” clear |
| Maximum Spacing - Moment Reinforcement | |
| Absolute Max. - Slabs | 1.5(slab thickness) |
| Absolute Max. - All Other | 18" |
| Minimum Spacing - Shear Reinforcement | |
| Absolute Min. - Substr. Beams | 6" centers |
| Absolute Min. - P/S I Girder | 5" centers |
| Maximum Spacing - Shear Reinforcement | |
| Absolute Max. - Substr. Beams | 12" centers |
| Absolute Max. - P/S I Girder | Refer to EPG 751.22 |
| Minimum Spacing - Longitudinal Compression Reinforcement | |
| Absolute Min. | 4 1/2" centers |
| Absolute Min. - Cols. (thru #10) | 2" clear |
| Absolute Min. - Cols. (#11, #14) | 2 1/2" clear |
| Absolute Min. - Cols (#18) | 3 1/2” clear |
| For Drilled Shafts and Rock Sockets, see EPG 751.37.6.1 Reinforcement Design. | |
| Minimum Pitch - Spiral Reinforcement for Compression Members (Static) | |
| For Columns, Drilled Shafts, Rock Sockets | See LRFD |
| Minimum Spacing- Ties (Transverse) Reinforcement for Compression Members (Static) | |
| For Columns | See LRFD |
| For Drilled Shafts and Rock Sockets, see EPG 751.37.6.1 Reinforcement Design. | 6” centers for #4 bars |
| Maximum Spacing - Longitudinal Compression Reinforcement | |
| Absolute Max. - the minimum number of longitudinal reinforcing bars shall be six for circular members and four for bars in a rectangular arrangement. For other requirements, see LRFD | |
| Maximum Pitch - Spiral Reinforcement for Compression Members (Static) | |
| Absolute Max. - Spirals | 6” pitch |
| Maximum Spacing - Ties (Transverse) Reinforcement for Compression Members (Static) | |
| Absolute Max. - Ties | 12" centers |
| Minimum & Maximum Pitch- Spiral Reinforcement for Compression Members (Seismic) | |
| See EPG 751.9 LFD Seismic | |
Reinforcement Cover
| Situation | Minimum Cover | |
|---|---|---|
| Conc. cast against and permanently exposed to earth: | ||
| - primary reinforcement | 3" | |
| - stirrups, ties, spirals | 2 1/2" | |
| Conc. exposed to earth or weather: | ||
| - primary reinforcement | 2" | |
| - stirrups, ties, spirals | 1 1/2" | |
| Conc. slabs which have no positive corrosion protection: | ||
| - top reinforcement | 3"(*) | |
| - bottom reinforcement | 1" | |
| Conc. not exposed to weather or in contract with ground: | ||
| - primary reinforcement (thru #11) | 1 1/2" | |
| - stirrups, ties, spirals | 1" | |
| Conc. piles cast against or permanently exposed to earth | 2" | |
- (*) Absolute minimum cover shall be 2 1/2” by LRFD 5.12.3.
- The minimum cover for stirrup and tie steel shall be 1 1/2" unless otherwise specified.
- For minimum cover for drilled shafts and rock sockets, see EPG 751.37.6.1 Reinforcement Design.
Reinforcing Bar Supports
The height of all reinforcing bar supports shall be carried to the nearest 1/4". See Missouri Standard Plans Drawing 706.35 for details of bar supports.
| Stirrup and Tie bars Hooks only |

|
| (**) | Deduct(*) | or (**) | |||||
| #3 | 3/8” | = 1 1/2” | 15/16” | 1 1/8” | 1 1/2” | 3/4” | 4” |
| #4 | 1/2" | = 2” | 1 1/4” | 1 1/2” | 2” | 1” | 4 1/2” |
| #5 | 5/8” | = 2 1/2” | 1 9/16” | 1 7/8” | 2 1/2” | 1 1/4” | 6” |
| #6 | 3/4” | = 4 1/2” | 2 5/8” | 3” | 4 1/8” | 1 7/8” | 12” |
| = Bar diameter | = Finish inside bend diameter |
| Deduct * | Deduct * |
EXAMPLE:
| #4 Stirrup with 2 - bends | 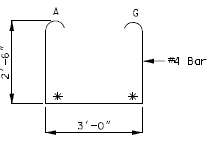
| ||
| 2(2'-6") = | 5'-0" | ||
| 3'-0" = | 3'-0" | ||
| A + G = | 9" | ** | |
| 8'-9" | |||
| 2(*) = 2 (Deduct)= | 2" | (From Table) | |
| Actual Length = | 8'-7" | ||
- C = Length along centerline of bar.
- D (#3 thru #8) = 6d, D(#9 thru #11) = 8d Above tables only.
- Deduct (all above angles except 90°) * = 2M - C or Deduct (90° Only) * = 2R - C
- M (all above angles except 90°) = R tan (/2) or M (90° Only) = R
- For additional coding and information see preceding page.
- (*) Do not deduct * for a bend where A or G is taken from CRSI Manual of Standard Practice
 |

|
| STIRRUP HOOK DIMENSIONS (*) | ||||
|---|---|---|---|---|
| GRADE 40 - 50 - 60 ksi | ||||
| BAR SIZE | D (inch) | Hook | Hook | |
| Hook A or G | Hook A or G | Approx. H | ||
| #4 | 2” | 4 1/2” | 4 1/2” | 3” |
| #5 | 2 1/2” | 6” | 5 1/2” | 3 3/4” |
| #6 | 4 1/2” | 12” | 8” | 4 1/2” |
751.5.11 Development and Splicing of Reinforcement
751.5.11.1 General
Development of Tension Reinforcement
Development lengths for tension reinforcement shall be calculated in accordance with LRFD 5.11.2.1. Development length modification factors described in second and third bulleted paragraphs of LRFD 5.11.2.1.3 shall only be used in situations where development length without these factors is difficult to attain. All other modification factors shown shall be used.
Development lengths for tension reinforcement have been tabulated on the following pages and include the modification factors except those described above.
Lap Splices of Tension Reinforcement
Lap splices of reinforcement in tension shall be calculated in accordance with LRFD 5.11.5.2.1 and 5.11.5.3.1. Class C splices are preferred when possible, however it is permissible to use Class A or B when physical space is limited. The designer shall satisfy LRFD Table 5.11.5.3.1-1 when using Class A or B splices. It should be noted that "" is based on the stress encountered at the splice location, which is not necessarily the maximum stress used to design the reinforcement.
Temperature and shrinkage reinforcement is assumed to fully develop the specified yield stresses. Therefore the development length shall not be reduced by .
Splice lengths for tension reinforcement have been tabulated on the following pages and include the development length modifications as described above.
Development of Tension Hooks
Development of tension hooks shall be calculated in accordance with LRFD 5.11.2.4. Hook length modification factors described in the second and third bulleted paragraphs of LRFD 5.11.2.4.2 shall only be used in situations where hook length without these factors is difficult to attain. All other modification factors shown shall be used.
Development lengths of tension hooks have been tabulated on the following pages and include the modification factors except those described above.
Development of Compression Reinforcement
Development lengths for compression reinforcement shall be calculated in accordance with LRFD 5.11.2.2. Development length modification factors described in LRFD 5.11.2.2.2 shall only be used in situations where development length without these factors is difficult to attain. All other modification factors shown shall be used.
Development lengths for compression reinforcement have been tabulated on the following pages and include the modification factors except those described above.
Lap Splices of Compression Reinforcement
Lap splices of reinforcement in compression shall be calculated in accordance with LRFD 5.11.5.2.1 and 5.11.5.5.1.
Splice lengths for compression reinforcement have been tabulated on the following pages.
Mechanical Bar Splices
Mechanical bar splices may be used in situations where it is not possible or feasible to use lap splices. Mechanical bar splices shall meet the criteria of LRFD 5.11.5.2.2. Refer to the manufacturers literature for more information on the design of mechanical bar splices.
751.5.11.2 Development and Tension Lap Splice Lengths – Top Bars ( = 60 ksi)

- Top bar is horizontal reinforcement placed so that more than 12” of fresh concrete is cast below the reinforcement.
- Class A splice = 1.0 , Class B splice = 1.3 , Class C splice =1.7
- Use development and tension lap splices of = 4 ksi for concrete strengths greater than 4 ksi.
751.5.11.3 Development and Tension Lap Splice Lengths – Other Than Top Bars ( = 60 ksi)

- Class A splice = 1.0 , Class B splice = 1.3 , Class C splice =1.7
- Use development and tension lap splices of = 4 ksi for concrete strengths greater than 4 ksi.
751.5.11.4 Development and Lap Splice Lengths - Bars in Compression ( = 60 ksi)

- Development length for bar with spirals, , should be used if reinforcement is enclosed in a spiral of not less than 1/4" diameter and no more than 4” pitch. See LRFD 5.11.2.2 for special conditions.
- Lap splices for #14 and #18 bars are not permitted except as column to footing dowels.
- Lap splice length with ties should be used when the ties along the splice have an effective area not less than 0.15 percent of the product of the thickness of the compression component times the tie spacing.
- All values are for splices with the same size bars. For different size bars, use the higher value of either the development length of the larger bar or the splice length of the smaller bar.
751.5.11.5 Development of Standard Hooks in Tension, ( = 60 ksi)
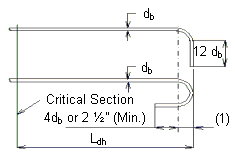
The development length, , is measured from the critical section to the outside edge of the hook. The tabulated values are valid for both epoxy and uncoated hooks.

- Case A - For #11 bar and smaller, side cover (normal to plane of hook) less than 2 1/2” and for a 90° hook with cover on the hook extension less than 2”.
- Case B - For #11 bar and smaller, side cover (normal to plane of hook) greater than 2 1/2” and for a 90° hook with cover on the hook extension 2” or greater.
- See Structural Project Manager before using #14 or #18 hook.
- When detailing near a free edge or construction joint, the larger development length value from the minimum category or the value from the applicable case given in the table shall govern.

|
| |
| (1) = (#3 thru #8) | ||
| (1) = (#9, #10 and #11) | ||
| (1) = (#14 and #18) | ||
| DETAILS NEAR FREE EDGE <br\>OR CONSTRUCTION JOINT | HOOKED-BAR DETAILS FOR<br\>DEVELOPMENT OF STANDARD HOOKS |
|---|
751.5.11.6 Development of uncoated Grade 40 deformed bars in tension, (LRFD 5.11.2.1)

- Top bars are placed such that more than 12” of concrete is cast below the reinforcement.
751.5.11.7 Minimum lap length for uncoated Grade 40 tension lap splices, (LRFD 5.11.5)
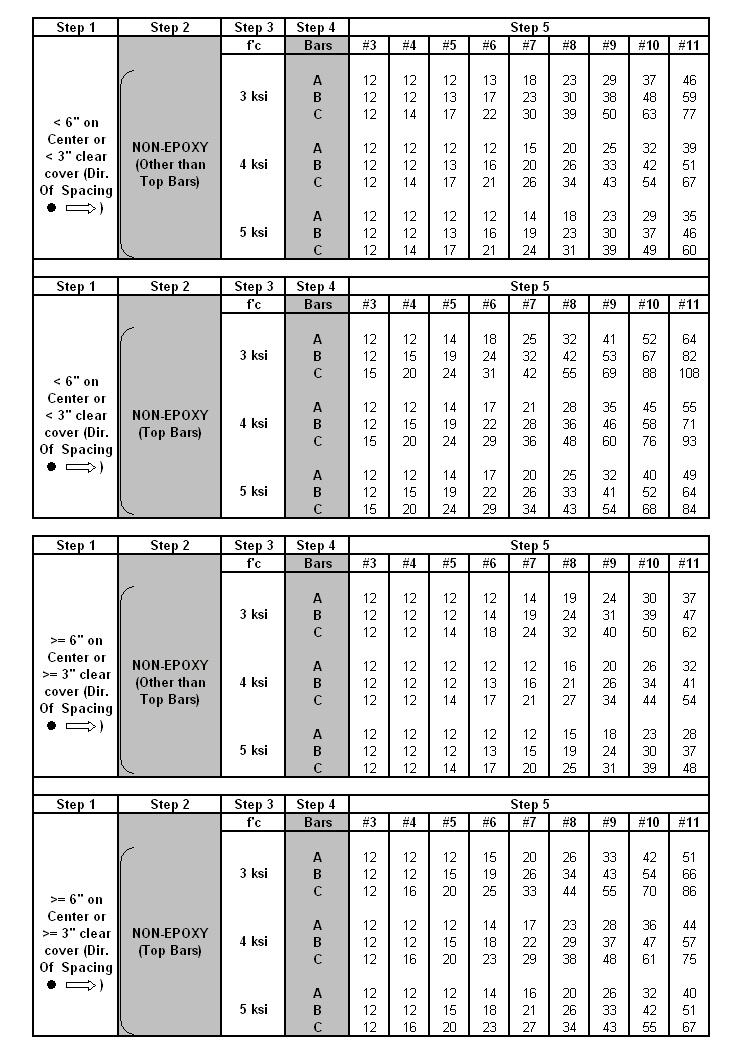
- Note: Design plan details shall indicate splice length.
- Top bars are placed such that more than 12” of concrete is cast below the reinforcement.
751.5.12 Miscellaneous
751.5.12.1 Notch Toughness
Wide Flange Beams Structures:
Proper notes to be placed on plans.
Plate Girder Structures:
Proper notes to be placed on plans. Typical examples for location of *** on plans for tension flange only of plate girders are shown below.
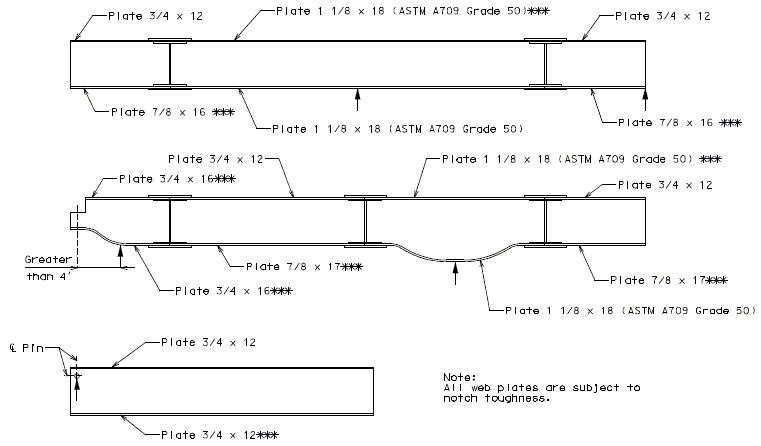
Other special locations for *** will be for tension flanges of floor beams in straight girder bridges, and for top and bottom flanges of floor beams in curved girder bridges.
When any splices are located in a moment area, all flange and web splice plates for the bridge are subject to notch toughness requirements. Show *** with detail of flange splice plate
751.5.12.2 Fracture Control Plan (FCP) *
Fracture Control Plan (FCP), Section 12 of ANSI/AASHTO/AWS D1.5-95, shall apply to fracture critical nonredundant member.
Main elements and components whose failure is expected to cause the collapse of the bridge shall be designated as failure-critical and the associated structural system as non-redundant. Examples of nonredundant members are flange and web plates in one or two girder bridges, main one-element truss members and hanger plates.
For non-redundant steel structures or members, the designer shall determine which, if any, component is a Fracture Critical Member (FCM). The location of all FCMs shall be clearly delineated on the design plans.
FCMs are defined as tension members or tension components of bending members (including those subject to reversal of stress), the failure of which would be expected to result in collapse of the bridge. The designation "FCM" shall mean fracture critical member or member component. Members and components that are not subject to tension stress under any condition of live load are not fracture critical.
Any attachment welded to a tension zone of an FCM shall be considered an FCM when any dimension of the attachment exceeds 4 inches in the direction parallel to the calculated tensile stress in the FCM. Attachments designated FCM shall meet all requirements of FCP. All welds to FCMs shall be considered fracture critical and shall conform to the requirements of FCP. Welds to compression members or compression area of bending member are not fracture critical.
FCMs shall be fabricated in accordance with FCP. Material for FCM shall be tested in accordance with AASHTO T243 (ASTM A673), Frequency P. Material for components not designed as fracture critical shall be tested in conformance with AASHTO T243 (ASTM A673), Frequency H. Sec 712 and FCM Special Provisions will include additional requirement for material, welding, inspection and manufacturing.
Notes to be placed on contract plans are as follows:
- General Notes:
- This structure contains non-redundant Fracture Critical
- Members (FCM). See Special Provisions for FCM requirements.
- Notes for Superstructure - Steel Spans
- (Place FCM next to the member or member components)
- (Place following notes near the FCM)
- FCM indicates Fracture Critical Member, see Special Provisions.
- The welds for FCM's are controlled by ANSI/AASHTO/AWS D1.5-95.
The notes may replace the notch toughness requirement now being used. If there are components requiring notch toughness that are not FCM's on the same plans as FCM's both notes will be necessary.
(*) The designation "FCP" shall mean fracture control plan and shall include all provisions of Section 12 AASHTO/AWS Fracture Control Plan (FCP) for Nonredundant Members of ANSI/AASHTO/AWS D1.5-95, Bridge Welding Code.
