Uncategorized files
Jump to navigation
Jump to search
Showing below up to 50 results in range #11,801 to #11,850.
-
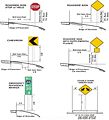 Figure 903.2.26.1.jpg 788 × 869; 90 KB
-
 Figure 903.2.26.1 2012.jpg 788 × 924; 143 KB
-
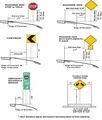 Figure 903.2.26.1 2019.jpg 788 × 924; 144 KB
-
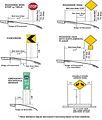 Figure 903.2.26.1 Oct 2012.jpg 788 × 924; 146 KB
-
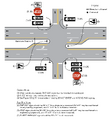
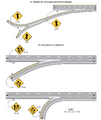
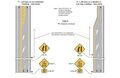
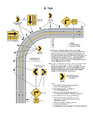
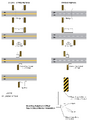
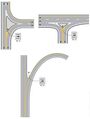 Figure 903.2.34.1 Examples of Keep Right and Keep Left Sign Placement (Sheet 1 of 2).jpg 2,138 × 2,837; 281 KB
-
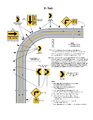
 Figure 903.2.34.2 Examples of Keep Right and Keep Left Sign Placement (Sheet 2 of 2).jpg 2,083 × 2,854; 279 KB
-
-

-
-
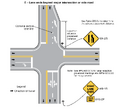
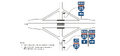
 Figure 903.2.40.1 Example of Regulatory and Warning Signs for a Mini-Roundabout.png 2,326 × 2,888; 106 KB
-
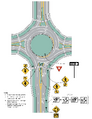
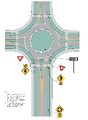 Figure 903.2.40.2 Example of Regulatory and Warning Signs for a One-Lane Roundabout.png 2,084 × 2,849; 117 KB
-
-
-
-
-
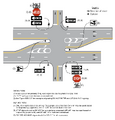 Figure 903.2.41.4 ONE WAY Signing for Divided Highways with Offset Left Turn Lanes.png 2,073 × 2,165; 122 KB
-
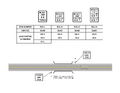 Figure 903.2.53.1 Weight Limit Restrictions.png 3,300 × 2,550; 184 KB
-
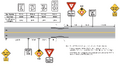 Figure 903.2.53.2 One Lane Bridge Weight and Width Restrictions.png 2,850 × 1,571; 113 KB
-
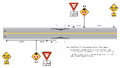 Figure 903.2.53.3 One Lane Bridge Width Restrictions.png 2,775 × 1,571; 77 KB
-
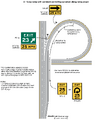 Figure 903.3.12 Examples of Exit Ramp Advisory Speed and Other Warning Signs.png 1,708 × 2,002; 131 KB
-
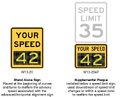 Figure 903.3.13 Vehicle Speed Feedback Sign and Plaque.png 1,372 × 1,104; 497 KB
-
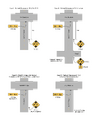 Figure 903.3.22 Examples of Low Clearance Signs.png 1,275 × 1,650; 364 KB
-
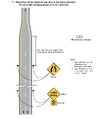
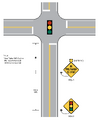 Figure 903.3.29.1 Example for Placement of Be Prepared To Stop Sign.png 1,598 × 1,959; 40 KB
-
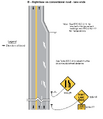
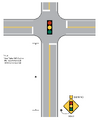 Figure 903.3.29.2 Example for Placement Of Signal Ahead Sign-Condition B.png 1,598 × 1,959; 33 KB
-
-

-
-
-
-
-
-
-
-
 Figure 903.3.70 Object Markers.png 1,064 × 2,096; 330 KB
-
-
-
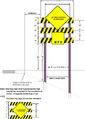 Figure 903.3.74 Shoulder Barricade Assembly.png 640 × 897; 70 KB
-
-
-
-
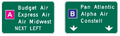 Figure 903.4.2 Examples of Color-Coded Destination Guide Signs.png 586 × 175; 101 KB
-
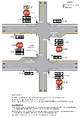
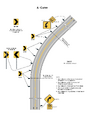
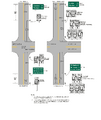
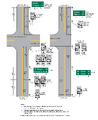
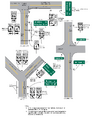
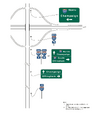
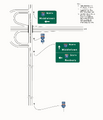
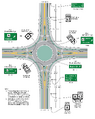 Figure 903.4.35.1 Examples of Guide Signs for Circular Intersections (Sheet 1 of 2).png 2,327 × 2,925; 620 KB
-
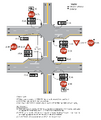
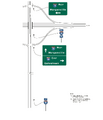
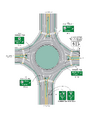 Figure 903.4.35.2 Examples of Guide Signs for Circular Intersections (Sheet 2 of 2).png 2,550 × 3,300; 502 KB
-
-
-
-
-
-
-


.jpg)
.jpg)


.png)
.png)
.jpg)
.png)
.png)
.png)
.png)
_.png)


.png)
.png)
.png)
.png)
.png)


