|
|
| (6 intermediate revisions by the same user not shown) |
| Line 89: |
Line 89: |
|
| |
|
| Designs of Mechanically Stabilized Earth (MSE) walls shall be completed by consultants or contractors in accordance with Section 11.10 of LRFD specifications, FHWA-NHI-10-024 and FHWA-NHI-10-025 for LRFD. [https://www.modot.org/bridge-pre-qualified-products-list Bridge Pre-qualified Products List (BPPL)] provided on MoDOT's web page and in Sharepoint contains a listing of facing unit manufacturers, soil reinforcement suppliers, and wall system suppliers which have been approved for use. See [http://www.modot.org/business/standards_and_specs/SpecbookEPG.pdf#page=11 Sec 720] and [http://www.modot.org/business/standards_and_specs/SpecbookEPG.pdf#page=14 Sec 1010] for additional information. The Geotechnical Section is responsible for checking global stability of permanent MSE wall systems, which should be reported in the Foundation Investigation Geotechnical Report. For MSE wall preliminary information, see [[751.1_Preliminary_Design#751.1.4.3_MSE_Walls|EPG 751.1.4.3 MSE Walls]]. For design requirements of MSE wall systems and temporary shoring (including temporary MSE walls), see [[:Category:720_Mechanically_Stabilized_Earth_Wall_Systems#720.2_Design_Requirements|EPG 720 Mechanically Stabilized Earth Wall Systems]]. For staged bridge construction, see [[751.1_Preliminary_Design#751.1.2.11_Staged_Construction|EPG 751.1.2.11 Staged Construction]]. | | Designs of Mechanically Stabilized Earth (MSE) walls shall be completed by consultants or contractors in accordance with Section 11.10 of LRFD specifications, FHWA-NHI-10-024 and FHWA-NHI-10-025 for LRFD. [https://www.modot.org/bridge-pre-qualified-products-list Bridge Pre-qualified Products List (BPPL)] provided on MoDOT's web page and in Sharepoint contains a listing of facing unit manufacturers, soil reinforcement suppliers, and wall system suppliers which have been approved for use. See [http://www.modot.org/business/standards_and_specs/SpecbookEPG.pdf#page=11 Sec 720] and [http://www.modot.org/business/standards_and_specs/SpecbookEPG.pdf#page=14 Sec 1010] for additional information. The Geotechnical Section is responsible for checking global stability of permanent MSE wall systems, which should be reported in the Foundation Investigation Geotechnical Report. For MSE wall preliminary information, see [[751.1_Preliminary_Design#751.1.4.3_MSE_Walls|EPG 751.1.4.3 MSE Walls]]. For design requirements of MSE wall systems and temporary shoring (including temporary MSE walls), see [[:Category:720_Mechanically_Stabilized_Earth_Wall_Systems#720.2_Design_Requirements|EPG 720 Mechanically Stabilized Earth Wall Systems]]. For staged bridge construction, see [[751.1_Preliminary_Design#751.1.2.11_Staged_Construction|EPG 751.1.2.11 Staged Construction]]. |
| | |
| | Global (overall) stability of a permanent MSE wall shall be performed by the Geotechnical Section or their agent and the global stability of a temporary MSE wall shall be performed by the contractor/wall designer. The compound stability of a permanent MSE wall and temporary MSE wall shall be performed by the contractor/wall designer. |
| | |
| | Global stability (i.e., overall and compound stability) of the wall shall be performed in accordance with FHWA GEC 011, and LRFD BDS 11.6.3.7 and 11.10.5.6. For additional information, See [[321.1_Design_of_Earth_Slopes#321.1.2_Slope_Stability_Analyses_for_Special_Foundation_Investigations|EPG 321.1.2 Slope Stability Analyses for Special Foundation Investigations]]. |
| | |
| | For MSE walls settlement limit, see [[321.2_Geotechnical_Guidelines#321.2.2.2_Walls|EPG 321.2.2.2 Walls]]. |
| | |
|
| |
|
| For seismic design requirements, see [https://epg.modot.org/forms/general_files/BR/Bridge_Seismic_Design_Flowchart.pdf Bridge Seismic Design Flowchart]. References for consultants and contractors include Section 11.10 of LRFD, FHWA-NHI-10-024 and FHWA-NHI-10-025. | | For seismic design requirements, see [https://epg.modot.org/forms/general_files/BR/Bridge_Seismic_Design_Flowchart.pdf Bridge Seismic Design Flowchart]. References for consultants and contractors include Section 11.10 of LRFD, FHWA-NHI-10-024 and FHWA-NHI-10-025. |
| Line 115: |
Line 122: |
| :* Compound Stability | | :* Compound Stability |
| :: Capacity/Demand ratio (CDR) for bearing capacity shall be ≥ 1.0 | | :: Capacity/Demand ratio (CDR) for bearing capacity shall be ≥ 1.0 |
| :: <math>Bearing\ Capacity\ (CDR) = \frac{Factored\ Bearing\ Resistance}{Maximum\ Factored\ Bearing\ Stress} \ge 1.0</math> | | :: <math>Bearing\ Capacity\ (CDR) = \frac{Factored\ Bearing\ Resistance}{Maximum\ Factored\ Bearing\ Stress} \ge 1.0</math> |
| :: Strength Limit States: | | :: Strength Limit States: |
| :: Factored bearing resistance = Nominal bearing resistance from Geotech report X Minimum Resistance factor (0.65, Geotech report) LRFD Table 11.5.7-1 | | :: Factored bearing resistance = Nominal bearing resistance from the Geotechnical report * Resistance factor. |
| | :: For walls that DO NOT contain or support a structure use resistance factor per LRFDLRFD BDS Table 11.5.7-1. |
| | :: For walls that contain or support a structure use resistance factor per LRFD BDS Table 10.5.5.2.2-1 or as otherwise recommended in the Geotechnical report. |
|
| |
|
| :: Extreme Event I Limit State: | | :: Extreme Event I Limit State: |
| :: Factored bearing resistance = Nominal bearing resistance from Geotech report X Resistance factor | | :: Factored bearing resistance = Nominal bearing resistance from the Geotechnical report * Resistance factor. |
| :: Resistance factor = 0.9 LRFD 11.8.6.1 | | :: Resistance factor = 0.9 in accordance with LRFD BDS 11.5.8 |
|
| |
|
| :: Factored bearing stress shall be computed using a uniform base pressure distribution over an effective width of footing determined in accordance with the provisions of LRFD 10.6.3.1 and 10.6.3.2, 11.10.5.4 and Figure 11.6.3.2-1 for foundation supported on soil or rock. | | :: Factored bearing stress shall be computed using a uniform base pressure distribution over an effective width of footing determined in accordance with the provisions of LRFD 10.6.3.1 and 10.6.3.2, 11.10.5.4 and Figure 11.6.3.2-1 for foundation supported on soil or rock. |
|
| |
|
| :: B’ = L – 2e | | :: B’ = L – 2e |
| Line 134: |
Line 143: |
|
| |
|
| ::Capacity/Demand ratio (CDR) for overturning shall be ≥ 1.0 | | ::Capacity/Demand ratio (CDR) for overturning shall be ≥ 1.0 |
| ::<math>Overtuning\ (CDR) = \frac{Total\ Factored\ Resisting\ Moment}{Total\ Factored\ Driving\ Moment} \ge 1.0</math> | | ::<math>Overtuning\ (CDR) = \frac{Total\ Factored\ Resisting\ Moment}{Total\ Factored\ Driving\ Moment} \ge 1.0</math> |
|
| |
|
| ::Capacity/Demand ratio (CDR) for eccentricity shall be ≥ 1.0 | | ::Capacity/Demand ratio (CDR) for eccentricity shall be ≥ 1.0 |
| ::<math>Eccentricity\ (CDR) = \frac{e_{Limit}}{e_{design}} \ge 1.0</math> | | ::<math>Eccentricity\ (CDR) = \frac{e_{Limit}}{e_{design}} \ge 1.0</math> |
|
| |
|
| ::Capacity/Demand ratio (CDR) for sliding shall be ≥ 1.0 LRFD 11.10.5.3 & 10.6.3.4 | | ::Capacity/Demand ratio (CDR) for sliding shall be ≥ 1.0 LRFD 11.10.5.3 & 10.6.3.4 |
| ::<math>Sliding\ (CDR) = \frac{Total\ Factored\ Sliding\ Resistance}{Total\ Factored\ Active\ Force} \ge 1.0</math> | | ::<math>Sliding\ (CDR) = \frac{Total\ Factored\ Sliding\ Resistance}{Total\ Factored\ Active\ Force} \ge 1.0</math> |
|
| |
|
| ::Capacity/Demand ratio (CDR) for internal stability shall be ≥ 1.0 | | ::Capacity/Demand ratio (CDR) for internal stability shall be ≥ 1.0 |
| Line 148: |
Line 157: |
|
| |
|
| ::Eccentricity, (e) Limit for Extreme Event I (Seismic): LRFD 11.6.5.1 | | ::Eccentricity, (e) Limit for Extreme Event I (Seismic): LRFD 11.6.5.1 |
| :::For foundations supported on soil or rock, the location of the resultant of the reaction forces shall be within the middle two-thirds of the base width, L or (e ≤ 0.33L) for γ<sub>EQ</sub> = 0.0 and middle eight-tenths of the base width, L or (e ≤ 0.40L) for γ<sub>EQ</sub> = 1.0. For γ<sub>EQ</sub> between 0.0 and 1.0, interpolate e value linearly between 0.33L and 0.40L. For γ<sub>EQ</sub> refer to LRFD 3.4. | | :::For foundations supported on soil or rock, the location of the resultant of the reaction forces shall be within the middle two-thirds of the base width, L or (e ≤ 0.33L) for γ<sub>EQ</sub> = 0.0 and middle eight-tenths of the base width, L or (e ≤ 0.40L) for γ<sub>EQ</sub> = 1.0. For γ<sub>EQ</sub> between 0.0 and 1.0, interpolate e value linearly between 0.33L and 0.40L. For γ<sub>EQ</sub> refer to LRFD 3.4. |
|
| |
|
| :::Note: Seismic design shall be performed for γ<sub>EQ</sub> = 0.5 | | :::Note: Seismic design shall be performed for γ<sub>EQ</sub> = 0.5 |
|
| |
|
| ::Eccentricity, (e) Limit for Extreme Event II: | | ::Eccentricity, (e) Limit for Extreme Event II: |
| :::For foundations supported on soil or rock, the location of the resultant of the reaction forces shall be within the middle eight-tenths of the base width, L or (e ≤ 0.40L). | | :::For foundations supported on soil or rock, the location of the resultant of the reaction forces shall be within the middle eight-tenths of the base width, L or (e ≤ 0.40L). |
|
| |
|
| '''General Guidelines''' | | '''General Guidelines''' |
| Line 319: |
Line 328: |
| :2. Gutters behind MSE walls are required for flat or positive sloping backfills to prevent concentrated infiltration behind the wall facing regardless of when top of backfill is paved or unpaved. This avoids pocket erosion behind facing and protection of nearest-surface wall connections which are vulnerable to corrosion and deterioration. Drainage swales lined with concrete, paved or precast gutter can be used to collect and discharge surface water to an eventual point away from the wall. If rock is used, use impermeable geotextile under rock and align top of gutter to bottom of rock to drain. (For negative sloping backfills away from top of wall, use of gutters is not required.) | | :2. Gutters behind MSE walls are required for flat or positive sloping backfills to prevent concentrated infiltration behind the wall facing regardless of when top of backfill is paved or unpaved. This avoids pocket erosion behind facing and protection of nearest-surface wall connections which are vulnerable to corrosion and deterioration. Drainage swales lined with concrete, paved or precast gutter can be used to collect and discharge surface water to an eventual point away from the wall. If rock is used, use impermeable geotextile under rock and align top of gutter to bottom of rock to drain. (For negative sloping backfills away from top of wall, use of gutters is not required.) |
|
| |
|
| :District Design Division shall verify the size of the two-6 in. (min.) diameter lower perforated MSE wall drain pipes and where piping will daylight at ends of MSE wall or increase the diameters accordingly. This should be part of the preliminary design of the MSE wall. (This shall include when lateral pipes are required and where lateral drain pipes will daylight/discharge). | | :District Design Division shall verify the size of the two-6 in. (min.) diameter lower perforated MSE wall drain pipes and where piping will daylight at ends of MSE wall or increase the diameters accordingly. This should be part of the preliminary design of the MSE wall. (This shall include when lateral pipes are required and where lateral drain pipes will daylight/discharge). |
| | | |
| :BRIDGE ABUTMENTS WITH MSE WALLS | | :BRIDGE ABUTMENTS WITH MSE WALLS |
|
| |
|
| :Areas of concern: bridge deck drainage, approach slab drainage, approach roadway drainage, bridge underdrainage: vertical drains at end bents and approach slab underdrainage, showing drainage details on the roadway and MSE wall plans | | :Areas of concern: bridge deck drainage, approach slab drainage, approach roadway drainage, bridge underdrainage: vertical drains at end bents and approach slab underdrainage, showing drainage details on the roadway and MSE wall plans |
|
| |
|
| :3. Bridge slab drain design shall be in accordance with [[751.10 General Superstructure#751.10.3 Bridge Deck Drainage - Slab Drains |EPG 751.10.3 Bridge Deck Drainage – Slab Drains]] unless as modified below. | | :3. Bridge slab drain design shall be in accordance with [[751.10 General Superstructure#751.10.3 Bridge Deck Drainage - Slab Drains |EPG 751.10.3 Bridge Deck Drainage – Slab Drains]] unless as modified below. |
| Line 336: |
Line 345: |
| :::* Conduit: Drain away from bridge and bury conduit daylighting to natural ground or roadway drainage ditch at an eventual point beyond the limits of the wall. Use expansion fittings to allow for bridge movement and consider placing conduit to front of MSE wall and discharging more than 10 feet from front of wall or using lower drain pipes to intercept slab drainage conduit running through backfill. | | :::* Conduit: Drain away from bridge and bury conduit daylighting to natural ground or roadway drainage ditch at an eventual point beyond the limits of the wall. Use expansion fittings to allow for bridge movement and consider placing conduit to front of MSE wall and discharging more than 10 feet from front of wall or using lower drain pipes to intercept slab drainage conduit running through backfill. |
|
| |
|
| :::* Conduit and Gutters: Drain away from bridge using conduit and 90° elbow (or 45° bend) for smoothly directing drainage flow into gutters and that may be attached to inside of gutters to continue along downward sloping gutters along back of MSE wall to discharge to sewer or to natural drainage system, or to eventual point beyond the limits of the wall. Allow for independent bridge and wall movements by using expansion fittings where needed. See [[751.10 General Superstructure#751.10.3.1 Type, Alignment and Spacing|EPG 751.10.3.1 Type, Alignment and Spacing]] and [[751.10 General Superstructure#751.10.3.3 General Requirements for Location of Slab Drains|EPG 751.10.3.3 General Requirements for Location of Slab Drains]]. | | :::* Conduit and Gutters: Drain away from bridge using conduit and 90° elbow (or 45° bend) for smoothly directing drainage flow into gutters and that may be attached to inside of gutters to continue along downward sloping gutters along back of MSE wall to discharge to sewer or to natural drainage system, or to eventual point beyond the limits of the wall. Allow for independent bridge and wall movements by using expansion fittings where needed. See [[751.10 General Superstructure#751.10.3.1 Type, Alignment and Spacing|EPG 751.10.3.1 Type, Alignment and Spacing]] and [[751.10 General Superstructure#751.10.3.3 General Requirements for Location of Slab Drains|EPG 751.10.3.3 General Requirements for Location of Slab Drains]]. |
|
| |
|
| :6. Vertical drains at end bents and approach slab underdrainage should be intercepted to drain away from bridge end and MSE wall. | | :6. Vertical drains at end bents and approach slab underdrainage should be intercepted to drain away from bridge end and MSE wall. |
| Line 350: |
Line 359: |
| :9. For long MSE walls, where lower perforated drain pipe slope become excessive, non-perforated lateral drain pipes, permitted by Standard Specifications, shall be designed to intercept them and go underneath the concrete leveling pad with a 2% minimum slope. Lateral drain pipes shall daylight/discharge at least 10 ft. from front of MSE wall. Screens should be installed and maintained on drain pipe outlets. | | :9. For long MSE walls, where lower perforated drain pipe slope become excessive, non-perforated lateral drain pipes, permitted by Standard Specifications, shall be designed to intercept them and go underneath the concrete leveling pad with a 2% minimum slope. Lateral drain pipes shall daylight/discharge at least 10 ft. from front of MSE wall. Screens should be installed and maintained on drain pipe outlets. |
|
| |
|
| :10. Roadway and pavement drainage shall not be allowed to be discharged to MSE wall backfill area or within 10 feet from front of MSE wall. | | :10. Roadway and pavement drainage shall not be allowed to be discharged to MSE wall backfill area or within 10 feet from front of MSE wall. |
|
| |
|
| :11. For district design MSE walls, use roadway or pavement drainage collection pipes to transport and discharge to an eventual point outside the limits of the wall. | | :11. For district design MSE walls, use roadway or pavement drainage collection pipes to transport and discharge to an eventual point outside the limits of the wall. |
|
| |
|
| :Example: Showing drain pipe details on the MSE wall plans. | | : Example: Showing drain pipe details on the MSE wall plans. |
|
| |
|
| <gallery mode=packed widths=300px heights=300px> | | <gallery mode=packed widths=300px heights=300px> |
| Line 443: |
Line 452: |
| : <math>Bearing\ Capacity\ (CDR) = \frac{Factored\ Bearing\ Resistance}{Maximum\ Factored\ Bearing\ Stress} \ge 1.0</math> | | : <math>Bearing\ Capacity\ (CDR) = \frac{Factored\ Bearing\ Resistance}{Maximum\ Factored\ Bearing\ Stress} \ge 1.0</math> |
| : Strength Limit States: | | : Strength Limit States: |
| : Factored bearing resistance = Nominal bearing resistance from Geotech report X | | : Factored bearing resistance = Nominal bearing resistance from the Geotechnical report * Resistance factor . |
| : Minimum Resistance factor (0.55, Geotech report) LRFD Table 11.5.7 | | : For walls that DO NOT contain or support a structure use resistance factor per LRFD BDS Table 11.5.7-1. |
| | : For walls that contain or support a structure use resistance factor per LRFD BDS Table 10.5.5.2.2-1 or as otherwise recommended in the Geotechnical report. |
|
| |
|
| : Extreme Event I and II Limit State: | | : Extreme Event I and II Limit State: |
| : Factored bearing resistance = Nominal bearing resistance from Geotech report X Resistance factor | | : Factored bearing resistance = Nominal bearing resistance from the Geotechnical report * Resistance factor |
| : Resistance factor = 0.8 LRFD 11.5.8 | | : Resistance factor = 0.8 LRFD BDS 11.5.8 |
|
| |
|
| : When wall is supported by soil: | | : When wall is supported by soil: |
| Line 488: |
Line 498: |
|
| |
|
|
| |
|
|
| |
|
| |
|
| |
|
| |
| <!-- moved
| |
| {|style="padding: 0.3em; margin-left:5px; border:2px solid #a9a9a9; text-align:center; font-size: 95%; background:#f5f5f5" width="160px" align="right"
| |
| |-
| |
| |'''Additional Information'''
| |
| |-
| |
| |AASHTO 5.5.5
| |
| |}
| |
|
| |
|
| |
| ====751.24.3.2.1 Spread Footings====
| |
|
| |
| '''Location of Resultant'''
| |
|
| |
| The resultant of the footing pressure must be within the section of the footing specified in the following table.
| |
|
| |
| {| border="1" class="wikitable" style="margin: 1em auto 1em auto"
| |
| |+
| |
| ! style="background:#BEBEBE" |When Retaining Wall is Built on: !! style="background:#BEBEBE"|AASHTO Group Loads I-VI !! style="background:#BEBEBE"|For Seismic Loads
| |
| |-
| |
| | align="center" |Soil<sup>a</sup> || align="center"|Middle 1/3|| align="center"|Middle 1/2 <sup>b</sup>
| |
| |-
| |
| | align="center"|Rock<sup>c</sup> || align="center"|Middle 1/2||align="center"|Middle 2/3
| |
| |-
| |
| |colspan="3"|<sup>'''a'''</sup> Soil is defined as clay, clay and boulders, cemented gravel, soft shale, etc. with allowable bearing values less than 6 tons/sq. ft.
| |
| |-
| |
| |colspan="3"|<sup>'''b'''</sup> MoDOT is more conservative than AASHTO in this requirement.
| |
| |-
| |
| |colspan="3"|<sup>'''c'''</sup> Rock is defined as rock or hard shale with allowable bearing values of 6 tons/sq. ft. or more.
| |
| |}
| |
|
| |
| Note: The location of the resultant is not critical when considering collision loads.
| |
|
| |
| '''Factor of Safety Against Overturning'''
| |
| {|style="padding: 0.3em; margin-left:5px; border:2px solid #a9a9a9; text-align:center; font-size: 95%; background:#f5f5f5" width="160px" align="right"
| |
| |-
| |
| |'''Additional Information'''
| |
| |-
| |
| |AASHTO 5.5.5
| |
| |}
| |
|
| |
| AASHTO Group Loads I - VI:
| |
| * F.S. for overturning ≥ 2.0 for footings on soil.
| |
| * F.S. for overturning ≥ 1.5 for footings on rock.
| |
|
| |
| For seismic loading, F.S. for overturning may be reduced to 75% of the value for AASHTO Group Loads I - VI. For seismic loading:
| |
| * F.S. for overturning ≥ (0.75)(2.0) = 1.5 for footings on soil.
| |
| * F.S. for overturning ≥ (0.75)(1.5) = 1.125 for footings on rock.
| |
|
| |
| For collision forces:
| |
| * F.S. for overturning ≥ 1.2.
| |
|
| |
| '''Factor of Safety Against Sliding'''
| |
| {|style="padding: 0.3em; margin-left:5px; border:2px solid #a9a9a9; text-align:center; font-size: 95%; background:#f5f5f5" width="160px" align="right"
| |
| |-
| |
| |'''Additional Information'''
| |
| |-
| |
| |AASHTO 5.5.5
| |
| |}
| |
|
| |
| Only spread footings on soil need be checked for sliding because spread footings on rock or shale are embedded into the rock.
| |
| * F.S. for sliding ≥ 1.5 for AASHTO Group Loads I - VI.
| |
| * F.S. for sliding ≥ (0.75)(1.5) = 1.125 for seismic loads.
| |
| * F.S. for sliding ≥ 1.2 for collision forces.
| |
|
| |
| The resistance to sliding may be increased by:
| |
| * adding a shear key that projects into the soil below the footing.
| |
| * widening the footing to increase the weight and therefore increase the frictional resistance to sliding.
| |
|
| |
| '''Passive Resistance of Soil to Lateral Load'''
| |
|
| |
| The Rankine formula for passive pressure can be used to determine the passive resistance of soil to the lateral force on the wall. This passive pressure is developed at shear keys in retaining walls and at end abutments.
| |
|
| |
| {|style="padding: 0.3em; margin-left:5px; border:2px solid #a9a9a9; text-align:center; font-size: 95%; background:#f5f5f5" width="160px" align="right"
| |
| |-
| |
| |'''Additional Information'''
| |
| |-
| |
| |AASHTO 5.5.5A
| |
| |}
| |
|
| |
| The passive pressure against the front face of the wall and the footing of a retaining wall is loosely compacted and should be neglected when considering sliding.
| |
|
| |
| Rankine Formula: <math>P_p = \frac{1}{2}C_p\gamma_s[H^2-H_1^2]</math> where thefollowing variables are defined in the figure below
| |
| :
| |
| :''C<sub>p</sub>'' = <math>\tan \big( 45^\circ + \frac{\phi}{2}\big)</math>
| |
|
| |
| :''y<sub>1</sub> = <math>\frac{H_1y_2^2 + \frac{2}{3}y_2^3}{H^2 - H_1^2}</math>
| |
|
| |
| :''P<sub>p</sub>'' = passive force at shear key in pounds per foot of wall length
| |
|
| |
| :''C<sub>p</sub>'' = coefficient of passive earth pressure
| |
|
| |
| :<math>\boldsymbol{\gamma_s}</math> = unit weight of soil
| |
|
| |
| :''H'' = height of the front face fill less than 1 ft. min. for erosion
| |
|
| |
| :''H<sub>1</sub>'' = H minus depth of shear key
| |
|
| |
| :''y<sub>1</sub>'' = location of ''P<sub>p</sub>'' from bottom of footing
| |
|
| |
| :<math>\boldsymbol{\phi}</math> = angle of internal friction of soil
| |
|
| |
| [[image:751.24.3.2.1 passive.jpg|center|500px]]
| |
| {|style="padding: 0.3em; margin-left:5px; border:2px solid #a9a9a9; text-align:center; font-size: 95%; background:#f5f5f5" width="160px" align="right"
| |
| |-
| |
| |'''Additional Information'''
| |
| |-
| |
| |AASHTO 5.5.2
| |
| |}
| |
| The resistance due to passive pressure in front of the shear key shall be neglected unless the key extends below the depth of frost penetration.
| |
| {|style="padding: 0.3em; margin-right:7px; border:2px solid #a9a9a9; text-align:center; font-size: 95%; background:#f5f5f5" width="160px" align="left"
| |
| |-
| |
| |'''Additional Information'''
| |
| |-
| |
| |[http://sp/sites/cm/Pages/default.aspx MoDOT Materials Division]
| |
| |}
| |
|
| |
| Frost line is set at 36 in. at the north border of Missouri and at 18 in. at the south border.
| |
|
| |
| '''Passive Pressure During Seismic Loading'''
| |
|
| |
| During an earthquake, the passive resistance of soil to lateral loads is slightly decreased. The Mononobe-Okabe static method is used to determine the equivalent fluid pressure.
| |
|
| |
| :''P<sub>PE</sub>'' = equivalent passive earth pressure during an earthquake
| |
| {|style="padding: 0.3em; margin-left:5px; border:2px solid #a9a9a9; text-align:center; font-size: 95%; background:#f5f5f5" width="160px" align="right"
| |
| |-
| |
| |'''Additional Information'''
| |
| |-
| |
| |1992 AASHTO Div. IA Eqns. C6-5 and C6-6
| |
| |}
| |
| :<math>P_{PE} = \frac{1}{2}\gamma_sH^2(1 - k_v)K_{PE}</math> where:
| |
|
| |
| :''K<sub>PE</sub>'' = seismic passive pressure coefficient
| |
|
| |
| :<math>K_{PE} = \frac{\cos^2(\phi - \theta - \beta)}{\cos\theta\cos^2\beta\cos(\delta + \beta + \theta)\Bigg[1 + \sqrt{\frac{\sin(\phi + \delta)\sin(\phi - \theta - i)}{\cos(\delta + \beta + \theta)\cos(i - \beta)}}\Bigg]^2}</math>
| |
|
| |
| ::<math>\boldsymbol{\gamma}_s</math> = unit weight of soil
| |
|
| |
| :''H'' = height of soil at the location where the earth pressure is to be found
| |
|
| |
| :''k<sub>V</sub>'' = vertical acceleration coefficient
| |
|
| |
| :<math>\boldsymbol{\phi}</math> = angle of internal friction of soil
| |
|
| |
| :<math>\boldsymbol{\theta} = arctan \big[\frac{k_h}{1 - k_V}\big]</math>
| |
|
| |
| :''k<sub>H</sub>'' = horizontal acceleration coefficient
| |
|
| |
| :<math>\boldsymbol{\beta}</math> = slope of soil face in degrees
| |
|
| |
| :''i'' = backfill slope angle in degrees
| |
|
| |
| :<math>\boldsymbol{\delta}</math> = angle of friction between soil and wall
| |
|
| |
| '''Special Soil Conditions'''
| |
|
| |
| Due to creep, some soft clay soils have no passive resistance under a continuing load. Removal of undesirable material and replacement with suitable material such as sand or crushed stone is necessary in such cases. Generally, this condition is indicated by a void ratio above 0.9, an angle of internal friction (<math>\boldsymbol{\phi}</math>) less than 22°, or a soil shear less than 0.8 ksf. Soil shear is determined from a standard penetration test.
| |
|
| |
| :Soil Shear <math>\Big(\frac{k}{ft^2}\Big) = \frac{blows \ per\ 12\ in.}{10}</math>
| |
|
| |
| '''Friction'''
| |
|
| |
| In the absence of tests, the total shearing resistance to lateral loads between the footing and a soil that derives most of its strength from internal friction may be taken as the normal force times a coefficient of friction. If the plane at
| |
| which frictional resistance is evaluated is not below the frost line then this resistance must be neglected.
| |
|
| |
| [[image:751.24.3.2.1 friction 2016.jpg|center|450px|thumb|<center>'''When A Shear Key Is Not Used'''</center>]]
| |
| {|style="padding: 0.3em; margin-left:5px; border:2px solid #a9a9a9; text-align:center; font-size: 95%; background:#f5f5f5" width="160px" align="right"
| |
| |-
| |
| |'''Additional Information'''
| |
| |-
| |
| |AASHTO 5.5.2B
| |
| |}
| |
|
| |
| Sliding is resisted by the friction force developed at the interface between the soil and the concrete footing along the failure plane. The coefficient of friction for soil against concrete can be taken from the table below. If soil data
| |
| is not readily available or is inconsistent, the friction factor (f) can be taken as
| |
|
| |
| : ''f'' =<math>tan \Big(\frac{2\phi}{3}\Big)</math> where <math>\boldsymbol{\phi}</math> is the angle of internal friction of the soil (''Civil Engineering Reference Manual'' by Michael R. Lindeburg, 6th ed., 1992).
| |
|
| |
| {| border="1" class="wikitable" style="margin: 1em auto 1em auto"
| |
| |+
| |
| !style="background:#BEBEBE" colspan="2"|Coefficient of Friction Values for Soil Against Concrete
| |
| |-
| |
| ! style="background:#BEBEBE" |Soil Type<sup>a</sup> !! style="background:#BEBEBE"|Coefficient of Friction
| |
| |-
| |
| | align="center" |coarse-grained soil without silt || align="center"|0.55
| |
| |-
| |
| | align="center"|coarse-grained soil with silt || align="center"|0.45
| |
| |-
| |
| |align="center"|silt (only)|| align="center"|0.35
| |
| |-
| |
| |align="center"|clay|| align="center"|0.30<sup>b</sup>
| |
| |-
| |
| |colspan="2"|<sup>'''a'''</sup> It is not necessary to check rock or shale for sliding due to embedment.
| |
| |-
| |
| |colspan="2"|<sup>'''b'''</sup> Caution should be used with soils with <math>\boldsymbol{\phi}</math> < 22° or soil shear < 0.8 k/sq.ft. (soft clay soils). Removal and replacement of such soil with suitable material should be considered.
| |
| |}
| |
|
| |
| [[image:751.24.3.2.1 soil and soil.jpg|center|450px|thumb|<center>'''When A Shear Key Is Used'''</center>]]
| |
|
| |
| When a shear key is used, the failure plane is located at the bottom of the shear key in the front half of the footing. The friction force resisting sliding in front of the shear key is provided at the interface between the stationary layer of soil and the moving layer of soil, thus the friction angle is the internal angle of friction of the soil (soil against soil). The friction force resisting sliding on the rest of the footing is of that between the concrete and soil. Theoretically
| |
| the bearing pressure distribution should be used to determine how much normal load exists on each surface, however it is reasonable to assume a constant distribution. Thus the normal load to each surface can be divided out between the two surfaces based on the fractional length of each and the total frictional force will be the sum of the normal load on each surface
| |
| multiplied by the corresponding friction factor.
| |
|
| |
| '''Bearing Pressure'''
| |
| {|style="padding: 0.3em; margin-left:5px; border:2px solid #a9a9a9; text-align:center; font-size: 95%; background:#f5f5f5" width="160px" align="right"
| |
| |-
| |
| |'''Additional Information'''
| |
| |-
| |
| |AASHTO 4.4.7.1.2 & 4.4.8.1.3
| |
| |}
| |
|
| |
| :'''Group Loads I - VI'''
| |
|
| |
| :The bearing capacity failure factor of safety for Group Loads I - VI must be greater than or equal to 3.0. This factor of safety is figured into the allowable bearing pressure given on the "Design Layout Sheet".
| |
|
| |
| :The bearing pressure on the supporting soil shall not be greater than the allowable bearing pressure given on the "Design Layout Sheet".
| |
|
| |
| :'''Seismic Loads'''
| |
| {|style="padding: 0.3em; margin-left:5px; border:2px solid #a9a9a9; text-align:center; font-size: 95%; background:#f5f5f5" width="160px" align="right"
| |
| |-
| |
| |'''Additional Information'''
| |
| |-
| |
| |AASHTO Div. IA 6.3.1(B) and AASHTO 5.5.6.2
| |
| |}
| |
|
| |
| :When seismic loads are considered, AASHTO allows the ultimate bearing capacity to be used. The ultimate capacity of the foundation soil can be conservatively estimated as 2.0 times the allowable bearing pressure given on the "Design Layout".
| |
|
| |
| :'''Stem Design'''
| |
|
| |
| :The vertical stem (the wall portion) of a cantilever retaining wall shall be designed as a cantilever supported at the base.
| |
|
| |
| :'''Footing Design'''
| |
| {|style="padding: 0.3em; margin-left:5px; border:2px solid #a9a9a9; text-align:center; font-size: 95%; background:#f5f5f5" width="160px" align="right"
| |
| |-
| |
| |'''Additional Information'''
| |
| |-
| |
| |AASHTO 5.5.6.1
| |
| |}
| |
|
| |
| ::'''Toe'''
| |
|
| |
| ::The toe of the base slab of a cantilever wall shall be designed as a cantilever supported by the wall. The critical section for bending moments shall be taken at the front face of the stem. The critical section for shear shall be taken at a distance d (d = effective depth) from the front face of the stem.
| |
|
| |
| ::'''Heel'''
| |
|
| |
| ::The rear projection (heel) of the base slab shall be designed to support the entire weight of the superimposed materials, unless a more exact method is used. The heel shall be designed as a cantilever supported by the wall. The critical section for bending moments and shear shall be taken at the back face of the stem.
| |
|
| |
| :'''Shear Key Design'''
| |
|
| |
| :The shear key shall be designed as a cantilever supported at the bottom of the footing.
| |
|
| |
| ====751.24.3.2.2 Pile Footings====
| |
|
| |
| Footings shall be cast on piles when specified on the "Design Layout Sheet". If the horizontal force against the retaining wall cannot otherwise be resisted, some of the piles shall be driven on a batter.
| |
|
| |
| :'''Pile Arrangement'''
| |
|
| |
| :For retaining walls subject to moderate horizontal loads (walls 15 to 20 ft. tall), the following layout is suggested.
| |
|
| |
| [[image:751.24.3.2.2 batter piles.jpg|center|300px|thumb|<center>'''Section'''</center>]]
| |
|
| |
| [[image:751.24.3.2.2 plan 2016.jpg|center|450px|thumb|<center>'''Plan'''</center>]]
| |
|
| |
| :For higher walls and more extreme conditions of loading, it may be necessary to:
| |
|
| |
| :* use the same number of piles along all rows
| |
|
| |
| :* use three rows of piles
| |
|
| |
| :* provide batter piles in more than one row
| |
|
| |
| ::'''Loading Combinations for Stability and Bearing'''
| |
|
| |
| ::The following table gives the loading combinations to be checked for stability and pile loads. These abbreviations are used in the table:
| |
|
| |
| :::DL = dead load weight of the wall elements
| |
|
| |
| :::SUR = two feet of live load surcharge
| |
|
| |
| :::E = earth weight
| |
|
| |
| :::EP = equivalent fluid earth pressure
| |
|
| |
| :::COL = collision force
| |
|
| |
| :::EQ = earthquake inertial force of failure wedge
| |
|
| |
| {| border="1" class="wikitable" style="margin: 1em auto 1em auto"
| |
| |+
| |
| !style="background:#BEBEBE" rowspan="2"|Loading Case !!style="background:#BEBEBE" rowspan="2"|Vertical Loads !!style="background:#BEBEBE" rowspan="2"|Horizontal Loads !!style="background:#BEBEBE" rowspan="2"|Overturning Factor of Safety !!style="background:#BEBEBE" colspan="2"|Sliding Factor of Safety
| |
| |-
| |
| !style="background:#BEBEBE" |Battered Toe Piles !!style="background:#BEBEBE" |Vertical Toe Piles
| |
| |-
| |
| |align="center"|I<sup>a</sup>||align="center"| DL+SUR+E ||align="center"|EP+SUR||align="center"| 1.5||align="center"| 1.5||align="center"|2.0
| |
| |-
| |
| |align="center"|II||align="center"| DL+SUR+E ||align="center"|EP+SUR+COL||align="center"| 1.2|| align="center"|1.2||align="center"| 1.2
| |
| |-
| |
| |align="center"|III||align="center"| DL+E||align="center"| EP||align="center"| 1.5||align="center"| 1.5||align="center"| 2.0
| |
| |-
| |
| |align="center"|IV<sup>b</sup>||align="center"| DL+E ||align="center"|None||align="center"| -||align="center"| -||align="center"| -
| |
| |-
| |
| |align="center"|V<sup>c</sup>||align="center"| DL+E||align="center"| EP+EQ||align="center"| 1.125||align="center"| 1.125||align="center"| 1.5
| |
| |-
| |
| |colspan="6"|<sup>'''a'''</sup> Load Case I should be checked with and without the vertical surcharge.
| |
| |-
| |
| |colspan="6"|<sup>'''b'''</sup> A 25% overstress is allowed on the heel pile in Load Case IV.
| |
| |-
| |
| |colspan="6"|<sup>'''c'''</sup> The factors of safety for earthquake loading are 75% of that used in Load Case III. Battered piles are not recommended for use in seismic performance categories B, C, and D. Seismic design of retaining walls is not required in SPC A and B. Retaining walls in SPC B located under a bridge abutment shall be designed to AASHTO Specifications for SPC B.
| |
| |}
| |
|
| |
| ::'''Pile Properties and Capacities'''
| |
|
| |
| ::For Load Cases I-IV in the table above, the allowable compressive pile force may be taken from the pile capacity table in the Piling Section of the Bridge Manual which is based in part on AASHTO 4.5.7.3. Alternatively, the allowable compressive pile capacity of a friction pile may be determined from the ultimate frictional and bearing capacity between the soil and pile divided by a safety factor of 3.5 (AASHTO Table 4.5.6.2.A). The maximum amount of tension allowed on a heel pile is 3 tons.
| |
|
| |
| ::For Load Case V in the table above, the allowable compressive pile force may be taken from the pile capacity table in the Piling Section of the Bridge Manual multiplied by the appropriate factor (2.0 for steel bearing piles, 1.5 for friction piles). Alternatively, the allowable compressive pile capacity of a friction pile may be determined from the ultimate frictional and bearing capacity between the soil and pile divided by a safety factor of 2.0. The allowable tension force on a bearing or friction pile will be equal to the ultimate friction capacity between the soil and pile divided by a safety factor of 2.0.
| |
|
| |
| ::To calculate the ultimate compressive or tensile capacity between the soil and pile requires the boring data which includes the SPT blow counts, the friction angle, the water level, and the soil layer descriptions.
| |
|
| |
| ::Assume the vertical load carried by battered piles is the same as it would be if the pile were vertical. The properties of piles may be found in the Piling Section of the Bridge Manual.
| |
|
| |
| :::'''Neutral Axis of Pile Group'''
| |
|
| |
| :::Locate the neutral axis of the pile group in the repetitive strip from the toe of the footing at the bottom of the footing.
| |
|
| |
| :::'''Moment of Inertia of Pile Group'''
| |
|
| |
| :::The moment of inertia of the pile group in the repetitive strip about the neutral axis of the section may be determined using the parallel axis theorem:
| |
|
| |
| ::::I = Σ(I<sub>A</sub>) + Σ(Ad<sup>2</sup>) where :
| |
|
| |
| ::::''I<sub>A</sub>'' = moment of inertia of a pile about its neutral axis
| |
|
| |
| ::::''A'' = area of a pile
| |
|
| |
| ::::''d'' = distance from a pile's neutral axis to pile group's neutral axis
| |
|
| |
| :::''I<sub>A</sub>'' may be neglected so the equation reduces to:
| |
|
| |
| ::::''I'' = Σ(Ad<sup>2</sup>)
| |
|
| |
| ::'''Resistance To Sliding'''
| |
|
| |
| ::Any frictional resistance to sliding shall be ignored, such as would occur between the bottom of the footing and the soil on a spread footing.
| |
|
| |
| ::'''Friction or Bearing Piles With Batter (Case 1)'''
| |
|
| |
| ::Retaining walls using friction or bearing piles with batter should develop lateral strength (resistance to sliding) first from the batter component of the pile and second from the passive pressure against the shear key and the piles.
| |
|
| |
| ::'''Friction or Bearing Piles Without Batter (Case 2)'''
| |
|
| |
| ::Retaining walls using friction or bearing piles without batter due to site constrictions should develop lateral strength first from the passive pressure against the shear key and second from the passive pressure against the pile below the bottom of footing. In this case, the shear key shall be placed at the front face of the footing.
| |
|
| |
| ::'''Concrete Pedestal Piles or Drilled Shafts (Case 3)'''
| |
|
| |
| ::Retaining walls using concrete pedestal piles should develop lateral strength first from passive pressure against the shear key and second from passive pressure against the pile below the bottom of the footing. In this case, the shear key shall be placed at the front of the footing. Do not batter concrete pedestal piles.
| |
|
| |
| [[image:751.24.3.2.2 cases.jpg|center|450px]]
| |
|
| |
| ::'''Resistance Due to Passive Pressure Against Pile'''
| |
|
| |
| ::The procedure below may be used to determine the passive pressure resistance developed in the soil against the piles. The procedure assumes that the piles develop a local failure plane.
| |
|
| |
| :::''F'' = the lateral force due to passive pressure on pile
| |
|
| |
| :::<math>F = \frac{1}{2}\gamma_s C_P H^2 B </math> , where: <math> C_P = tan^2\Big[45 + \frac{\phi}{2}\Big]</math>
| |
|
| |
| :::<math>\boldsymbol{\gamma_s}</math> = unit weight of soil
| |
|
| |
| :::''H'' = depth of pile considered for lateral resistance (H<sub>max</sub>= 6B)
| |
|
| |
| :::''C<sub>P</sub>'' = coefficient of active earth pressure
| |
|
| |
| :::''B'' = width of pile
| |
|
| |
| :::<math>\boldsymbol{\phi}</math> = angle of internal friction of soil
| |
|
| |
| [[image:751.24.3.2.2 resistance passive.jpg|center|450px]]
| |
|
| |
| ::'''Resistance Due to Pile Batter'''
| |
|
| |
| ::Use the horizontal component (due to pile batter) of the allowable pile load as the lateral resistance of the battered pile. (This presupposes that sufficient lateral movement of the wall can take place before failure to develop the ultimate strength of both elements.)
| |
|
| |
| [[image:751.24.3.2.2 12.jpg|center|125px]]
| |
|
| |
| :::''b'' = the amount of batter per 12 inches.
| |
|
| |
| :::<math> c = \sqrt{(12 in.)^2 + b^2}</math>
| |
|
| |
| :::<math>P_{HBatter} = P_T \Big(\frac{b}{c}\Big)</math> (# of battered piles) where:
| |
|
| |
| :::''P<sub>HBatter</sub>'' = the horizontal force due to the battered piles
| |
|
| |
| :::''P<sub>T</sub>'' = the allowable pile load
| |
|
| |
| ::Maximum batter is 4" per 12".
| |
|
| |
| ::'''Resistance Due to Shear Keys'''
| |
|
| |
| ::A shear key may be needed if the passive pressure against the piles and the horizontal force due to batter is not sufficient to attain the factor of safety against sliding. The passive pressure against the shear key on a pile footing is found in the same manner as for spread footings.
| |
|
| |
| ::'''Resistance to Overturning'''
| |
|
| |
| ::The resisting and overturning moments shall be computed at the centerline of the toe pile at a distance of 6B (where B is the width of the pile) below the bottom of the footing. A maximum of 3 tons of tension on each heel pile may be assumed to resist overturning. Any effects of passive pressure, either on the shear key or on the piles, which resist overturning, shall be ignored.
| |
|
| |
| [[image:751.24.3.2.2 resistance overturning.jpg|center|450px]]
| |
|
| |
| ::'''Pile Properties'''
| |
|
| |
| :::'''Location of Resultant'''
| |
|
| |
| :::The location of the resultant shall be evaluated at the bottom of the footing and can be determined by the equation below:
| |
|
| |
| ::::<math>e = \frac{\Sigma M}{\Sigma V}</math> where:
| |
|
| |
| ::::e = the distance between the resultant and the neutral axis of the pile group
| |
|
| |
| ::::''ΣM'' = the sum of the moments taken about the neutral axis of the pile group at the bottom of the footing
| |
|
| |
| ::::''ΣV'' = the sum of the vertical loads used in calculating the moment
| |
|
| |
| :::'''Pile Loads'''
| |
|
| |
| :::The loads on the pile can be determined as follows:
| |
|
| |
| ::::<math>P = \frac{\Sigma V}{A} \pm \frac{Mc}{I}</math> where:
| |
|
| |
| :::::''P'' = the force on the pile
| |
|
| |
| :::::''A'' = the areas of all the piles being considered
| |
|
| |
| :::::''M'' = the moment of the resultant about the neutral axis
| |
|
| |
| :::::''c'' = distance from the neutral axis to the centerline of the pile being investigated
| |
|
| |
| :::::''I'' = the moment of inertia of the pile group
| |
| {|style="padding: 0.3em; margin-left:5px; border:2px solid #a9a9a9; text-align:center; font-size: 95%; background:#f5f5f5" width="160px" align="right"
| |
| |-
| |
| |'''Additional Information'''
| |
| |-
| |
| |AASHTO 5.5.6.2
| |
| |}
| |
|
| |
| :::'''Stem Design'''
| |
|
| |
| :::The vertical stem (the wall portion) of a cantilever retaining wall shall be designed as a cantilever supported at the base.
| |
|
| |
| :::'''Footing Design'''
| |
|
| |
| ::::'''Toe'''
| |
| {|style="padding: 0.3em; margin-left:5px; border:2px solid #a9a9a9; text-align:center; font-size: 95%; background:#f5f5f5" width="160px" align="right"
| |
| |-
| |
| |'''Additional Information'''
| |
| |-
| |
| |AASHTO 5.5.6.1
| |
| |}
| |
|
| |
| ::::The toe of the base slab of a cantilever wall shall be designed as a cantilever supported by the wall. The critical section for bending moments shall be taken at the front face of the stem. The critical section for shear shall be taken at a distance d (d = effective depth) from the front face of the stem.
| |
|
| |
| ::::'''Heel'''
| |
| ::::The top reinforcement in the rear projection (heel) of the base slab shall be designed to support the entire weight of the superimposed materials plus any tension load in the heel piles (neglect compression loads in the pile), unless a more exact method is used. The bottom reinforcement in the heel of the base slab shall be designed to support the maximum compression load in the pile neglecting the weight of the superimposed materials. The heel shall be designed as a cantilever supported by the wall. The critical sections for bending moments and shear shall be taken at the back face of the stem.
| |
|
| |
| :::'''Shear Key Design'''
| |
| :::The shear key shall be designed as a cantilever supported at the bottom of the footing.
| |
|
| |
| ====751.24.3.2.3 Counterfort Walls====
| |
|
| |
| '''Assumptions:'''
| |
|
| |
| (1) Stability
| |
| The external stability of a counterfort retaining wall shall be determined in the same manner as described for cantilever retaining walls. Therefore refer to previous pages for the criteria for location of resultant, factor of safety for sliding and bearing pressures.
| |
|
| |
| (2) Stem
| |
|
| |
| [[image:751.24.3.2.3 counterfort.jpg|center|800px]]
| |
|
| |
| :<math>P = C_a \boldsymbol \gamma_s</math>
| |
|
| |
| :where:
| |
| ::''C<sub>a</sub>'' = coefficient of active earth pressure
| |
|
| |
| ::<math>\boldsymbol \gamma_s</math> = unit weigt of soil
| |
|
| |
| Design the wall to support horizontal load from the earth pressure and the liveload surcharge (if applicable) as outlined on the previous pages and as designated in AASHTD Section 3.20, except that maximum horizontal loads shall be the calculated equivalent fluid pressure at 3/4 height of wall [(0.75 H)P] which shall be considered applied uniformly from the lower quarter point to the bottom of wall.
| |
|
| |
| In addition, vertical steel In the fill face of the bottom quarter of the wall shall be that required by the vertical cantilever wall with the equivalent fluid pressure of that (0.25 H) height.
| |
|
| |
| Maximum concrete stress shall be assumed as the greater of the two thus obtained.
| |
|
| |
| The application of these horizontal pressures shall be as follows:
| |
|
| |
| [[image:751.24.3.2.3 counterfort wall.jpg|center|800px|thumb|<center>'''Counterfort Wall Section'''</center> <center>Moments are to be determined by analysis as a continuous beam. The counterforts are to be spaced so as to produce approximately equal positive and negative moments.</center>]]
| |
|
| |
| (3) Counterfort
| |
| Counterforts shall be designed as T-beams, of which the wall is the flange and the counterfort is the stem. For this reason the concrete stresses ane normally low and will not control.
| |
|
| |
| For the design of reinforcing steel in the back of the counterfort, the effective d shall be the perpendicular distance from the front face of the wall (at point that moment is considered), to center of reinforcing steel.
| |
|
| |
| [[image:751.24.3.2.3 moment.jpg|center|500px]]
| |
|
| |
| (4) Footing
| |
|
| |
| The footing of the counterfort walls shall be designed as a continuous beam of spans equal to the distance between the counterforts.
| |
|
| |
| The rear projection or heel shall be designed to support the entire weight of the superimposed materials, unless a more exact method is used. Refer to AASHTD Section 5.5.6.
| |
|
| |
| Divide footing (transversely) into four (4) equal sections for design footing pressures.
| |
|
| |
| Counterfort walls on pile are very rare and are to be treated as special cases. See Structural Project Manager.
| |
|
| |
| (5) Sign-Board type walls
| |
|
| |
| The Sign-Board type of retaining walls are a special case of the counterfort retaining walls. This type of wall is used where the soiI conditions are such that the footings must be placed a great distance below the finished ground line. For this situation, the wall is discontinued approximately 12 in. below the finished ground line or below the frost line.
| |
|
| |
| Due to the large depth of the counterforts, it may be more economical to use a smaller number of counterforts than would otherwise be used.
| |
|
| |
| All design assumptions that apply to counterfort walls will apply to sign-board walls with the exception of the application of horizontal forces for the stem (or wall design), and the footing design which shall be as follows:
| |
|
| |
| :'''Wall'''
| |
|
| |
| [[image:751.24.3.2.3 load.jpg|center|550px]]
| |
|
| |
| :'''Footing'''
| |
|
| |
| :The individual footings shall be designed transversely as cantilevers supported by the wall. Refer to AASHTO Section 5.
| |
|
| |
| ===751.24.3.3 Example 1: Spread Footing Cantilever Wall===
| |
|
| |
| [[image:751.24.3.3.jpg|center|750px|thumb|<Center>'''Typical Section thru Wall</center><center>(Spread Footing)</center>''']]
| |
|
| |
| :f'<sub>c</sub> = 3,000 psi
| |
| :f<sub>y</sub> = 60,000 psi
| |
| :''φ'' = 24 in.
| |
| :''γ<sub>s</sub>'' = 120 pcf (unit wgt of soil)
| |
| :Allowable soil pressure = 2 tsf
| |
| :''γ<sub>c</sub>'' = 150 pcf (unit wgt of concr.)
| |
| :Retaining wall is located in Seismic Performance Category (SPC) B.
| |
| :A = 0.1 (A = seismic acceleration coefficient)
| |
|
| |
| {| style="margin: 1em auto 1em auto"
| |
| |-
| |
| |<math>P_a = \frac{1}{2}\gamma_s C_a H^2</math>||width=50| ||<math>P_p = \frac{1}{2}\gamma_s C_p H_2^2 - H_1^2</math>
| |
| |}
| |
|
| |
| '''Assumptions'''
| |
|
| |
| * Retaining wall is under an abutment or in a location where failure of the wall may affect the structural integrity of a bridge. Therefore, it must be designed for SPC B.
| |
|
| |
| * Design is for a unit length (1 ft.) of wall.
| |
|
| |
| * Sum moments about the toe at the bottom of the footing for overturning.
| |
|
| |
| *For Group Loads I-VI loading:
| |
| :* F.S. for overturning ≥ 2.0 for footings on soil.
| |
| :* F.S. for sliding ≥ 1.5.
| |
| * Resultant to be within middle 1/3 of footing.
| |
|
| |
| * For earthquake loading:
| |
| :* F.S. for overturning ≥ 0.75(2.0) = 1.5.
| |
| :* F.S. for sliding ≥ 0.75(1.5) = 1.125.
| |
| :* Resultant to be within middle 1/2 of footing.
| |
|
| |
| * Base of footing is below the frost line.
| |
|
| |
| * Neglect top one foot of fill over toe when determining passive pressure and soil weight.
| |
|
| |
| * Use of a shear key shifts the failure plane to "B" where resistance to sliding is provided by passive pressure against the shear key, friction of soil along failure plane "B" in front of the key, and friction between soil and concrete along the footing behind the key.
| |
|
| |
| * Soil cohesion along failure plane is neglected.
| |
|
| |
| * Footings are designed as cantilevers supported by the wall.
| |
| :* Critical sections for bending are at the front and back faces of the wall.
| |
| :* Critical sections for shear are at the back face of the wall for the heel and at a distance d (effective depth) from the front face for the toe.
| |
|
| |
| * Neglect soil weight above toe of footing in design of the toe.
| |
|
| |
| * The wall is designed as a cantilever supported by the footing.
| |
|
| |
| * Load factors for AASHTO Groups I - VI for design of concrete:
| |
| :* ''γ'' = 1.3.
| |
| :* ''β<sub>E</sub>'' = 1.3 for horizontal earth pressure on retaining walls.
| |
| :* ''β<sub>E</sub>'' = 1.0 for vertical earth pressure.
| |
|
| |
| * Load factor for earthquake loads = 1.0.
| |
|
| |
| '''Lateral Pressures Without Earthquake'''
| |
|
| |
| :''C<sub>a</sub>'' = <math>\cos\delta\Bigg[\frac{\cos\delta - \sqrt{\cos^2\delta - \cos^2\phi}}{\cos\delta + \sqrt{\cos^2\delta - \cos^2\phi}}\Bigg]</math>
| |
|
| |
| :''C<sub>a</sub>'' = <math>\cos 18.435^\circ \Bigg[\frac{\cos\ 18.435^\circ - \sqrt{\cos^2\ 18.435^\circ - \cos^2\ 24^\circ }}{\cos\ 18.435^\circ + \sqrt{\cos^2\ 18.435^\circ - \cos^2\ 24^\circ }}\Bigg]</math> = 0.546
| |
|
| |
| :<math>C_p = tan^2 \big( 45^\circ + \frac{\phi}{2}\big) = tan^2 \big( 45^\circ + \frac{24^\circ}{2}\big) = 2.371</math>
| |
|
| |
| :<math>P_A = \frac{1}{2}\big[0.120\frac{k}{ft^3}\big](1 ft)(0.546)(10.667 ft)^2 = 3.726k</math>
| |
|
| |
| :<math>P_P = \frac{1}{2}\big[0.120\frac{k}{ft^3}\big](1 ft)(2.371)\big[(5.0)^2 - (2.5)^2\big] = 2.668k</math>
| |
|
| |
| :<math>P_{AV} = P_A (sin \delta) = 3.726k (sin 18.435^\circ ) = 1.178k</math>
| |
|
| |
| :<math>P_{AH} = P_A (cos \delta) = 3.726k (cos 18.435^\circ ) = 3.534k</math>
| |
|
| |
| {| border="1" class="wikitable" style="margin: 1em auto 1em auto"
| |
| |+
| |
| !style="background:#BEBEBE" |Load !!style="background:#BEBEBE" |Area (ft<sup>2</sup>) !!style="background:#BEBEBE" |Force (k) = (Unit Wgt.)(Area) !!style="background:#BEBEBE" |Arm (ft.) !!style="background:#BEBEBE"|Moment (ft-k)
| |
| |-
| |
| |align="center"|(1)||align="center"| (0.5)(6.667ft)(2.222ft) = 7.407||align="center"| 0.889||align="center"| 7.278 ||align="center"|6.469
| |
| |-
| |
| |align="center"|(2)||align="center"| (6.667ft)(6.944ft) = 46.296||align="center"| 5.556||align="center"| 6.167||align="center"| 34.259
| |
| |-
| |
| |align="center"|(3) ||align="center"|(0.833ft)(8.000ft) + (0.5)(0.083ft)(8.000ft) = 7.000||align="center"|1.050||align="center"| 2.396||align="center"| 2.515
| |
| |-
| |
| |align="center"|(4) ||align="center"|(1.500ft)(9.500ft) = 14.250||align="center"| 2.138 ||align="center"|4.750 ||align="center"|10.153
| |
| |-
| |
| |align="center"|(5) ||align="center"|(2.500ft)(1.000ft) = 2.500||align="center"| 0.375||align="center"| 2.500||align="center"| 0.938
| |
| |-
| |
| |align="center"|(6) ||align="center"|(1.000ft)(1.917ft)+(0.5)(0.010ft)(1.000ft) = 1.922||align="center"|<u>0.231</u>||align="center"| 0.961||align="center"|<u>0.222</u>
| |
| |-
| |
| |align="center"|Σ ||align="center"| - ||align="center"|ΣV = 10.239 ||align="center"| - ||align="center"|ΣM<sub>R</sub> = 54.556
| |
| |-
| |
| |align="center"|P<sub>AV</sub>||align="center"| - ||align="center"|<u>1.178</u>||align="center"| 9.500 ||align="center"|<u>11.192</u>
| |
| |-
| |
| |align="center"|Σ resisting ||align="center"| - ||align="center"|ΣV = 11.417||align="center"| - ||align="center"| ΣM<sub>R</sub> = 65.748
| |
| |-
| |
| |align="center"|P<sub>AH</sub> ||align="center"| - ||align="center"|3.534 ||align="center"|3.556 ||align="center"|12.567
| |
| |-
| |
| |align="center"|P<sub>P</sub>||align="center"| - ||align="center"|2.668 ||align="center"|1.389<sup>1</sup>||align="center"| -
| |
| |-
| |
| |colspan="5"|'''<sup>1</sup>''' The passive capacity at the shear key is ignored in overturning checks,since this capacity is considered in the factor of safety against sliding. It is assumed that a sliding and overturning failure will not occur simultaneously. The passive capacity at the shear key is developed only if the wall does slide.
| |
| |}
| |
|
| |
| [[image:751.24.3.3 passive.jpg|right|150px]]
| |
| <math>\bar{y} = \frac{H_1y^2 + \frac{2}{3}y^3}{H_2^2 - H_1^2} = \frac{(2.5 ft)(2.5 ft)^2 + \frac{2}{3}(2.5 ft)^3}{(5.0 ft)^2 - (2.5 ft)^2}</math> = 1.389 ft.
| |
|
| |
| :'''Overturning'''
| |
|
| |
| :F.S. = <math>\frac{M_R}{M_{OT}} = \frac{65.748(ft-k)}{12.567(ft-k)} = 5.232 \ge 2.0 </math> <u>o.k.</u>
| |
|
| |
| :where: M<sub>OT</sub> = overturning moment; M<sub>R</sub> = resisting moment
| |
|
| |
| :'''Resultant Eccentricity'''
| |
|
| |
| :<math>\bar{x} = \frac{(65.748 - 12.567)(ft-k)}{11.417k}</math> = 4.658 ft.
| |
|
| |
| :<math>e = \frac{9.500 ft}{2} - 4.658 ft. = 0.092 ft.</math>
| |
| :<math>\frac{L}{6} =\frac{9.500 ft}{6} = 1.583 ft > e</math> <u>o.k.</u>
| |
|
| |
| :'''Sliding'''
| |
|
| |
| :Check if shear key is required for Group Loads I-VI:
| |
|
| |
| :F.S. = <math>\frac{\Sigma V(tan\phi_{s-c})}{P_{AH}} = \frac{11.042k(tan \frac{2}{3}(24^\circ)}{3.534k} </math>= 0.896 <u>no good - shear key req'd</u>
| |
|
| |
| :where: ''φ<sub>s-c</sub>'' = angle of friction between soil and concrete = (2/3)''φ<sub>s-s</sub>''
| |
|
| |
| :F.S. = <math>\frac{P_P + (\Sigma V) \Big(\frac{L_2}{L_1} tan \phi_{s-s}+\frac{L_3}{L_1} tan \phi_{s-c}\Big)}{P_{AH}}</math>
| |
|
| |
| :where: ''φ<sub>s-s</sub>'' = angle of internal friction of soil
| |
|
| |
| :F.S. = <math>\frac{2.668k + (11.417k) \Big[\Big(\frac{2 ft}{9.50 ft}\Big) tan 24^\circ + \Big(\frac{7.50 ft}{9.50 ft} tan \Big(\frac{2}{3}(24^\circ)\Big)\Big]}{3.534 k}</math> = 1.789 ≥ 1.5 <u>o.k.</u>
| |
|
| |
| :'''Footing Pressure'''
| |
|
| |
| :<math>P = \frac{\Sigma V}{bL} \Big[1 \pm \frac{6e}{L}\Big]</math>
| |
|
| |
| :P<sub>H</sub> = pressure at heel <math>P_H = \frac{11.417 k}{(1 ft)9.50 ft} \Big[1 - \frac{6 (0.092 ft)}{9.50 ft}\Big]</math> = 1.132 k/ft<sup>2</sup>
| |
|
| |
| :P<sub>T</sub> = pressure at toe <math>P_T = \frac{11.417 k}{(1 ft)9.50 ft} \Big[1 + \frac{6 (0.092 ft)}{9.50 ft}\Big]</math> = 1.272 k/ft<sup>2</sup>
| |
|
| |
| :Allowable pressure = 2 tons/ft<sup>2</sup> = 4 k/ft<sup>2</sup> ≥ 1.272 k/ft<sup>2</sup> <u>o.k.</u>
| |
|
| |
| '''Lateral Pressures With Earthquake'''
| |
|
| |
| k<sub>h</sub> = 0.5A = 0.5 (0.1) = 0.05
| |
|
| |
| k<sub>v</sub> = 0
| |
|
| |
| <math>\theta = arctan \Big[\frac{k_h}{1 - k_v}\Big] = arctan \Big[\frac{0.05}{1 - 0}\Big] = 2.862^\circ</math>
| |
|
| |
| :'''Active Pressure on Psuedo-Wall'''
| |
|
| |
| :''δ'' = ''φ'' = 24° (''δ'' is the angle of friction between the soil and the wall. In this case, ''δ'' = ''φ'' = because the soil wedge considered is next to the soil above the footing.)
| |
|
| |
| :''i'' = 18.435°
| |
|
| |
| :''β'' = 0°
| |
|
| |
| :<math>K_{AE} = \frac{cos^2(\phi - \theta - \beta)}{cos \theta cos^2 \beta cos(\delta + \beta + \theta)\Big(1 + \sqrt\frac{sin(\phi + \delta) sin (\phi - \theta - i)}{cos (\delta + \beta + \theta) cos(I - \beta)}\Big)^2}</math>
| |
|
| |
| :<math>K_{AE} = \frac{cos^2(24^\circ - 2.862^\circ - 0^\circ)}{cos (2.862^\circ) cos^2 (0^\circ) cos(24^\circ + 0^\circ + 2.862^\circ)\Big(1 + \sqrt\frac{sin(24^\circ + 24^\circ) sin (24^\circ - 2.862^\circ - 18.435^\circ)}{cos (24^\circ + 0^\circ + 2.862^\circ) cos(18.435^\circ - 0^\circ)}\Big)^2}</math>
| |
|
| |
| :K<sub>AE</sub> = 0.674
| |
|
| |
| :P<sub>AE</sub> = ½''γ<sub>s</sub>H<sup>2</sup>''(1 − ''k<sub>v</sub>'')''K<sub>AE</sub>''
| |
|
| |
| :P<sub>AE</sub> = ½[0.120 k/ft<sup>3</sup>](10.667 ft)<sup>2</sup>(1 ft.)(1 - 0)(0.674) = 4.602k
| |
|
| |
| :P<sub>AEV</sub> = P<sub>AE</sub>(sin''δ'') = 4.602k(sin24°) = 1.872k
| |
|
| |
| :P<sub>AEH</sub> = P<sub>AE</sub>(cos''δ'') = 4.602k(cos 24°) = 4.204k
| |
|
| |
| :P'<sub>AH</sub> = P<sub>AEH</sub> − P<sub>AH</sub> = 4.204k − 3.534k = 0.670k
| |
|
| |
| :P'<sub>AV</sub> = P<sub>AEV</sub> − P<sub>AV</sub> = 1.872k − 1.178k = 0.694k
| |
|
| |
| :where: P'<sub>AH</sub> and P'<sub>AV</sub> are the seismic components of the active force.
| |
|
| |
| :'''Passive Pressure on Shear Key'''
| |
|
| |
| :''δ'' = ''φ'' = 24° (''δ'' = ''φ'' because the soil wedge considered is assumed to form in front of the footing.)
| |
|
| |
| :''i'' = 0
| |
|
| |
| :''β'' = 0
| |
|
| |
| :<math>K_{PE} = \frac{cos^2(\phi - \theta + \beta)}{cos \theta cos^2 \beta cos(\delta - \beta + \theta)\Big(1 - \sqrt\frac{sin(\phi - \delta) sin (\phi - \theta + i)}{cos (\delta - \beta + \theta) cos(I - \beta)}\Big)^2}</math>
| |
|
| |
| :<math>K_{PE} = \frac{cos^2(24^\circ - 2.862^\circ + 0^\circ)}{cos (2.862^\circ) cos^2 (0^\circ) cos(24^\circ - 0^\circ + 2.862^\circ)\Big(1 - \sqrt\frac{sin(24^\circ - 24^\circ) sin (24^\circ - 2.862^\circ + 0^\circ)}{cos (24^\circ - 0^\circ + 2.862^\circ) cos(0^\circ - 0^\circ)}\Big)^2}</math>
| |
|
| |
| :K<sub>PE</sub> = 0.976
| |
|
| |
| :P<sub>PE</sub> = ½''γ<sub>s</sub>H<sup>2</sup>''(1 − ''k<sub>v</sub>'')''K<sub>PE</sub>''
| |
|
| |
| :P<sub>PE</sub> = ½[0.120 k/ft<sup>3</sup>][(5.0 ft)<sup>2</sup> - (2.5 ft<sup>2</sup>)](1 ft.)(1 - 0)(0.976) = 1.098k
| |
|
| |
| {| border="1" class="wikitable" style="margin: 1em auto 1em auto"
| |
| |+
| |
| !style="background:#BEBEBE" |Load !!style="background:#BEBEBE" |Force (k) !!style="background:#BEBEBE" |Arm (ft) !!style="background:#BEBEBE" |Moment (ft-k)
| |
| |-
| |
| |align="center"|Σ (1) thru (6) ||align="center"| 10.239||align="center"| - ||align="center"| 54.556
| |
| |-
| |
| |align="center"|P<sub>AV</sub>||align="center"| 1.178 ||align="center"|9.500||align="center"| 11.192
| |
| |-
| |
| |align="center"|P'<sub>AV</sub> ||align="center"|0.694 ||align="center"|9.500||align="center"| 6.593
| |
| |-
| |
| |align="center"|Σ<sub>resisting</sub> ||align="center"|ΣV = 12.111 ||align="center"| - ||align="center"|ΣM<sub>R</sub> = 72.341
| |
| |-
| |
| |align="center"|P<sub>AH</sub> ||align="center"|3.534 ||align="center"|3.556 ||align="center"|12.567
| |
| |-
| |
| |align="center"|P'<sub>AH</sub> ||align="center"|0.670||align="center"| 6.400<sup>a</sup>||align="center"| 4.288
| |
| |-
| |
| |align="center"|P<sub>PEV</sub> ||align="center"|0.447<sup>b</sup>||align="center"| 0.000||align="center"| 0.000
| |
| |-
| |
| |align="center"|P<sub>PEH</sub> ||align="center"|1.003<sup>b</sup> ||align="center"|1.389<sup>c</sup>||align="center"| <u>0.000</u>
| |
| |-
| |
| |align="center"| - ||align="center"| - ||align="center"| - ||align="center"|ΣM<sub>OT</sub> = 16.855
| |
| |-
| |
| |colspan="4"|<sup>'''a'''</sup> P'<sub>AH</sub> acts at 0.6H of the wedge face (1992 AASHTO Div. IA Commentary).
| |
| |-
| |
| |colspan="4"|<sup>'''b'''</sup> P<sub>PEH</sub> and P<sub>PEH</sub> are the components of P<sub>PE</sub> with respect to ''δ'' (the friction angle). P<sub>PE</sub> does not contribute to overturning.
| |
| |-
| |
| |colspan="4"|<sup>'''c'''</sup> The line of action of P<sub>PEH</sub> can be located as was done for P<sub>P</sub>.
| |
| |}
| |
|
| |
| :'''Overturning'''
| |
|
| |
| :<math>F.S._{OT} = \frac{72.341ft-k}{16.855ft-k} = 4.292 > 1.5</math> <u>o.k.</u>
| |
|
| |
| :'''Resultant Eccentricity'''
| |
|
| |
| :<math>\bar{x} = \frac{72.341ft-k - 16.855ft-k}{12.111k} = 4.581 ft.</math>
| |
|
| |
| :<math>e = \frac{9.5 ft.}{2}\ - 4.581 ft. = 0.169 ft.</math>
| |
|
| |
| :<math>\frac{L}{4} = \frac{9.5 ft.}{4} = 2.375 ft. > e</math> <u>o.k.</u>
| |
|
| |
|
| |
| :'''Sliding'''
| |
|
| |
| :<math>F.S. = \frac{1.003k + 12.111k \Big[(\frac{2}{9.5})tan 24^\circ + (\frac{7.5}{9.5}) tan \Big( \frac{2}{3}(24^\circ) \Big)\Big]}{4.204 k} = 1.161 > 1.125</math> <u>o.k.</u>
| |
|
| |
|
| |
| :'''Footing Pressure'''
| |
|
| |
| :for e ≤ L/6:
| |
|
| |
| :<math>P = \frac{\Sigma V}{bL} \Big[ 1 \pm \frac{6e}{L}\Big] </math>
| |
|
| |
| :<math>P_H = pressure\ at\ heel\ P_H = \frac{12.111 k}{(1 ft.)9.50 ft.} \Big[1 - \frac{6(0.169 ft.)}{9.50 ft}\Big]</math> = 1.139 k/ft<sup>2</sup>
| |
|
| |
| :<math>P_TH = pressure\ at\ toe\ P_T = \frac{12.111 k}{(1 ft.)9.50 ft.} \Big[1 + \frac{6(0.169 ft.)}{9.50 ft}\Big]</math> = 1.411 k/ft<sup>2</sup>
| |
|
| |
| :Allowable soil pressure for earthquake = 2 (allowable soil pressure)
| |
|
| |
| :(2)[4 k/ft<sup>2</sup>] = 8 k/ft<sup>2</sup> > 1.411 k/ft<sup>2</sup> <u>o.k.</u>
| |
|
| |
| '''Reinforcement-Stem'''
| |
|
| |
| [[image:751.24.3.3 reinforcement stem.jpg|center|200px]]
| |
|
| |
| d = 11" - 2" - (1/2)(0.5") = 8.75"
| |
|
| |
| b = 12"
| |
|
| |
| f'<sub>c</sub> = 3,000 psi
| |
|
| |
| :'''Without Earthquake'''
| |
|
| |
| :P<sub>AH</sub> = ½ [0.120 k/ft<sup>3</sup>](0.546)(6.944 ft.)<sup>2</sup>(1 ft.)(cos 18.435°) = 1.499k
| |
|
| |
| :''γ'' = 1.3
| |
|
| |
| :''β<sub>E</sub>'' = 1.3 (active lateral earth pressure)
| |
|
| |
| :M<sub>u</sub> = (1.3)(1.3)(1.499k)(2.315ft) = 5.865 (ft-k)
| |
|
| |
| :'''With Earthquake'''
| |
|
| |
| :k<sub>h</sub> = 0.05
| |
|
| |
| :k<sub>v</sub> = 0
| |
| {|style="padding: 0.3em; margin-left:5px; border:2px solid #a9a9a9; text-align:center; font-size: 95%; background:#f5f5f5" width="160px" align="right"
| |
| |-
| |
| |'''Additional Information'''
| |
| |-
| |
| |1992 AASHTO Div. IA Commentary
| |
| |}
| |
|
| |
| :''θ'' = 2.862°
| |
|
| |
| :''δ'' = ''φ''/2 = 24°/2 = 12° for angle of friction between soil and wall. This criteria is used only for seismic loading if the angle of friction is not known.
| |
|
| |
| :''φ'' = 24°
| |
|
| |
| :''i'' = 18.435°
| |
|
| |
| :''β'' = 0°
| |
|
| |
| :K<sub>AE</sub> = 0.654
| |
|
| |
| :P<sub>AEH</sub> = 1/2 ''γ<sub>s''</sub>K<sub>AE</sub>H<sup>2</sup>cos''δ''
| |
|
| |
| :P<sub>AEH</sub> = 1/2 [0.120k/ft](0.654)(6.944 ft.)<sup>2</sup>(1 ft.) cos(12°) = 1.851k
| |
|
| |
| :M<sub>u</sub> = (1.499k)(2.315 ft.) + (1.851k − 1.499k)(0.6(6.944 ft.)) = 4.936(ft−k)
| |
|
| |
| :The moment without earthquake controls:
| |
|
| |
| :<math>R_n = \frac{M_u}{\phi bd^2} = \frac{5.865(ft-k)}{0.9(1 ft.)(8.75 in.)^2}\Big(1000 \frac{lb}{k}\Big)</math> = 85.116 psi
| |
|
| |
| :''ρ'' = <math>\frac{0.85f'_c}{f_y} \Big[1 - \sqrt{1 - \frac{2R_n}{0.85f'_c}}\Big]</math>
| |
|
| |
| :''ρ'' = <math>\frac{0.85 (3.000 psi}{60,000 psi} \Bigg[1 - \sqrt{1 - \frac{2 (85.116 psi}{0.85 (3000 psi)}}\Bigg]</math> = 0.00144
| |
|
| |
| {|style="padding: 0.3em; margin-left:5px; border:2px solid #a9a9a9; text-align:center; font-size: 95%; background:#f5f5f5" width="160px" align="right"
| |
| |-
| |
| |'''Additional Information'''
| |
| |-
| |
| |AASHTO 8.17.1.1 & 8.15.2.1.1
| |
| |}
| |
|
| |
| :''ρ<sub>min</sub>'' = <math> 1.7 \Bigg[\frac{h}{d}\Bigg]^2 \frac{\sqrt{f'_c}}{f_y} = 1.7 \Bigg[\frac{11 in.}{8.75 in.}^2 \frac{\sqrt{3000 psi}}{60,000 psi}\Bigg]</math> = 0.00245
| |
|
| |
| :Use ''ρ'' = 4/3 ''ρ'' = 4/3 (0.00144) = 0.00192
| |
|
| |
| :''A<sub>S<sub>Req</sub></sub>'' = ''ρbd'' = 0.00192 (12 in.)(8.75 in.) = 0.202 in.<sup>2</sup>/ft
| |
|
| |
| :One #4 bar has A<sub>S</sub> = 0.196 in<sup>2</sup>
| |
|
| |
| :<math>\frac{s}{0.196 in.^2} = \frac{12 in.}{0.202 in.^2}</math>
| |
|
| |
| :''s'' = 11.64 in.
| |
|
| |
| :<u>Use #4's @ 10" cts.</u>
| |
|
| |
| :'''Check Shear'''
| |
|
| |
| :V<sub>u</sub> ≥ ''φ'' V<sub>n</sub>
| |
|
| |
| ::'''Without Earthquake'''
| |
|
| |
| ::V<sub>u,</sub> = (1.3)(1.3)(1.499k) = 2.533k
| |
|
| |
| ::'''With Earthquake'''
| |
|
| |
| ::V<sub>u</sub> = 1.851k
| |
|
| |
| :The shear force without earthquake controls.
| |
|
| |
| :<math>\frac{\nu_u}{\phi} = \frac{2.533k}{0.85(12 in.)(8.75 in.)} (1000 lb/k)</math> = 28.4 psi
| |
|
| |
| :<math>\nu_c = 2 \sqrt{3,000 psi}</math> = 109.5 psi > 28.4 psi <u>o.k.</u>
| |
|
| |
| '''Reinforcement-Footing-Heel'''
| |
|
| |
| [[image:751.24.3.3 heel.jpg|center|250px]]
| |
|
| |
| Note: Earthquake will not control and will not be checked.
| |
|
| |
| ''β<sub>E</sub>'' = 1.0 (vertical earth pressure)
| |
|
| |
| d = 18" - 3" - (1/2)(0.750") = 14.625"
| |
|
| |
| b = 12"
| |
|
| |
| ''f'<sub>c</sub>'' = 3,000 psi
| |
|
| |
| ''M<sub>u</sub>'' = 1.3 [(5.556k + 1.500k)(3.333ft) + 0.889k(4.444ft) + 1.178k(6.667ft)]
| |
|
| |
| ''M<sub>u</sub>'' = 45.919(ft−k)
| |
|
| |
| <math>R_n = \frac{45.919(ft-k)}{0.9(1 ft.)(14.625 in.)^2}(1000\frac{lb}{k})</math> = 238.5 psi
| |
|
| |
| ''ρ'' = <math>\frac{0.85(3000)psi}{60,000 psi} \Bigg[ 1 - \sqrt{1 - \frac{2(238.5 psi)}{0.85(3000psi)}}\Bigg]</math> = 0.00418
| |
|
| |
| ''ρ<sub>min</sub>'' = <math> 1.7 \Big[\frac{18 in.}{14.625 in.}\Big]^2 \frac{\sqrt{3000 psi}}{60,000 psi}</math> = 0.00235
| |
|
| |
| ''A<sub>S<sub>Req</sub></sub>'' = 0.00418 (12 in.) (14.625 in.) = 0.734 in<sup>2</sup>/ft.
| |
|
| |
|
| |
| <u>Use #6's @ 7" cts.</u>
| |
|
| |
| :'''Check Shear'''
| |
|
| |
| :Shear shall be checked at back face of stem.
| |
|
| |
| :''V<sub>u</sub>'' = 1.3 (5.556k + 1.500k + 0.889k + 1.178k) = 11.860k
| |
|
| |
| :<math>\frac{\nu_u}{\phi} = \frac{11.860k}{0.85(12 in.)(14.625 in.)}(1000 \frac{lb}{k} ) = 79.5 psi < 2 \sqrt{3,000 psi}</math> = 109.5 psi o.k.
| |
|
| |
| '''Reinforcement-Footing-Toe'''
| |
|
| |
| [[image:751.24.3.3. toe.jpg|center|350px]]
| |
|
| |
| d = 18" - 4" = 14"
| |
|
| |
| b = 12"
| |
|
| |
| :'''Without Earthquake'''
| |
|
| |
| ::'''Apply Load Factors'''
| |
|
| |
| ::load 4 (weight) = 0.431k(1.3)(1.0) = 0.560k
| |
|
| |
| ::''β<sub>E</sub>'' = 1.3 for lateral earth pressure for retaining walls.
| |
|
| |
| ::''β<sub>E</sub>'' = 1.0 for vertical earth pressure.
| |
|
| |
| ::''ΣM<sub>OT</sub>'' = 12.567(ft−k)(1.3)(1.3) = 21.238(ft−k)
| |
|
| |
| ::''ΣM<sub>R</sub>'' = [54.556(ft−k) + 11.192(ft−k)](1.3)(1.0) = 85.472(ft−k)
| |
|
| |
| ::''ΣV'' = 11.417k(1.3)(1.0) = 14.842k
| |
|
| |
| :<math>\bar{x} = \frac{85.472(ft-k) - 21.238(ft-k)}{14.842k}</math> = 4.328 ft.
| |
|
| |
| :''e'' = (9.5 ft./2) − 4.328 ft. = 0.422 ft.
| |
|
| |
| :<math>P_H = \frac{14.842k}{(1 ft.)(9.5 ft.)} \Big[1 - \frac{6(0.422 ft.)}{9.5 ft.}\Big]</math> = 1.146k/ft<sup>2</sup>
| |
|
| |
| :<math>P_T = \frac{14.842k}{(1 ft.)(9.5 ft.)} \Big[1 + \frac{6(0.422 ft.)}{9.5 ft.}\Big]</math> = 1.979k/ft<sup>2</sup>
| |
|
| |
| :<math>P =\Bigg[\frac{1.979 \frac{k}{ft.} - 1.146 \frac{k}{ft.}}{9.5 ft.}\Bigg](7.583 ft.) + 1.146\frac{k}{ft.}</math> = 1.811k/ft.
| |
|
| |
| :<math>M_u = 1.811\frac{k}{ft.}\frac{(1.917 ft.)^2}{2} + \frac{1}{2}(1.917 ft.)^2\Big[1.979\frac{k}{ft.} - 1.811\frac{k}{ft.}\Big]\frac{2}{3} - 0.560k(0.958 ft.)</math>
| |
|
| |
| :''M<sub>u</sub>'' = 2.997(ft−k)
| |
|
| |
| :'''With Earthquake'''
| |
|
| |
| :''P<sub>H</sub>'' = 1.139 k/ft
| |
|
| |
| :''P<sub>T</sub>'' = 1.411 k/ft
| |
|
| |
| :<math>P = \Bigg[\frac{1.411\frac{k}{ft.} - 1.139\frac{k}{ft.}}{9.5 ft.}\Bigg](7.583 ft.) + 1.139\frac{k}{ft.}</math> = 1.356 k/ft
| |
|
| |
| :<math>M_u = 1.356\frac{k}{ft.}\frac{(1.917 ft.)^2}{2} + \frac{1}{2}(1.917 ft.)^2 \Bigg[1.411\frac{k}{ft.} - 1.356\frac{k}{ft.}\Bigg]\frac{2}{3} - 0.431k (0.958 ft.)</math>
| |
|
| |
| :''M<sub>u</sub>'' = 2.146(ft−k)
| |
|
| |
| :The moment without earthquake controls.
| |
|
| |
| :<math>R_n = \frac{2.997(ft-k)}{0.9(1 ft.)(14.0 in.)^2}(1000\frac{lb}{k})</math> = 16.990 psi
| |
|
| |
| :''ρ'' = <math>\frac{0.85(3000 psi)}{60,000 psi}\Bigg[1 - \sqrt{1 - \frac{2(16.990 psi)}{0.85(3000psi)}}\Bigg]</math> = 0.000284
| |
|
| |
| :''ρ<sub>min</sub>'' = <math>1.7\Big[\frac{18 in.}{14.0 in.}\Big]^2 \frac{\sqrt{3,000 psi}}{60,000 psi}</math> = 0.00257
| |
|
| |
| :Use ''ρ'' = 4/3 ''ρ'' = <math>\frac{4}{3}(0.000284)</math> = 0.000379
| |
|
| |
| :''A<sub>S<sub>Req</sub></sub>'' = 0.000379 (12 in.)(14.0 in.) = 0.064 in.<sup>2</sup>/ft.
| |
|
| |
|
| |
| :<math>\frac{12 in.}{0.064 in.^2} = \frac{s}{0.196 in.^2}</math>
| |
|
| |
| :''s'' = 36.8 in.
| |
|
| |
| :Minimum is # 4 bars at 12 inches. These will be the same bars that are in the back of the stem. Use the smaller of the two spacings.
| |
|
| |
| :<u>Use # 4's @ 10" cts.</u>
| |
|
| |
| :'''Check Shear'''
| |
|
| |
| :Shear shall be checked at a distance "d" from the face of the stem.
| |
|
| |
| ::'''Without Earthquake'''
| |
|
| |
| ::<math>P_d =\Bigg[\frac{1.979\frac{k}{ft.} - 1.146\frac{k}{ft.}}{9.5 ft.}\Bigg](8.750 ft.) + 1.146\frac{k}{ft.}</math> = 1.913k/ft.
| |
|
| |
| ::<math>V_u =\frac{1.979\frac{k}{ft.} + 1.913\frac{k}{ft.}}{2}(0.750 ft.) - 1.3\Big[0.225\frac{k}{ft.}\Big](0.750 ft.)</math> = 1.240k
| |
|
| |
| ::'''With Earthquake'''
| |
|
| |
| ::<math>P_d =\Bigg[\frac{1.411\frac{k}{ft.} - 1.139\frac{k}{ft.}}{9.5 ft.}\Bigg](8.750 ft.) + 1.139\frac{k}{ft.}</math> = 1390k/ft.
| |
|
| |
| ::<math>V_u =\frac{1.411\frac{k}{ft.} + 1.139\frac{k}{ft.}}{2}(0.750 ft.) - \Big[0.225\frac{k}{ft.}\Big](0.750 ft.)</math> = 0.788k
| |
|
| |
| :Shear without earthquake controls.
| |
|
| |
| :<math>\frac{\nu_u}{\phi} = \frac{1.240k}{0.85(12 in.)(14.0 in.)}(1000\frac{lb}{k} ) = 8.7 psi < 2\sqrt{3000 psi}</math> = 109.5 psi <u>o.k.</u>
| |
|
| |
| '''Reinforcement-Shear Key'''
| |
|
| |
| [[image:751.24.3.3 shear key.jpg|center|250px]]
| |
|
| |
| The passive pressure is higher without earthquake loads.
| |
|
| |
| ''γ'' = 1.3
| |
|
| |
| ''β<sub>E</sub>'' = 1.3 (lateral earth pressure)
| |
|
| |
| d = 12"-3"-(1/2)(0.5") = 8.75"
| |
|
| |
| b = 12"
| |
|
| |
| ''M<sub>u</sub> = (3.379k)(1.360 ft.)(1.3)(1.3) = 7.764(ft−k)
| |
|
| |
| <math>R_n = \frac{7.764(ft-k)}{0.9(1 ft.)(8.75 in.)^2} (1000\frac{lb}{k})</math> = 112.677 psi
| |
|
| |
| ''ρ'' = <math>\frac{0.85(3000 psi)}{60,000 psi}\Bigg[1 - \sqrt{1 - \frac{2(112.677 psi)}{0.85(3000psi)}}\Bigg]</math> = 0.00192
| |
|
| |
| ''ρ<sub>min</sub> = <math>1.7\Big[\frac{12 in.}{8.75 in.}\Big]^2 \frac{\sqrt{3000 psi}}{60,000 psi}</math> = 0.00292
| |
|
| |
| Use ''ρ'' = 4/3 ''ρ'' = 4/3 (0.00192) = 0.00256
| |
|
| |
| A<sub>S<sub>Req</sub></sub> = 0.00256(12 in.)(8.75 in.) = 0.269 in.<sup>2</sup>/ft.
| |
|
| |
|
| |
| <u>Use # 4 @ 8.5 in cts.</u>
| |
|
| |
| Check Shear
| |
|
| |
| :<math>\frac{\nu_u}{\phi} = \frac{1.3(3.379k)(1.3)}{0.85(12 in.)(8.75.)}(1000\frac{lb}{k} ) = 64.0 psi < 2\sqrt{3000 psi}</math> = 109.5 psi <u>o.k.</u>
| |
|
| |
| '''Reinforcement Summary'''
| |
|
| |
| [[Image:751.24.3.3 summary.jpg|500px|center]]
| |
|
| |
| ===751.24.3.4 Example 2: L-Shaped Cantilever Wall===
| |
|
| |
| [[image:751.24.3.4.jpg|center|650px|thumb|<center>'''Typical Section thru Wall</center><center>(Spread Footing)</center>''']]
| |
|
| |
| ''f'<sub>c</sub>'' = 4000 psi
| |
|
| |
| ''f<sub>y</sub>'' = 60,000 psi
| |
|
| |
| ''φ'' = 29°
| |
|
| |
| ''γ<sub>s</sub> = 120 pcf
| |
|
| |
| Allowable soil pressure = 1.5 tsf = 3.0 ksf
| |
|
| |
| Retaining wall is located in Seismic Performance Category (SPC) A.
| |
|
| |
| <math>\delta = tan^{-1}\frac{1}{2.5}</math> = 21.801°
| |
|
| |
| <math>C_a = cos \delta\Bigg[\frac{cos \delta - \sqrt{cos^2\delta - cos^2\phi}}{cos \delta + \sqrt{cos^2\delta - cos^2\phi}}\Bigg]</math> = 0.462
| |
|
| |
| <math>C_p = tan^2\Big[45 + \frac{\phi}{2}\Big]</math> = 2.882
| |
|
| |
| ''P<sub>A</sub>'' = 1/2 ''γ<sub>s</sub>'' C<sub>a</sub>H<sup>2</sup> = 1/2 (0.120 k/ft<sup>3</sup>)(0.462)(4.958 ft.)<sup>2</sup> = 0.681k
| |
|
| |
| For sliding, P<sub>P</sub> is assumed to act only on the portion of key below the frost line that is set at an 18 in. depth on the southern border.
| |
|
| |
| ''P<sub>P</sub>'' = 1/2 (0.120 k/ft<sup>3</sup>)(2.882)[(2.458 ft.)<sup>2</sup> − (1.500 ft.)<sup>2</sup>] = 0.656k
| |
|
| |
| '''Assumptions'''
| |
|
| |
| * Design is for a unit length (1 ft.) of wall.
| |
|
| |
| * Sum moments about the toe at the bottom of the footing for overturning.
| |
|
| |
| * F.S. for overturning ≥ 2.0 for footings on soil.
| |
|
| |
| * F.S. for sliding ≥ 1.5 for footings on soil.
| |
|
| |
| * Resultant of dead load and earth pressure to be in back half of the middle third of the footing if subjected to frost heave.
| |
|
| |
| * For all loading combinations the resultant must be in the middle third of the footing except for collision loads.
| |
|
| |
| * The top 12 in. of the soil is not neglected in determining the passive pressure because the soil there will be maintained.
| |
|
| |
| * Frost line is set at 18 in. at the south border for Missouri.
| |
|
| |
| * Portions of shear key which are above the frost line are assumed not to resist sliding by passive pressure.
| |
|
| |
| * Use of a shear key shifts the failure plane to "B" where resistance to sliding is also provided by friction of soil along the failure plane in front of the shear key. Friction between the soil and concrete behind the shear key will be neglected.
| |
|
| |
| * Soil cohesion along the failure plane is neglected.
| |
|
| |
| * Live loads can move to within 1 ft. of the stem face and 1 ft. from the toe.
| |
|
| |
| * The wall is designed as a cantilever supported by the footing.
| |
|
| |
| * Footing is designed as a cantilever supported by the wall. Critical sections for bending and shear will be taken at the face of the wall.
| |
|
| |
| * Load factors for AASHTO Groups I-VI for design of concrete are:
| |
|
| |
| ::*''γ'' = 1.3.
| |
|
| |
| ::*''β<sub>E</sub>'' = 1.3 for horizontal earth pressure on retaining walls.
| |
|
| |
| ::*''β<sub>E</sub>'' = 1.0 for vertical earth pressure.
| |
|
| |
| ::*''β<sub>LL</sub>'' = 1.67 for live loads and collision loads.
| |
|
| |
| '''Dead Load and Earth Pressure - Stabilty and Pressure Checks'''
| |
|
| |
| {| border="1" class="wikitable" style="margin: 1em auto 1em auto"
| |
| |+
| |
| |-
| |
| !colspan="4" style="background:#BEBEBE" |Dead Load and Earth Pressure - Stabilty and Pressure Checks
| |
| |-
| |
| !style="background:#BEBEBE" |Load !!style="background:#BEBEBE" |Force (k) !!style="background:#BEBEBE" |Arm (in.) !!style="background:#BEBEBE"|Moment (ft-k)
| |
| |-
| |
| |align="center"|(1)||align="center"| (0.833 ft.)(5.167 ft.)(0.150k/ft<sup>3</sup>) = 0.646||align="center"| 5.333||align="center"| 3.444
| |
| |-
| |
| |align="center"|(2)||align="center"| (0.958ft)(5.750ft)(0.150k/ft3) = 0.827||align="center"| 2.875||align="center"| 2.376
| |
| |-
| |
| |align="center"| (3)||align="center"| (1.000ft)(1.500ft)(0.150k/ft3) = 0.22534.259||align="center"| 4.250 ||align="center"| 0.956
| |
| |-
| |
| |align="center" colspan="3"|ΣV = 1.698 ||align="center"| ΣM<sub>R</sub> = 6.776
| |
| |-
| |
| |align="center"| P<sub>AV</sub>||align="center"| 0.253 ||align="center"| 5.750 ||align="center"| 1.455
| |
| |-
| |
| |align="center" colspan="3"| ΣV = 1.951||align="center"| ΣM<sub>R</sub> = 8.231
| |
| |-
| |
| |align="center"| P<sub>AH</sub> ||align="center"| 0.633 ||align="center"| 1.653 ||align="center"| 1.045
| |
| |-
| |
| |align="center"| P<sub>P</sub>||align="center"| 0.656 ||align="center"| 1.06<sup>1</sup>||align="center"| -
| |
| |-
| |
| |colspan="4" align="right"|ΣM<sub>OT</sub> = 1.045
| |
| |-
| |
| |colspan="4"|<sup>'''1'''</sup> The passive pressure at the shear key is ignored in overturning checks.
| |
| |}
| |
|
| |
| :'''Overturning'''
| |
|
| |
| :<math>F.S. = \frac{\Sigma M_R}{\Sigma M_{OT}} = \frac{8.231(ft-k)}{1.045(ft-k)}</math> = 7.877 ≥ 2.0 <u>o.k.</u>
| |
|
| |
| :'''Location of Resultant'''
| |
|
| |
| :MoDOT policy is that the resultant must be in the back half of the middle third of the footing when considering dead and earth loads:
| |
|
| |
| :<math>\Bigg[\frac{5.750 ft.}{2} = 2.875 ft.\Bigg] \le \bar{x} \le \Bigg[\Bigg(\frac{5.750 ft.}{2} + \frac{5.750 ft.}{6}\Bigg) = 3.833 ft.\Bigg] </math>
| |
|
| |
| :<math>\bar{x} = \frac{M_{NET}}{\Sigma V} = \frac{8.231(ft-k) - 1.045(ft-k)}{1.951k}</math> = 3.683 ft. <u>o.k.</u>
| |
|
| |
| :'''Sliding'''
| |
|
| |
| :<math>F.S. = \frac{P_P + \Sigma V \Bigg[\Big(\frac{L_2}{L_1}\Big)tan\phi_{s-s} + \Big(\frac{L_3}{L_1}\Big)tan\phi_{s-c}\Bigg]}{P_{AH}}</math>
| |
|
| |
| :where:
| |
| ::''φ<sub>s-s</sub>'' = angle of internal friction of soil
| |
|
| |
| ::''φ<sub>s-c</sub>'' = angle of friction between soil and concrete = (2/3)''φ<sub>s-s</sub>''
| |
|
| |
| :<math>F.S. = \frac{0.656k +(1.951k)\Big[\Big(\frac{3.75 ft.}{5.75 ft.}\Big)tan 29^\circ + \Big(\frac{1 ft.}{5.75 ft.}\Big) tan\Big(\frac{2}{3}(29^\circ)\Big)\Big]}{0.633 k}</math> = 2.339 ≥ 1.5 <u>o.k.</u>
| |
|
| |
| :'''Footing Pressure'''
| |
|
| |
| :<math>P = \frac{\Sigma V}{bL} \Big[1 \pm \frac{6e}{L}\Big]</math>
| |
|
| |
| :<math>e = \bar{x} - \frac{L}{2} = 3.683 ft. - \frac{5.75 ft.}{2}</math> = 0.808 ft.
| |
|
| |
| :Heel: <math>P_H = \frac{1.951k}{(1 ft.)(5.75 ft.)}\Big[1 + \frac{6(0.808 ft.)}{5.75 ft.}\Big]</math> = 0.625 ksf < 3.0 ksf <u>o.k.</u>
| |
|
| |
| :Toe: <math>P_T = \frac{1.951k}{(1 ft.)(5.75 ft.)}\Big[1 - \frac{6(0.808 ft.)}{5.75 ft.}\Big]</math> = 0.053 ksf < 3.0 ksf <u>o.k.</u>
| |
|
| |
| '''Dead Load, Earth Pressure, and Live Load - Stability and Pressure Checks'''
| |
|
| |
| Stability is not an issue because the live load resists overturning and increases the sliding friction force.
| |
|
| |
| [[image:751.24.3.4 checks.jpg|center|250px]]
| |
|
| |
| The live load will be distributed as:
| |
|
| |
| <math> F_{LL} = \frac{LL_{WL}}{E}</math>
| |
|
| |
| :where E = 0.8X + 3.75
| |
|
| |
| ::X = distance in feet from the load to the front face of wall
| |
|
| |
| The live load will be positioned as shown by the dashed lines above. The bearing pressure and resultant location will be determined for these two positions.
| |
|
| |
| :'''Live Load 1 ft From Stem Face'''
| |
|
| |
| ::'''Resultant Eccentricity'''
| |
|
| |
| ::X = 1 ft.
| |
|
| |
| ::E = 0.8(1 ft.) + 3.75 = 4.55 ft.
| |
|
| |
| ::<math>F_{LL} = \frac{16k}{4.55 ft.} (1 ft.)</math> = 3.516k
| |
|
| |
| ::<math>\bar{x} = \frac{M_{NET}}{\Sigma V} = \frac{8.231(ft-k) + (3.516k)(3.917 ft.) - 1.045(ft-k)}{1.951k + 3.516k}</math> = 3.834 ft.
| |
|
| |
| ::<math>e = \bar{x} - \frac{L}{2} = 3.834 ft. - \frac{5.75 ft.}{2} = 0.959 ft. \le \frac{L}{6}</math> = 5.75 ft. <u>o.k.</u>
| |
|
| |
| ::'''Footing Pressure'''
| |
|
| |
| ::<math>P = \frac{\Sigma V}{bL} \Big[1 \pm \frac{6e}{L}\Big]</math>
| |
|
| |
| ::Allowable Pressure = 3.0 ksf
| |
|
| |
| ::Heel: <math>P_H = \frac{5.467k}{(1 ft.)(5.75 ft.)}\Big[1 + \frac{6(0.959 ft.)}{5.75 ft.}\Big]</math> = 1.902 ksf
| |
|
| |
| ::Toe: <math>P_T = \frac{5.467k}{(1 ft.)(5.75 ft.)}\Big[1 - \frac{6(0.959 ft.)}{5.75 ft.}\Big]</math> = 0.000ksf
| |
|
| |
| :'''Live Load 1 ft From Toe'''
| |
|
| |
| ::'''Resultant Eccentricity'''
| |
|
| |
| ::X = 3.917 ft.
| |
|
| |
| ::E = 0.8(3.917 ft.) + 3.75 = 6.883 ft.
| |
|
| |
| ::<math>F_{LL} = \frac{16k}{6.883 ft} (1 ft.)</math> = 2.324k
| |
|
| |
| ::<math>x = \frac{8.231(ft-k) + (2.324k)(1ft.) - 1.045(ft-k)}{1.951k + 2.324k}</math> = 2.225 ft.
| |
|
| |
| ::<math>e = \frac{L}{2} - \bar{x} = \frac{5.75 ft.}{2} - 2.225 ft. = 0.650 ft. \le \frac{L}{6} = \frac{5.75 ft.}{6}</math> = 0.958 ft. <u>o.k.</u>
| |
|
| |
| ::'''Footing Pressure'''
| |
|
| |
| ::Allowable Pressure = 3.0ksf
| |
|
| |
| ::Heel: <math>P_H = \frac{4.275k}{(1 ft.)(5.75 ft.}\Big[1 - \frac{6 (0.650 ft.)}{5.75 ft.}\Big]</math> = 0.239ksf <u>o.k.</u>
| |
|
| |
| ::Toe: <math>P_T = \frac{4.275k}{(1 ft.)(5.75 ft.}\Big[1 + \frac{6 (0.650 ft.)}{5.75 ft.}\Big]</math> = 1.248ksf <u>o.k.</u>
| |
|
| |
| '''Dead Load, Earth Pressure, Collision Load, and Live Load - Stability and Pressure Checks'''
| |
|
| |
| During a collision, the live load will be close to the wall so check this combination when the live load is one foot from the face of the stem. Sliding (in either direction) will not be an issue. Stability about the heel should be checked although it is unlikely to be a problem. There are no criteria for the location of the resultant, so long as the footing pressure does not exceed 125% of the allowable. It is assumed that the distributed collision force will develop an equal and opposite force on the fillface of the back wall unless it exceeds the passive pressure that can be developed by soil behind the wall.
| |
|
| |
| ''F<sub>LL</sub>'' = 3.516k
| |
|
| |
| [[image:751.24.3.4 collision.jpg|center|250px]]
| |
|
| |
| ''F<sub>COLL</sub>'' = <math>\frac{10k}{2(3 ft.)}(1 ft.)</math> = 1.667k
| |
|
| |
| <math>C_P = cos \delta \Bigg[\frac{cos \delta + \sqrt{cos^2 \delta - cos^2 \phi}}{cos \delta - \sqrt{cos^2 \delta - cos^2 \phi}}\Bigg]</math> = 1.867
| |
|
| |
| <math>P_{PH} = \frac{1}{2}\gamma_s C_P H^2 cos\delta = \frac{1}{2}(0.120kcf)(1.867)(4.958ft)^2 cos(21.801^\circ)</math>
| |
|
| |
| ''P<sub>PH</sub>'' = 2.556k > ''F<sub>COLL</sub>'' Thus the soil will develop an equal but opp. force.
| |
|
| |
| :'''Overturning About the Heel'''
| |
|
| |
| :F.S. = <math>\frac{(0.646k)(0.417 ft.) + (0.827k)(2.875 ft.) + (0.225k)(1.500 ft.) + (3.516k)(1.833 ft.) + (1.667k)\big(\frac{4.958 ft.}{3}\big)}{(1.667k)(3.958 ft.)}</math>
| |
|
| |
| :F.S. = <math>\frac{12.184(ft-k)}{6.598(ft-k)}</math> = 1.847 ≥ 1.2 <u>o.k.</u>
| |
|
| |
| :'''Footing Pressure'''
| |
|
| |
| :<math>\bar{x} = \frac{12.184(ft-k) - 6.598(ft-k)}{1.951k + 3.516k}</math> = 1.022 ft. from heel
| |
|
| |
| :''e'' = <math>\frac{5.75 ft.}{2} - 1.022 ft.</math> = 1.853 ft.
| |
|
| |
| :Allowable Pressure = (1.25)(3.0ksf) = 3.75ksf
| |
|
| |
| :Heel: <math> P_H =\frac {2(\Sigma V)}{3b[\frac{L}{2} - e]} = \frac {2(5.467k)}{3(1 ft.)\big[\frac{5.75 ft.}{2} - 1.853 ft.\big]}</math> = 3.566ksf <u>o.k.</u>
| |
|
| |
| '''Stem Design-Steel in Rear Face'''
| |
|
| |
| [[image:751.24.3.4 steel in rear face.jpg|center|250px]]
| |
|
| |
| ''γ'' = 1.3
| |
|
| |
| ''β<sub>E</sub>'' = 1.3 (active lateral earth pressure)
| |
|
| |
| d = 10 in. − 2 in. − (0.5 in./2) = 7.75 in.
| |
|
| |
| <math>P_{AH} = \frac{1}{2}\gamma_s C_a H^2 cos\delta = \frac{1}{2}\Bigg[0.120 \frac{k}{ft^3}\Bigg](0.462)(4 ft.)^2(1 ft.) cos 21.801^\circ</math>
| |
|
| |
| ''P<sub>AH</sub>'' = 0.412k
| |
|
| |
| ''M<sub>u</sub>'' = (1.333 ft.)(0.412k)(1.3)(1.3) = 0.928(ft−k)
| |
|
| |
| <math>R_n = \frac{M_u}{\phi b d^2} = \frac{0.928(ft-k)}{(0.9)(1 ft.)(7.75 in.)^2}\Big(1000\frac{lb}{k}\Big)</math> = 17.160psi
| |
|
| |
| <math>\rho = \frac{0.85f_c}{f_y}\Bigg[1 - \sqrt{1 - \frac{2R_n}{0.85 f_c}}\Bigg]</math>
| |
|
| |
| <math>\rho = \frac{4000 psi}{60,000 psi}\Bigg[1 - \sqrt{1 - \frac{2(17.160 psi)}{0.85 (4000psi)}}\Bigg]</math> = 0.000287
| |
|
| |
| <math>\rho_{min} = 1.7 \Bigg[\frac{h}{d}\Bigg]^2 \frac{\sqrt{f_c}}{f_y}</math>
| |
|
| |
| <math>\rho_{min} = 1.7 \Bigg[\frac{10 in.}{7.75 in.}\Bigg]^2 \frac{\sqrt{4000 psi}}{60000 psi}</math> = 0.00298
| |
|
| |
| Use ''ρ'' = (4/3)ρ = (4/3)(0.000287) = 0.000382
| |
|
| |
| <math>A_{S_{Req}} = \rho bd = 0.000382(12 in.)(7.75 in.) = 0.036 \frac{in^2}{ft.}</math>
| |
|
| |
| One #4 bar has A<sub>S</sub> = 0.196 in<sup>2</sup>, so the required minimum of one #4 bar every 12 in. controls.
| |
|
| |
| <u>Use #4's @ 12 in. (min)</u>
| |
|
| |
| (These bars are also the bars in the bottom of the footing so the smaller of the two required spacings will be used.)
| |
|
| |
| :'''Check Shear'''
| |
|
| |
| :<math>\frac{\nu_u}{\phi} \le V_n</math>
| |
|
| |
| :<math>\frac{\nu_u}{\phi} = \frac{(1.3)(1.3)(0.412k)}{0.85(12 in.)(7.75 in.)}(1000\frac{lb}{k})</math> = 8.8 psi
| |
|
| |
| :<math>\nu_c = 2 \sqrt{f'_c}</math>
| |
|
| |
| :<math>\nu_c = 2 \sqrt{4, 000 psi}</math> = 126.5 psi > 8.8 psi <u>o.k.</u>
| |
|
| |
| '''Stem Design-Steel in Front Face (Collision Loads)'''
| |
|
| |
| [[image:751.24.3.4 steel in front face.jpg|center|300px]]
| |
|
| |
|
| |
| The soil pressure on the back of the stem becomes passive soil pressure during a collision, however this pressure is ignored for reinforcement design.
| |
|
| |
| ''γ'' = 1.3
| |
|
| |
| ''β<sub>LL</sub>'' = 1.67
| |
|
| |
| <math>d = 10 in. - 1.5 in. - 0.5 in. - \frac{0.5 in.}{2}</math> = 7.75 in.
| |
|
| |
| <math>F_{COLL} = \frac{10k}{2L} = \frac{10k}{(2)(3 ft.)}</math> = 1.667 k/ft.
| |
|
| |
| ''M<sub>u</sub>'' = 1.667k/ft. (1 ft.)(3 ft.)(1.3)(1.67) = 10.855(ft−k)
| |
|
| |
| <math>R_n = \frac{10.855(ft-k)}{0.9(1 ft.)(7.75 in.)^2} (1000\frac{lb}{k})</math> = 200.809 psi
| |
|
| |
| <math>\rho = \frac{0.85(4000 psi)}{60,000 psi}\Bigg[1 - \sqrt{1 - \frac{2(200.809 psi)}{0.85(4000psi)}}\Bigg]</math> = 0.00345
| |
|
| |
| <math>\rho_{min} = 1.7\Bigg[\frac{10 in.}{7.75 in.}\Bigg]^2 \frac{\sqrt{4000 psi}}{60,000 psi}</math> = 0.00298
| |
|
| |
| <math>A_{S_{Req}} = 0.00345 (12 in.)(7.75 in.) = 0.321 \frac{in.^2}{ft.}</math>
| |
|
| |
| One #4 bar has A<sub>S</sub> = 0.196 in<sup>2</sup>.
| |
|
| |
| <math>\frac{s}{0.196 in.^2} = \frac{12 in.}{0.321 in.^2}</math>
| |
|
| |
| ''s'' = 7.3 in.
| |
|
| |
| <u>Use #4's @ 7 in.</u>
| |
|
| |
| :'''Check Shear'''
| |
|
| |
| :<math>\frac{\nu_u}{\phi} = \frac{(1.3)(1.67)(1.667k)}{(0.85)(12 in.)(7.75 in.)} (1000\frac{lb}{k})</math> = 45.8 psi < 126.5 psi <u>o.k.</u>
| |
|
| |
| '''Footing Design - Bottom Steel'''
| |
|
| |
| It is not considered necessary to design footing reinforcement based upon a load case which includes collision loads.
| |
|
| |
| :'''Dead Load and Earth Pressure Only'''
| |
|
| |
| [[image:751.24.3.4 dead load.jpg|center|250px]]
| |
|
| |
| :''Footing wt.'' = <math>\Big[\frac{11.5}{12}ft.\Big](4.917 ft.)\Big[0.150 \frac{k}{ft.^3}\Big](1 ft.)</math> = 0.707k
| |
|
| |
| :''β<sub>E</sub>'' = 1.3 (lateral earth pressure)
| |
|
| |
| :''γ'' = 1.3
| |
|
| |
| :Apply Load Factors:
| |
|
| |
| :''ΣV'' = 1.951k (1.3) = 2.536k
| |
|
| |
| :''ΣM<sub>R</sub>'' = 8.231(ft−k)(1.3) = 10.700(ft−k)
| |
|
| |
| :''ΣM<sub>OT</sub>'' = 1.045(ft−k)(1.3)(1.3) = 1.766(ft−k)
| |
|
| |
| :''Footing wt.'' = 0.707k (1.3) = 0.919k
| |
|
| |
| :<math>\bar{x} = \frac{10.700(ft-k) - 1.766(ft-k)}{2.536k}</math> = 3.523 ft.
| |
|
| |
| :<math>e = 3.523 ft. - \frac{5.75ft}{2}</math> = 0.648 ft.
| |
|
| |
| :<math>P_H = \frac{2.536k}{(1 ft.)(5.75 ft.)}\Bigg[1 + \frac{6(0.648 ft.)}{5.75 ft.}\Bigg]</math> = 0.739 ksf
| |
|
| |
| :<math>P_T = \frac{2.536k}{(1 ft.)(5.75 ft.)}\Bigg[1 - \frac{6(0.648 ft.)}{5.75 ft.}\Bigg]</math> = 0.143ksf
| |
|
| |
| :<math>P_W = 0.143 ksf + [0.739 ksf - 0.143 ksf]\Bigg[\frac{4.917 ft.}{5.75 ft.}\Bigg]</math> = 0.653 ksf
| |
|
| |
| :Moment at Wall Face:
| |
|
| |
| :<math>M_W = \Big[0.143\frac{k}{ft.}\Big]\Bigg[\frac{(4.917 ft.)^2}{2}\Bigg] + \frac{1}{3}(4.917 ft.)^2 \Bigg[0.653\frac{k}{ft.} - 0.143\frac{k}{ft.}\Bigg]\frac{1}{2} - 0.919k \Bigg[\frac{4.917 ft.}{2}\Bigg]</math> = 1.524(ft−k)
| |
|
| |
| :'''Dead Load, Earth Pressure, and Live Load'''
| |
|
| |
| ::'''Live Load 1 ft. From Stem Face'''
| |
|
| |
| [[image:751.24.3.4 live load.jpg|center|300px]]
| |
|
| |
| ::''β<sub>E</sub>'' = 1.3 (lateral earth pressure)
| |
|
| |
| ::''β<sub>LL</sub>'' = 1.67
| |
|
| |
| ::''γ'' = 1.3
| |
|
| |
| ::Apply Load Factors:
| |
|
| |
| ::''F<sub>LL</sub>'' = 3.516k(1.3)(1.67) = 7.633k
| |
|
| |
| ::''ΣV'' = 7.633k + 1.951k(1.3) = 10.169k
| |
|
| |
| ::''ΣM<sub>OT</sub>'' = 1.045(ft−k)(1.3)(1.3) = 1.766(ft−k)
| |
|
| |
| ::''ΣM<sub>R</sub>'' = 8.231(ft−k)(1.3) + 3.917 ft.(7.633k) = 40.599(ft−k)
| |
|
| |
| ::<math>\bar{x} = \frac{40.599(ft-k) - 1.766(ft-k)}{10.169k}</math> = 3.819 ft.
| |
|
| |
| ::''e'' = 3.819 ft. − (5.75 ft./2) = 0.944 ft.
| |
|
| |
| ::<math>P_T = \Bigg[\frac{10.169k}{(1 ft.)(5.75 ft.)}\Bigg]\Bigg[{1 - \frac{ 6(0.944 ft.)}{5.75 ft.}}\Bigg]</math> = 0.026 ksf
| |
|
| |
| ::<math>P_H = \Bigg[\frac{10.169k}{(1 ft.)(5.75 ft.)}\Bigg]\Bigg[{1 + \frac{ 6(0.944 ft.)}{5.75 ft.}}\Bigg]</math> = 3.511 ksf
| |
|
| |
| ::<math>P_W = 0.026 ksf + [3.511 ksf - 0.026 ksf]\Big[\frac{4.917 ft.}{5.75 ft.}\Big]</math> = 3.006 ksf
| |
|
| |
| ::<math>P_{LL} = 0.026 ksf + [3.511 ksf - 0.026 ksf]\Bigg[\frac{3.917 ft.}{5.75 ft.}\Bigg] </math> = 2.400 ksf
| |
|
| |
| ::Footing wt. from face of wall to toe:
| |
|
| |
| ::''Footing wt.'' = <math>1.3\Bigg[\frac{11.5}{12} ft.\Bigg](4.917 ft.)\Bigg[0.150 \frac{k}{ft^3}\Bigg](1 ft.)</math> = 0.919k
| |
|
| |
| ::Footing wt. from LL<sub>WL</sub> to toe:
| |
|
| |
| ::''Footing wt.'' = <math>1.3\Bigg[\frac{11.5}{12} ft.\Bigg](3.917 ft.)\Bigg[0.150 \frac{k}{ft^3}\Bigg](1 ft.)</math> = 0.732k
| |
|
| |
| ::Moment at Wall Face:
| |
|
| |
| ::''M<sub>W</sub> = <math>0.026\frac{k}{ft} \frac{(4.917 ft.)^2}{2} - 7.633k (1 ft.) + \frac{1}{2}\Bigg[3.006\frac{k}{ft} - 0.026\frac{k}{ft}\Bigg](4.917 ft.)^2\Big[\frac{1}{3}\Big] - 0.919k\frac{(4.917 ft.)}{2}</math>
| |
|
| |
| ::M<sub>W</sub> = 2.430(ft−k)
| |
|
| |
| ::Moment at LL<sub>WL</sub>:
| |
|
| |
| ::''M<sub>LL</sub>'' = <math>0.026\frac{k}{ft} \frac{(3.917 ft.)^2}{2} - 0.732k \frac{(3.917 ft.)}{2} + \frac{1}{2}\Bigg[2.400\frac{k}{ft} - 0.026\frac{k}{ft}\Bigg](3.917 ft.)^2\Big[\frac{1}{3}\Big] </math> = 4.837(ft−k)
| |
|
| |
| ::'''Live Load 1 ft. From Toe'''
| |
|
| |
| [[image:751.24.3.4 toe.jpg|center|250px]]
| |
|
| |
| ::Apply Load Factors:
| |
|
| |
| ::''F<sub>LL</sub>'' = 2.324k(1.3)(1.67) = 5.045k
| |
|
| |
| ::''ΣV'' = 5.045k + 1.951k(1.3) = 7.581k
| |
|
| |
| ::''ΣM<sub>OT</sub>'' = 1.045(ft−k)(1.3)(1.3) = 1.766(ft−k)
| |
|
| |
| ::''ΣM<sub>R</sub>'' = 8.231(ft−k)(1.3) + 5.045k(1ft.) = 15.745(ft−k)
| |
|
| |
| ::<math>\bar{x} = \frac{15.745(ft-k)- 1.766(ft-k)}{7.581k}</math> = 1.844 ft.
| |
|
| |
| ::<math>e = \frac{5.75 ft.}{2} - 1.844 ft.</math> = 1.031 ft.
| |
|
| |
| ::''P<sub>H</sub>'' = 0 ksf
| |
|
| |
| ::<math>P_T = \frac{2(7.581k)}{3(1 ft.)\big[\frac{5.75 ft.}{2} - 1.031 ft.\big]}</math> = 2.741 ksf
| |
|
| |
| ::''L<sub>1</sub>'' = 3[(L/2)− e]
| |
|
| |
| ::''L<sub>1</sub>'' = 3[(5.75 ft./2)− 1.031 ft.] = 5.532 ft.
| |
|
| |
| ::<math>P_W = 2.741 ksf \Big[\frac{0.615 ft.}{5.532 ft.}\Big]</math> = 0.305 ksf
| |
|
| |
| ::<math>P_{LL} = 2.741 ksf \Big[\frac{4.432 ft.}{5.532 ft.}\Big]</math> = 2.196 ksf
| |
|
| |
| ::Moment at Wall Face:
| |
|
| |
| ::''M<sub>W</sub>'' = <math> -5.045k (3.917 ft.) - 0.919k\Bigg[\frac{4.917 ft.}{2}\Bigg] + \frac{1}{2}(0.305\frac{k}{ft.})(4.917 ft.)^2 + \frac{1}{2}(4.917 ft.)^2 \Bigg[2.741\frac{k}{ft.} - 0.305\frac{k}{ft.}\Bigg]\Bigg[\frac{2}{3}\Bigg]</math> = 1.298(ft−k)
| |
|
| |
| ::Moment at LL<sub>WL</sub>:
| |
|
| |
| ::''M<sub>LL</sub>'' = <math>-0.187k(0.5 ft.) + 2.196\frac{k}{ft.}\frac{(1 ft.)^2}{2} +\frac{1}{2}(1 ft.)\Bigg[2.741\frac{k}{ft.} - 2.196\frac{k}{ft.}\Bigg]\Bigg[\frac{2}{3}\Bigg](1 ft.)</math> = 1.186(ft−k)
| |
|
| |
| :'''Design Flexural Steel in Bottom of Footing'''
| |
|
| |
| :''d'' = 11.5 in. − 4 in. = 7.500 in.
| |
|
| |
| :''M<sub>u</sub>'' = 4.837(ft−k) (controlling moment)
| |
|
| |
| :<math>R_n = \frac{4.837(ft-k)}{0.9(1 ft.)(7.5 in.)^2}</math> = 0.096 ksi
| |
|
| |
| :<math>\rho = \frac{0.85(4000 psi)}{60,000 psi}\Bigg[1 - \sqrt{1 - \frac{2(0.096 ksi)}{0.85(4 ksi)}}\Bigg] </math> = 0.00162
| |
|
| |
| :<math>\rho_{min} = 1.7\Bigg[\frac{11.5 in.}{7.5 in.}\Bigg]^2\frac{\sqrt{4000 psi}}{60,000 psi}</math> = 0.00421
| |
|
| |
| :Use ''ρ'' = (4/3)''ρ'' = (4/3)(0.00162) = 0.00216
| |
|
| |
| :''A<sub>S<sub>Req</sub></sub>'' = 0.00216(12 in.)(7.5 in.) = 0.194 in<sup>2</sup>/ft.
| |
|
| |
|
| |
| :<math>\frac{s}{0.196 in^2} = \frac{12 in.}{0.194 in^2}</math>
| |
|
| |
| :''s'' = 12.1 in.
| |
|
| |
| :<u>Use #4's @ 12 in. cts.</u> (Also use this spacing in the back of the stem.)
| |
|
| |
| :'''Check Shear'''
| |
|
| |
| ::'''Dead Load and Earth Pressure Only'''
| |
|
| |
| ::<math>V_W = 0.143\frac{k}{ft.}(4.917 ft.) + \frac{1}{2}(4.917 ft.)\Big[0.653\frac{k}{ft.} - 0.143\frac{k}{ft.}\Big] - 0.919k</math>
| |
|
| |
| ::''V<sub>W</sub>'' = 1.038k
| |
|
| |
| ::'''Live Load 1 ft. From Stem Face'''
| |
|
| |
| ::Shear at the wall can be neglected for this loading case.
| |
|
| |
| ::<math>V_{LL} = 0.026\frac{k}{ft.}(3.917 ft.) + \frac{1}{2}(3.917 ft.)\Big[2.400\frac{k}{ft.} - 0.026\frac{k}{ft.}\Big] - 0.732k</math>
| |
|
| |
| ::''V<sub>LL</sub>'' = 4.019k
| |
|
| |
| ::'''Live Load 1 ft. From Toe'''
| |
|
| |
| ::<math>V_W = 0.305\frac{k}{ft.}(4.917 ft.) + \frac{1}{2}(4.917 ft.)\Big[2.741\frac{k}{ft.} - 0.305\frac{k}{ft.}\Big] - 0.919k - 5.045k</math>
| |
|
| |
| ::''V<sub>W</sub>'' = 1.525k
| |
|
| |
| ::<math>V_{LL} = 2.196\frac{k}{ft.}(1ft) + \frac{1}{2}(1ft)\Big[2.741\frac{k}{ft.} - 2.196\frac{k}{ft.}\Big] - 0.187k</math>
| |
|
| |
| ::''V<sub>LL</sub>'' = 2.282k
| |
|
| |
| :Use ''V<sub>U</sub>'' = 4.019k
| |
|
| |
| :<math>\frac{\nu_u}{\phi} = \frac{4019(lbs)}{0.85(12 in.)(7.5 in.)} = 52.5 psi < 2\sqrt{4000 psi}</math> = 126.5 psi
| |
|
| |
| '''Shear Key Design'''
| |
|
| |
| [[image:751.24.3.4 shear key.jpg|center|300px]]
| |
|
| |
| For concrete cast against and permanently exposed to earth, minimum cover for reinforcement is 3 inches.
| |
|
| |
| <math>d = 12 in. - 3 in. - \frac{1}{2}\Big[\frac{1}{2}in.\Big]</math> = 8.75 in.
| |
|
| |
| <math>P_1 = 0.120\frac{k}{ft^3}(1 ft.)(2.882)\Big[\frac{11.5}{12}ft.\Big]</math> = 0.331 k/ft.
| |
|
| |
| <math>P_2 = 0.120\frac{k}{ft^3}(1 ft.)(2.882)\Big[\frac{29.5}{12}ft.\Big]</math> = 0.850 k/ft.
| |
|
| |
| <math>M_u = (1.3)(1.3)\Bigg\{0.331\frac{k}{ft.}\frac{(1.5 ft.)^2}{2} + \frac{1}{2}(1.5 ft.)\Big[0.850\frac{k}{ft.} - 0.331\frac{k}{ft}\Big]\Big[\frac{2}{3}\Big](1.5 ft.)\Bigg\}</math>
| |
|
| |
| ''M<sub>u</sub>'' = 1.287(ft−k)
| |
|
| |
| <math>R_n = \frac{1.287(ft-k)}{0.9(1ft.)(8.75in.)^2}</math> = 0.0187 ksi
| |
|
| |
| <math>\rho = \frac{0.85(4000psi)}{60,000psi}\Bigg[1 - \sqrt{1 - \frac{2(0.0187ksi)}{0.85(4ksi)}}\Bigg]</math> = 0.000312
| |
|
| |
| <math>\rho_{min} = 1.7\Big[\frac{12in.}{8.75in.}\Big]^2\frac{\sqrt{4000psi}}{60,000psi}</math> = 0.00337
| |
|
| |
| Use ''ρ'' = (4/3)''ρ'' = (4/3)(0.000312) = 0.000416
| |
|
| |
| ''A<sub>S<sub>Req</sub></sub>'' = 0.000416 (12 in.)(8.75 in.) = 0.0437 in<sup>2</sup>/ft.
| |
|
| |
|
| |
| <math>\frac{s}{0.196 in.^2} = \frac{12in.}{0.0437in.^2}</math>
| |
|
| |
| ''s'' = 53.8 in.
| |
|
| |
| <u>Use #4's @ 18 in. cts. (min)</u>
| |
|
| |
| :'''Check Shear'''
| |
|
| |
| :''V'' = 0.886k
| |
|
| |
| :<math>\frac{\nu_u}{\phi} = \frac{(1.3)(1.3)(886 lbs)}{0.85(12 in.)(8.75 in.)}</math> = 16.8 psi < 126.5 psi <u>o.k.</u>
| |
|
| |
| '''Reinforcement Summary'''
| |
|
| |
| [[image:751.24.3.4 summary.jpg|center|400px]]
| |
|
| |
| ===751.24.3.5 Example 3: Pile Footing Cantilever Wall===
| |
|
| |
| [[image:751.24.3.5.jpg|center|850px]]
| |
|
| |
| ''f’<sub>c</sub>'' = 3,000 psi
| |
|
| |
| ''f<sub>y</sub>'' = 60,000 psi
| |
|
| |
| ''φ'' = 27°
| |
|
| |
| ''γ<sub>s</sub>'' = 120 pcf
| |
|
| |
| Pile type: HP 10 x 42
| |
|
| |
| Allowable pile bearing = 56 tons
| |
|
| |
| Pile width = 10 inches
| |
|
| |
| Toe pile batter = 1:3
| |
|
| |
| See [[751.12 Barriers, Railings, Curbs and Fences|EPG 751.12 Barriers, Railings, Curbs and Fences]] for weight and centroid of barrier.
| |
|
| |
| '''Assumptions'''
| |
|
| |
| :* Retaining wall is located such that traffic can come within half of the wall height to the plane where earth pressure is applied.
| |
|
| |
| :* Reinforcement design is for one foot of wall length.
| |
|
| |
| :* Sum moments about the centerline of the toe pile at a distance of 6B (where B is the pile width) below the bottom of the footing for overturning.
| |
|
| |
| :* Neglect top one foot of fill over toe in determining soil weight and passive pressure on shear key.
| |
|
| |
| :* Neglect all fill over toe in designing stem reinforcement.
| |
|
| |
| :* The wall is designed as a cantilever supported by the footing.
| |
|
| |
| :* Footing is designed as a cantilever supported by the wall.
| |
|
| |
| :* Critical sections for bending are at the front and back faces of the wall.
| |
|
| |
| :* Critical sections for shear are at the back face of the wall for the heel and at a distance d (effective depth) from the front face for the toe.
| |
|
| |
| :* For load factors for design of concrete, see [[#Group Loads|EPG 751.24.1.2 Group Loads]].
| |
|
| |
| <math>C_A = cos\delta\Bigg[\frac{cos\delta - \sqrt{cos^2\delta - cos^2\phi}}{cos\delta + \sqrt{cos^2\delta - cos^2\phi}}\Bigg]</math>
| |
|
| |
| ''δ'' = 0, ''ϕ'' = 27° so ''C<sub>A</sub>'' reduces to:
| |
|
| |
| <math>C_A = \frac{1 - sin\phi}{1 + sin\phi} = \frac{1 - sin 27^\circ}{1 + sin 27^\circ}</math> = 0.376
| |
|
| |
| <math>C_P = tan^2\Bigg[45^\circ + \frac{\phi}{2}\Bigg] = tan^2\Bigg[ 45^\circ + \frac{27^\circ}{2}\Bigg]</math> = 2.663
| |
|
| |
| Table 751.24.3.5.1 is for stability check (moments taken about C.L. of toe pile at a depth of 6B below the bottom of the footing).
| |
|
| |
| {| border="1" class="wikitable" style="margin: 1em auto 1em auto" style="text-align:center"
| |
| |+ '''''Table 751.24.3.5.1'''''
| |
| ! style="background:#BEBEBE" colspan="2"|Load !! style="background:#BEBEBE"|Force (kips/ft) !! style="background:#BEBEBE"|Arm about C.L. of toe pile at 6B below footing (ft.) !! style="background:#BEBEBE"|Moment (ft-kips) per foot of wall length
| |
| |-
| |
| |rowspan="5"|'''Dead Load'''||(1)|| 0.340|| 2.542|| 0.864
| |
| |-
| |
| |(2)|| (1.333 ft.)(7.000 ft.)(0.150k/ft<sup>3</sup>) = 1.400 ||2.833|| 3.966
| |
| |-
| |
| |(3)|| (3.000 ft.)(8.500 ft.)(0.150k/ft<sup>3</sup>) = 3.825|| 4.417|| 16.895
| |
| |-
| |
| |(4)|| (1.000 ft.)(1.750 ft.)(0.150k/ft<sup>3</sup>) = <u>0.263</u>|| 4.417|| <u>1.162</u>
| |
| |-
| |
| |Σ||ΣV = 5.828 || - ||ΣM<sub>R</sub> = 22.887
| |
| |-
| |
| |rowspan="3"|'''Earth Load'''||(5)|| (7.000 ft.)(5.167 ft.)(0.120k/ft<sup>3</sup>) = 4.340|| 6.083|| 26.400
| |
| |-
| |
| |(6)|| (2.000 ft.)(2.000 ft.)(0.120k/ft<sup>3</sup>) = <u>0.480</u>|| 1.167|| <u>0.560</u>
| |
| |-
| |
| |Σ ||ΣV = 4.820|| - ||ΣM<sub>R</sub> = 26.960
| |
| |-
| |
| |rowspan="2"|'''Live Load Surcharge'''||P<sub>SV</sub>|| (2.000 ft.)(5.167 ft.)(0.120k/ft<sub>3</sub>) = 1.240|| 6.083|| M<sub>R</sub> = 7.543
| |
| |-
| |
| |P<sub>SH</sub>||(2.000 ft.)(0.376)(10.000 ft.)(0.120k/ft<sup>3</sup>) = 0.902||10.000|| M<sub>OT</sub> = 9.020
| |
| |-
| |
| |rowspan="2"|'''Earth Pressure'''||P<sub>A</sub>||2.256<sup>'''1'''</sup>|| 8.333|| M<sub>OT</sub> = 18.799
| |
| |-
| |
| |P<sub>P</sub>|| 3.285<sup>'''2'''</sup> || - || -
| |
| |-
| |
| |colspan="2"|'''Collision Force''' (F<sub>COL</sub>)||(10.000k)/[2(7.000 ft.)] = 0.714|| 18.000 ||M<sub>OT</sub> = 12.852
| |
| |-
| |
| |colspan="2"|'''Heel Pile Tension''' (P<sub>HV</sub>)||(3.000 tons)(2 k/ton)(1 pile)/(12.000 ft.) = 0.500|| 7.167|| M<sub>R</sub> = 3.584
| |
| |-
| |
| |colspan="2"|'''Toe Pile Batter''' (P<sub>BH</sub>)|| 5.903<sup>'''3'''</sup>|| - || -
| |
| |-
| |
| |colspan="2"|'''Passive Pile Pressure''' (P<sub>pp</sub>)|| 0.832<sup>'''4'''</sup>|| - || -
| |
| |-
| |
| |colspan="5" align="left"|<sup>'''1'''</sup> <math>P_A = \frac{1}{2}\gamma_S C_A H^2 = \frac{1}{2}\Bigg[0.120\frac{k}{ft^3}\Bigg](0.376)(10 ft.)^3 = 2.256\frac{k}{ft}</math>
| |
| |-
| |
| |colspan="5" align="left"|<sup>'''2'''</sup> <math>P_P = \frac{1}{2}\gamma_S C_A\Big[H_2^2 - H_1^2\Big] = \frac{1}{2}\Bigg[0.120\frac{k}{ft^3}\Bigg](2.663)[(6.75 ft.)^2 - (5 ft.)^2] = 3.285\frac{k}{ft}</math>
| |
| |-
| |
| |colspan="5" align="left"|<sup>'''3'''</sup> <math>P_{BH} = \Big(56 \frac{tons}{pile}\Big)\Big( 2 \frac{k}{ton}\Big)(2 piles)\Bigg(\frac{4 in.}{\sqrt{(12 in.)^2 + (4 in.)^2}}\Bigg)\Big(\frac{1}{12 ft.}\Big) = 5.903 \frac{k}{ft}</math>
| |
| |-
| |
| |colspan="5" align="left"|<sup>'''4'''</sup> <math>P_{PP} = \frac{1}{2}(2.663)(5 ft.)^2\Big(0.120 \frac{k}{ft^3}\Big)(0.833 ft.)(3 piles)\Big(\frac{1}{12 ft.}\Big) = 0.832\frac{k}{ft}</math>
| |
| |}
| |
|
| |
|
| |
| Table 751.24.3.5.2 is for bearing pressure checks (moments taken about C.L of toe pile at the bottom of the footing).
| |
|
| |
| {| border="1" class="wikitable" style="margin: 1em auto 1em auto" style="text-align:center"
| |
| |+ '''''Table 751.24.3.5.2'''''
| |
| ! style="background:#BEBEBE" colspan="2"|Load !! style="background:#BEBEBE"|Force (kips/ft) !! style="background:#BEBEBE"|Arm about C.L. of toe pile at 6B below footing (ft.) !! style="background:#BEBEBE"|Moment (ft-kips) per foot of wall length
| |
| |-
| |
| |rowspan="5"|'''Dead Load'''||(1)|| 0.340|| 0.875|| 0.298
| |
| |-
| |
| |(2)|| (1.333 ft.)(7.000 ft.)(0.150k/ft<sup>3</sup>) = 1.400 ||1.167|| 1.634
| |
| |-
| |
| |(3)|| (3.000 ft.)(8.500 ft.)(0.150k/ft<sup>3</sup>) = 3.825|| 2.750|| 10.519
| |
| |-
| |
| |(4)|| (1.000 ft.)(1.750 ft.)(0.150k/ft<sup>3</sup>) = <u>0.263</u>|| 2.750|| <u>0.723</u>
| |
| |-
| |
| |Σ||ΣV = 5.828 || - ||ΣM<sub>R</sub> = 13.174
| |
| |-
| |
| |rowspan="3"|'''Earth Load'''||(5)|| (7.000 ft.)(5.167 ft.)(0.120k/ft<sup>3</sup>) = 4.340|| 4.417|| 19.170
| |
| |-
| |
| |(6)|| (2.000 ft.)(2.000 ft.)(0.120k/ft<sup>3</sup>) = <u>0.480</u>|| -0.500|| <u>-0.240</u>
| |
| |-
| |
| |Σ ||ΣV = 4.820|| - ||ΣM<sub>R</sub> = 18.930
| |
| |-
| |
| |rowspan="2"|'''Live Load Surcharge'''||P<sub>SV</sub>|| (2.000 ft.)(5.167 ft.)(0.120k/ft<sub>3</sub>) = 1.240|| 4.417|| M<sub>R</sub> = 5.477
| |
| |-
| |
| |P<sub>SH</sub>||(2.000 ft.)(0.376)(10.000 ft.)(0.120k/ft<sup>3</sup>) = 0.902||5.000|| M<sub>OT</sub> = 4.510
| |
| |-
| |
| |rowspan="2"|'''Earth Pressure'''||P<sub>A</sub>||2.256|| 3.333|| M<sub>OT</sub> = 7.519
| |
| |-
| |
| |P<sub>P</sub>|| 3.285 || - || -
| |
| |-
| |
| |colspan="2"|'''Collision Force''' (F<sub>COL</sub>)||(10.000k)/[2(7.000 ft.)] = 0.714|| 13.000 ||M<sub>OT</sub> = 9.282
| |
| |-
| |
| |colspan="2"|'''Heel Pile Tension''' (P<sub>HV</sub>)||(3.000 tons)(2 k/ton)(1 pile)/(12.000 ft.) = 0.500|| 5.500|| M<sub>R</sub> = 2.750
| |
| |-
| |
| |colspan="2"|'''Toe Pile Batter''' (P<sub>BH</sub>)|| 5.903|| - || -
| |
| |-
| |
| |colspan="2"|'''Passive Pile Pressure''' (P<sub>pp</sub>)|| 0.832|| - || -
| |
| |}
| |
|
| |
| Investigate a representative 12 ft. strip. This will include one heel pile and two toe piles. The assumption is made that the stiffness of a batter pile in the vertical direction is the same as that of a vertical pile.
| |
|
| |
| Neutral Axis Location = [2piles(1.5 ft.) + 1pile(7 ft.)] / (3 piles) = 3.333 ft. from the toe.
| |
|
| |
| [[image:751.24.3.5 neutral axis.jpg|center|350px]]
| |
|
| |
| ''I ''= Ad<sup>2</sup>
| |
|
| |
| For repetitive 12 ft. strip:
| |
|
| |
| :Total pile area = 3A
| |
|
| |
| :''I ''= 2A(1.833 ft.)<sup>2</sup> + A(3.667 ft.)<sup>2</sup> = 20.167(A)ft.<sup>2</sup>
| |
|
| |
| For a 1 ft. unit strip:
| |
|
| |
| :<math>I = \frac{20.167(A)ft.^2}{12 ft.} = 1.681(A)ft.^2</math>
| |
|
| |
| :Total pile area = (3A/12 ft.) = 0.250A
| |
|
| |
| :'''Case I'''
| |
|
| |
| :F.S. for overturning ≥ 1.5
| |
|
| |
| :F.S. for sliding ≥ 1.5
| |
|
| |
| ::'''Check Overturning'''
| |
|
| |
| ::Neglect resisting moment due to P<sub>SV</sub> for this check.
| |
|
| |
| ::''ΣM<sub>R</sub>'' = 22.887(ft−k) + 26.960(ft−k) + 3.584(ft−k)
| |
|
| |
| ::''ΣM<sub>R</sub>'' = 53.431(ft−k)
| |
|
| |
| ::''ΣM<sub>OT</sub>'' = 9.020(ft−k) + 18.799(ft−k) = 27.819(ft−k)
| |
|
| |
| ::''F.S.<sub>OT</sub>'' = <math>\frac{\Sigma M_R}{\Sigma M_{OT}} = \frac{53.431(ft-k)}{27.819(ft-k)}</math> = 1.921 > 1.5 <u>o.k.</u>
| |
|
| |
| ::'''Check Pile Bearing'''
| |
|
| |
| ::Without P<sub>SV</sub> :
| |
|
| |
| ::''ΣV'' = 5.828k + 4.820k = 10.648k
| |
|
| |
| ::''e'' = <math>\frac{\Sigma M}{\Sigma V} = \frac{(13.174 + 18.930)(ft-k) - (4.510 + 7.519)(ft-k)}{10.648k}</math> = 1.885 ft.
| |
|
| |
| ::Moment arm = 1.885 ft. - 1.833 ft. = 0.052 ft.
| |
|
| |
| ::<math>P_T = \frac{\Sigma V}{A} - \frac{M_c}{I} = \frac{10.648k}{0.250A} - \frac{10.648k(0.052 ft.)(1.833 ft.)}{1.681(A)ft^2}</math>
| |
|
| |
| ::<math>P_T = \frac{41.988}{A} k</math>
| |
|
| |
| ::<math>P_H = \frac{10.648k}{0.250A} + \frac{10.648k(0.052 ft.)(3.667 ft.)}{1.681(A)ft^2}</math>
| |
|
| |
| ::<math>P_H = \frac{43.800}{A} k</math>
| |
|
| |
| ::Allowable pile load = 56 tons/pile. Each pile has area A, so:
| |
|
| |
| ::<math>P_T = 41.988\frac{k}{pile} = 20.944\frac{tons}{pile} </math> <u> o.k.</u>
| |
|
| |
| ::<math>P_H = 43.800\frac{k}{pile} = 21.900\frac{tons}{pile} </math> <u> o.k.</u>
| |
|
| |
| ::With P<sub>SV</sub>:
| |
|
| |
| ::''ΣV'' = 5.828k + 4.820k + 1.240k = 11.888k
| |
|
| |
| ::<math>e = \frac{(13.174 + 18.930 + 5.477)(ft-k) - (4.510 + 7.519)(ft-k)}{11.888k}</math> = 2.149 ft.
| |
|
| |
| ::Moment arm = 2.149 ft. - 1.833 ft. = 0.316 ft.
| |
|
| |
| ::<math>P_T = \frac{11.888k}{0.250A} - \frac{11.888k(0.316 ft.)(1.833 ft.)}{1.681(A)ft^2} = 43.456k = 21.728\frac{tons}{pile}</math> <u> o.k.</u>
| |
|
| |
| ::<math>P_H = \frac{11.888k}{0.250A} + \frac{11.888k(0.316 ft.)(3.667 ft.)}{1.681(A)ft^2} = 55.747k = 27.874\frac{tons}{pile}</math> <u> o.k.</u>
| |
|
| |
| ::'''Check Sliding'''
| |
|
| |
| ::<math>F.S._{Sliding} = \frac{3.285k + 5.903k + 0.832k}{0.902 k + 2.256k}</math> = 3.173 ≥ 1.5 <u> o.k.</u>
| |
|
| |
| :'''Case II'''
| |
|
| |
| :F.S. for overturning ≥ 1.2
| |
|
| |
| :F.S. for sliding ≥ 1.2
| |
|
| |
| ::'''Check Overturning'''
| |
|
| |
| ::''ΣM<sub>R</sub> ''= (22.887 + 26.960 + 7.543 + 3.584)(ft−k) = 60.974(ft−k)
| |
|
| |
| ::''ΣM<sub>OT</sub>'' = (9.020 + 18.799 + 12.852)(ft−k) = 40.671(ft−k)
| |
|
| |
| ::<math>F.S._{OT} = \frac{\Sigma M_R}{\Sigma M_{OT}} = \frac{60.974(ft-k)}{40.671(ft-k)}</math> = 1.499 ≥ 1.2 <u> o.k.</u>
| |
|
| |
| ::'''Check Pile Bearing'''
| |
|
| |
| ::<math>e = \frac{\Sigma M}{\Sigma V} = \frac{(13.174 + 18.930 + 5.477)(ft-k) - (4.510 + 7.519 + 9.282)(ft-k)}{(5.828 + 4.820 + 1.240)k}</math> = 1.369 ft.
| |
|
| |
| ::Moment arm = 1.833 ft. - 1.369 ft. = 0.464 ft.
| |
|
| |
| ::<math>P_T = \frac{\Sigma V}{A} + \frac{M_c}{I} = \frac{11.888k}{0.250A} + \frac{11.888k(0.464 ft.)(1.833 ft.)}{1.681(A)ft^2}</math>
| |
|
| |
| ::<math>P_T = 53.567\frac{k}{pile} = 26.783\frac{tons}{pile} \le 56\frac{tons}{pile}</math> <u> o.k.</u>
| |
|
| |
| ::<math>P_H = \frac{11.888k}{0.250A} - \frac{11.888k(0.464 ft.)(3.667 ft.)}{1.681(A)ft^2}</math> = 35.519k
| |
|
| |
| ::<math>P_H = 17.760\frac{tons}{pile} \le 56\frac{tons}{pile} </math> <u> o.k.</u>
| |
|
| |
| ::'''Check Sliding'''
| |
|
| |
| ::<math>F.S._{Sliding} = \frac{3.285k + 5.903k + 0.832k}{0.902k + 2.256k + 0.714k}</math> = 2.588 ≥ 1.2 <u> o.k.</u>
| |
|
| |
| :'''Case III'''
| |
|
| |
| :F.S. for overturning ≥ 1.5
| |
|
| |
| :F.S. for sliding ≥ 1.5
| |
|
| |
| ::'''Check Overturning'''
| |
|
| |
| ::''ΣM<sub>R</sub>'' = (22.887 + 26.960 + 3.584)(ft−k) = 53.431(ft−k)
| |
|
| |
| ::''ΣM<sub>OT</sub>'' = 18.799(ft−k)
| |
|
| |
| ::<math>F.S._{OT} = \frac{\Sigma M_R}{\Sigma M_{OT}} = \frac{53.431(ft-k)}{18.799(ft-k)}</math> = 2.842 ≥ 1.5 <u> o.k.</u>
| |
|
| |
| ::'''Check Pile Bearing'''
| |
|
| |
| ::<math>e = \frac{\Sigma M}{\Sigma V} = \frac{(13.174 + 18.930)(ft-k) - 7.519(ft-k)}{(5.828 + 4.820)k}</math> = 2.309 ft.
| |
|
| |
| ::Moment arm = 2.309 ft. - 1.833 ft. = 0.476 ft.
| |
|
| |
| ::<math>P_T = \frac{10.648k}{0.250A} - \frac{10.648k(0.476 ft.)(1.833 ft.)}{1.681(A)ft^2}</math> = 37.065k
| |
|
| |
| ::<math>P_T = 18.532\frac{tons}{pile} \le 56\frac{tons}{pile}</math> <u> o.k.</u>
| |
|
| |
| ::<math>P_H = \frac{10.648k}{0.250A} + \frac{10.648k(0.476 ft.)(3.667 ft.)}{1.681(A)ft^2}</math> = 53.649k
| |
|
| |
| ::<math>P_H = 26.825\frac{tons}{pile} \le 56\frac{tons}{pile} </math> <u> o.k.</u>
| |
|
| |
| ::'''Check Sliding'''
| |
|
| |
| ::<math>F.S._{Sliding} = \frac{3.285k+5.903k+0.832k}{2.256k}</math> = 4.441 ≥ 1.5 <u> o.k.</u>
| |
|
| |
| :'''Case IV'''
| |
|
| |
| ::'''Check Pile Bearing'''
| |
|
| |
| ::<math>e = \frac{\Sigma M}{\Sigma V} = \frac{(13.174 + 18.930)(ft-k)}{5.828k + 4.820k}</math> = 3.015 ft.
| |
|
| |
| ::Moment arm = 3.015 ft. - 1.833 ft. = 1.182 ft.
| |
|
| |
| ::<math>P_H = \frac{\Sigma V}{A} + \frac{M_c}{I} = \frac{10.648k}{0.250A} + \frac{10.648k(1.182 ft.)(3.667 ft.)}{1.681(A)ft^2}</math>
| |
|
| |
| ::<math>P_H = 70.047k = 35.024 \frac{tons}{pile}</math>
| |
|
| |
| ::25% overstress is allowed on the heel pile:
| |
|
| |
| ::<math>P_H = 35.024\frac{tons}{pile} \le 1.25 (56\frac{tons}{pile}) = 70 \frac{tons}{pile}</math> <u> o.k.</u>
| |
|
| |
| ::<math>P_T = \frac{10.648k}{0.250A} - \frac{10.648k(1.182 ft.)(1.833 ft.)}{1.681(A)ft^2}</math> = 28.868k
| |
|
| |
| ::<math>P_T = 14.434\frac{tons}{pile} \le 56\frac{tons}{pile} </math> <u> o.k.</u>
| |
|
| |
| :'''Reinforcement - Stem'''
| |
|
| |
| [[image:751.24.3.5 reinforcement stem.jpg|300px|center]]
| |
|
| |
| :b = 12 in.
| |
|
| |
| :cover = 2 in.
| |
|
| |
| :h = 16 in.
| |
|
| |
| :d = 16 in. - 2 in. - 0.5(0.625 in.) = 13.688 in.
| |
|
| |
| :''F<sub>Collision</sub>'' = 0.714k/ft
| |
|
| |
| ::<math>P_{LL} = \gamma_s C_A H(2.000 ft.) = (2.000 ft.)(0.376)(7.000 ft.)(0.120 \frac{k}{ft^3}) = 0.632\frac{k}{ft}</math>
| |
|
| |
| ::<math>P_{A_{Stem}} = \frac{1}{2} \gamma_s C_A H^2 = \frac{1}{2}\Big[0.120 \frac{k}{ft^3}\Big](0.376)(7.000 ft.)^2 = 1.105\frac{k}{ft} </math>
| |
|
| |
| :::'''Apply Load Factors'''
| |
|
| |
| :::''F<sub>Col.</sub>'' = ''γβ<sub>LL</sub>''(0.714k) = (1.3)(1.67)(0.714k) = 1.550k
| |
|
| |
| :::''P<sub>LL</sub>'' = ''γβ<sub>E</sub>'' (0.632k) = (1.3)(1.67)(0.632k) = 1.372k
| |
|
| |
| :::''P<sub>A<sub>Stem</sub></sub>'' = ''γβ<sub>E</sub>'' (1.105k) = (1.3)(1.3)(1.105k) = 1.867k
| |
|
| |
| ::''M<sub>u</sub>'' = (10.00 ft.)(1.550k) + (3.500 ft.)(1.372k) + (2.333 ft.)(1.867k)
| |
|
| |
| ::''M<sub>u</sub>'' = 24.658(ft−k)
| |
|
| |
| ::<math>R_n = \frac{M_u}{\phi b d^2} = \frac{24.658(ft-k)}{(0.9)(1 ft.)(13.688 in.)^2}</math> = 0.146ksi
| |
|
| |
| ::<math>\rho = \frac{0.85f'_c}{f_y}\Bigg[1 - \sqrt{1 - \frac{2R_n}{0.85f'_c}}\Bigg] =
| |
| \frac{0.85(3 ksi)}{60 ksi}\Bigg[1 - \sqrt{1 - \frac{2(0.146 ksi)}{0.85(3 ksi)}}\Bigg]</math> = 0.00251
| |
|
| |
| ::<math>\rho_{min} = 1.7\Big[\frac{h}{d}\Big]^2 \frac{\sqrt{f'_c}}{f_y} = 1.7\Big[\frac{16 in.}{13.688 in.}\Big]^2 \frac{\sqrt{3000 psi}}{60,000 psi}</math> = 0.00212
| |
|
| |
| ::''ρ'' = 0.00251
| |
|
| |
| ::<math>A_{S_{Req.}} = \rho bd = (0.00251)(12 in.)(13.688 in.) = 0.412 \frac{in^2}{ft.}</math>
| |
|
| |
| ::One #5 bar has A<sub>S</sub> = 0.307 in<sup>2</sup>
| |
|
| |
| ::<math>\frac{s}{0.307 in^2} = \frac{12 in.}{0.412 in^2}</math>
| |
|
| |
| ::''s'' = 8.9 in.
| |
|
| |
| ::<u>Use # 5 bars @ 8.5 in. cts.</u>
| |
|
| |
| :::'''Check Shear'''
| |
|
| |
| :::''V<sub>u</sub>'' ≤ ''φV<sub>n</sub>''
| |
|
| |
| :::''V<sub>u</sub>'' = ''F<sub>Collision</sub>'' + ''P<sub>LL</sub>'' + ''P<sub>A<sub>Stem</sub></sub>'' = 1.550k + 1.372k + 1.867k = 4.789k
| |
|
| |
|
| |
| :::<math>\frac{\nu_u}{\phi} = \frac{v_u}{\phi bd} = \frac{4789 lbs}{0.85(12 in.)(13.688 in.)}</math> = 34.301 psi
| |
|
| |
| :::<math> \nu_n = \nu_c = 2\sqrt{f'_c} = 2\sqrt{3000psi}</math> = 109.5 psi > 34.3 psi <u>o.k.</u>
| |
|
| |
| ::'''Reinforcement - Footing - Top Steel'''
| |
|
| |
| [[image:751.24.3.5 footing.jpg|300px|center]]
| |
|
| |
| ::b = 12 in.
| |
|
| |
| ::cover = 3 in.
| |
|
| |
| ::h = 36 in.
| |
|
| |
| ::d = 36 in. - 3 in. - 0.5(0.5 in.) = 32.750 in.
| |
|
| |
| ::Design the heel to support the entire weight of the superimposed materials.
| |
|
| |
| ::Soil(1) = 4.340k/ft.
| |
|
| |
| ::LL<sub>s</sub> = 1.240k/ft.
| |
|
| |
| ::<math>Slab \ wt. = (3.000 ft.)\Big[0.150 \frac{k}{ft^3}\Big](5.167 ft.)</math> = 2.325k/ft.
| |
|
| |
| :::'''Apply Load Factors'''
| |
|
| |
| :::Soil(1) = ''γβ<sub>E</sub>''(4.340k) = (1.3)(1.0)(4.340k) = 5.642k
| |
|
| |
| :::''LL<sub>s</sub>'' = ''γβ<sub>E</sub>''(1.240k) = (1.3)(1.67)(1.240k) = 2.692k
| |
|
| |
| :::Slab wt. = ''γβ<sub>D</sub>''(2.325k) = (1.3)(1.0)(2.325k) = 3.023k
| |
|
| |
| ::''M<sub>u</sub>'' = (2.583 ft.)(5.642k + 2.692k + 3.023k) = 29.335(ft−k)
| |
|
| |
| ::<math>R_n = \frac{M_u}{\phi bd^2} = \frac{29.335(ft-k)}{(0.9)(1 ft.)(32.750 in.)^2}</math> = 0.0304 ksi
| |
|
| |
| ::<math>\rho = \frac{0.85(3ksi)}{60ksi}\Bigg[1 - \sqrt{1 - \frac{2(0.0304ksi)}{0.85(3ksi)}}\Bigg]</math> = 0.000510
| |
|
| |
| ::<math>\rho_{min} = 1.7\Big[\frac{36 in.}{32.750 in.}\Big]^2 \frac{\sqrt{3000 psi}}{60,000psi}</math> = 0.00188
| |
|
| |
| ::Use ''ρ'' = 4/3 ''ρ'' = 4/3 (0.000510) = 0.000680
| |
|
| |
| ::<math>A_{S_{Req}} = \rho bd = (0.000680)(12 in.)(32.750 in.) = 0.267\frac{in^2}{ft.}</math>
| |
|
| |
| ::One #4 bar has A<sub>s</sub> = 0.196 in.<sup>2</sup>
| |
|
| |
| ::<math>\frac{s}{0.196 in^2} = \frac{12 in}{0.267 in.^2}</math>
| |
|
| |
| ::''s'' = 8.8 in.
| |
|
| |
| ::<u>Use #4 bars @ 8.5 in. cts.</u>
| |
|
| |
| :::'''Check Shear'''
| |
|
| |
| :::<math>V_u = Soil(1) + LL_s + Slab \ wt. = 5.642k + 2.692k + 3.023k = 11.357k</math>
| |
|
| |
| :::<math>\frac{\nu_u}{\phi} = \frac{V_u}{\phi bd} = \frac{11357 lbs}{(0.85)(12 in.)(32.750 in.)}</math> = 33.998 psi ≤ 109.5 psi = ''ν<sub>c</sub>'' <u>o.k.</u>
| |
|
| |
| ::'''Reinforcement - Footing - Bottom Steel'''
| |
|
| |
| ::Design the flexural steel in the bottom of the footing to resist the largest moment that the heel pile could exert on the footing. The largest heel pile bearing force was in Case IV. The heel pile will cause a larger moment about the stem face than the toe pile (even though there are two toe piles for every one heel pile) because it has a much longer moment arm about the stem face.
| |
|
| |
| [[image: 751.24.3.5 heel pile.jpg|center|300px]]
| |
|
| |
| ::Pile is embedded into footing 12 inches.
| |
|
| |
| ::''b'' = 12 in.
| |
|
| |
| ::''h'' = 36 in.
| |
|
| |
| ::''d'' = 36 in. - 4 in. = 32 in.
| |
|
| |
| :::'''Apply Load Factors to Case IV Loads'''
| |
|
| |
| :::<math>\Sigma V = \gamma \beta_D\Big[5.828 \frac{k}{ft.}\Big] + \gamma \beta_E \Big[4.820 \frac{k}{ft.}\Big]</math>
| |
|
| |
| :::<math>\Sigma V = 1.3(1.0)\Big[5.828\frac{k}{ft.}\Big] + 1.3(1.0)\Big[4.820\frac{k}{ft.}\Big]</math>
| |
|
| |
| :::''ΣV'' = 13.842 k/ft.
| |
|
| |
| :::<math>\Sigma M = \gamma \beta_D\Big[13.174\frac{(ft-k)}{ft.}\Big] + \gamma \beta_E\Big[18.930\frac{(ft-k)}{ft.}\Big]</math>
| |
|
| |
| :::<math>\Sigma M = (1.3)(1.0)\Big[13.174\frac{(ft-k)}{ft.}\Big] + (1.3)(1.0)\Big[18.930\frac{(ft-k)}{ft.}\Big]</math>
| |
|
| |
| :::''ΣM'' = 41.735 (ft−k)/ft.
| |
|
| |
| ::e = <math>\frac{\Sigma M}{\Sigma V} = \frac{41.735 (ft-k)}{13.842k}</math> = 3.015 ft.
| |
|
| |
| ::Moment arm = 3.015 ft. - 1.833 ft. = 1.182 ft.
| |
|
| |
| ::<math>P_H = \frac{\Sigma V}{A} + \frac{M_c}{I} = \frac{13.842k}{0.250A} + \frac{13.842k (1.182 ft.)(3.667 ft.)}{1.681(A)ft^2}</math>
| |
|
| |
| ::<math>P_H = 91.059 \frac{k}{pile}\Big(\frac{1}{12 ft.}\Big)</math> = 7.588 k/ft.
| |
|
| |
| ::<math>M_u = \Big(7.588\frac{k}{ft.}\Big)(3.667 ft.)</math> = 27.825(ft−k)/ft.
| |
|
| |
| ::<math>R_n = \frac{M_u}{\phi bd^2} = \frac{27.825(ft-k)}{(0.9)(1 ft.)(32 in.)^2}</math> = 0.0301 ksi
| |
|
| |
| ::<math>\rho = \frac{0.85(3 ksi)}{60ksi}\Bigg[1 - \sqrt{1 - \frac{2(0.0301 ksi)}{0.85(3 ksi)}}\Bigg]</math> = 0.000505
| |
|
| |
| ::<math>\rho_{min} = 1.7\Big[\frac{36 in.}{32 in.}\Big]^2 \frac{\sqrt{3000 psi}}{60,000 psi}</math> = 0.00196
| |
|
| |
| ::Use ''ρ'' = 4/3 ''ρ'' = 4/3 (0.000505) = 0.000673
| |
|
| |
| ::''A<sub>S<sub>Req</sub></sub> = ρbd'' = (0.000673)(12 in.)(32 in.) = 0.258 in<sup>2</sup>/ft.''
| |
|
| |
|
| |
| ::One #4 bar has A<sub>s</sub> = 0.196 in<sup>2</sup>.
| |
|
| |
| ::<math>\frac{s}{0.196 in.^2} = \frac{12 in.}{0.258 in.^2}</math>
| |
|
| |
| ::''s'' = 9.1 in.
| |
|
| |
| ::<u>Use #4 bars @ 9 in. cts.</u>
| |
|
| |
| :::'''Check Shear'''
| |
|
| |
| :::The critical section for shear for the toe is at a distance d = 21.75 inches from the face of the stem. The toe pile is 6 inches from the stem face so the toe pile shear does not affect the shear at the critical section. The critical section for shear is at the stem face for the heel so all of the force of the heel pile affects the shear at the critical section. The worst case for shear is Case IV.
| |
|
| |
| :::''V<sub>u</sub>'' = 7.588k
| |
|
| |
| :::<math>\frac{\nu_u}{\phi} = \frac{V_u}{\phi bd} = {7588 lbs}{0.85(12 in.)(32 in.)}</math> = 23.248 psi ≤ 109.5 psi = ''ν<sub>c</sub>'' <u>o.k.</u>
| |
|
| |
| ::'''Reinforcement - Shear Key'''
| |
|
| |
| ::''b'' = 12 in.
| |
|
| |
| ::''h'' = 12 in.
| |
|
| |
| ::cover = 3 in.
| |
|
| |
| ::''d'' = 12 in. - 3 in. - 0.5(0.5 in.) = 8.75 in.
| |
|
| |
| :::'''Apply Load Factors'''
| |
|
| |
| :::''P<sub>P</sub> = γβ<sub>E</sub>'' (3.845k) = (1.3)(1.3)(3.845k) = 6.498k
| |
|
| |
| ::''M<sub>u</sub>'' = (0.912 ft.)(6.498k) = 5.926(ft−k)
| |
|
| |
| ::<math>R_n = \frac{M_u}{\phi bd^2} = \frac{5.926(ft-k)}{(0.9)(1 ft.)(8.75 in.)^2}</math> = 0.0860 ksi
| |
|
| |
| ::<math>\rho = \frac{0.85(3ksi)}{60ksi}\Bigg[1 - \sqrt{1 - \frac{2(0.0860ksi)}{0.85(3ksi)}}\Bigg]</math> = 0.00146
| |
|
| |
| ::<math>\rho_{min} = 1.7\Big[\frac{12 in.}{8.75 in}\Big]^2\frac{\sqrt{3000 psi}}{60,000 psi}</math> = 0.00292
| |
|
| |
| ::Use ''ρ'' = 4/3 ''ρ'' = 4/3(0.00146) = 0.00195
| |
|
| |
| ::''A<sub>S<sub>Req</sub></sub> = ρbd'' = (0.00195)(12 in.)(8.75 in.) = 0.205 in.<sup>2</sup>/ft.
| |
|
| |
|
| |
| ::One #4 bar has A<sub>s</sub> = 0.196 in<sup>2</sup>
| |
|
| |
|
| |
| ::<math>\frac{s}{0.196 in.^2} = \frac{12 in.}{0.205 in.^2}</math>
| |
|
| |
| ::''s'' = 11.5 in.
| |
|
| |
| ::<u>Use #4 bars @ 11 in. cts.</u>
| |
|
| |
| :::'''Check Shear'''
| |
|
| |
| :::<math>\frac{\nu_u}{\phi} = \frac{V_u}{\phi bd} = \frac{6498 lbs}{0.85(12 in.)(8.75 in.)}</math> = 72.807 psi < 109.5 psi = ''ν<Sub>c</sub>''
| |
|
| |
| ::'''Reinforcement Summary'''
| |
|
| |
| [[image:751.24.3.5 summary.jpg|center|350px]]
| |
|
| |
| ===751.24.3.6 Dimensions===
| |
| '''Cantilever Walls'''
| |
|
| |
| Each section of wall shall be in increments of 4 ft. with a maximum length of 28'-0".
| |
| [[image:751.24.3.6 friction or bearing piles.jpg|center|800px]]
| |
|
| |
|
| |
| Each section of wall shall be in increments of 4 ft. with a maximum length of 28'-0".
| |
| [[image:751.24.3.6 pile footing.jpg|center|800px]]
| |
|
| |
|
| |
| '''Cantilever Walls - L-Shaped'''
| |
|
| |
| Each section of wall shall be in increments of 4 ft. with a maximum length of 28'-0".
| |
| [[image:751.24.3.6 L shaped.jpg|center|800px]]
| |
|
| |
|
| |
| '''Counterfort Walls'''
| |
| [[image:751.24.3.6 counterfort part elev.jpg|center|800px|thumb|
| |
| {| style="margin: 1em auto 1em auto style="text-align:left""
| |
| |-
| |
| |'''Notes:'''
| |
| |-
| |
| |'''Dimension "A"'''
| |
| |-
| |
| |• Maximum length = 28'-0".
| |
| |-
| |
| |• Each section to be in 4'-0" increments.
| |
| |-
| |
| |• (See [[#Rustication Recess|rustication recess details]].)
| |
| |-
| |
| |'''Dimensions "B" & "C"'''
| |
| |-
| |
| |• As required by the design to balance the negative and positive moments. (See the design assumptions).
| |
| |}]]
| |
|
| |
| [[image:751.24.3.6 counterfort typ section.jpg|center|800px|thumb|
| |
| {| style="margin: 1em auto 1em auto style="text-align:left""
| |
| |-
| |
| |'''Notes:'''
| |
| |-
| |
| |'''Batter "D":'''
| |
| |-
| |
| |* As required to maintain 9" minimum at the top of the counterfort and 12" minimum edge distance at the top of the footing, between counterfort and footing edge.
| |
| |-
| |
| |* Batter to be given an eighth of an inch per foot of counterfort height.
| |
| |-
| |
| |'''Dimension "L":'''
| |
| |-
| |
| |* As required for stability.
| |
| |-
| |
| |* As an estimate, use "L" equal to 1/2 the height of "H".
| |
| |}]]
| |
|
| |
| '''Sign-Board Type Counterfort Walls'''
| |
| [[image:751.24.3.6 sign board part elev.jpg|center|800px|thumb|
| |
| {| style="margin: 1em auto 1em auto style="text-align:left""
| |
| |-
| |
| |'''Notes:'''
| |
| |-
| |
| |'''Dimension "A"'''
| |
| |-
| |
| |* Maximum length = 28'-0".
| |
| |-
| |
| |* Each section to be in 4'-0" increments.
| |
| |-
| |
| |* (See [[#Rustication Recess|rustication recess details]].)
| |
| |-
| |
| |'''Dimensions "B" & "C"'''
| |
| |-
| |
| |* As required by the design to balance the negative and positive moments. (See the design assumptions).
| |
| |-
| |
| |'''Dimension "E"'''
| |
| |-
| |
| |* (Sign-board type only)
| |
| |-
| |
| |* As required to maintain footing pressure within the allowable for existing foundation material. 12" minimum.
| |
|
| |
| |}]]
| |
|
| |
| [[image:751.24.3.6 sign board typ section.jpg|center|800px|thumb|
| |
| {| style="margin: 1em auto 1em auto style="text-align:left""
| |
| |-
| |
| |'''Notes:'''
| |
| |-
| |
| |'''Batter "D":'''
| |
| |-
| |
| |* As required to maintain 9" minimum at the top of the counterfort and 12" minimum edge distance at the top of the footing, between counterfort and footing edge.
| |
| |-
| |
| |* Batter to be given an eighth of an inch per foot of counterfort height.
| |
| |-
| |
| |'''Dimension "L":'''
| |
| |-
| |
| |* As required for stability.
| |
| |-
| |
| |* As an estimate, use "L" equal to 1/2 the height of "H".
| |
| |}]]
| |
|
| |
| ===751.24.3.7 Reinforcement===
| |
| '''Cantilever Walls'''
| |
| [[image:751.24.3.7 friction.jpg|center|800px|thumb|
| |
| {| style="margin: 1em auto 1em auto"
| |
| |-
| |
| |'''(*)''' Alternate long and short bars at equal spaces.
| |
| |-
| |
| |'''(**)''' If collision forces are assumed, use #4 @ 12" cts. min. and extend at least development length into footing. (See [[751.5 Structural Detailing Guidelines#751.5.9.2.8.1 Development and Lap Splice General|EPG 751.5.9.2.8.1 Development and Lap Splice General]].)
| |
| |-
| |
| |'''(***)''' Theo. cut-off for bending + development length. (Wall height over 10' only.)
| |
| |}
| |
| ]]
| |
|
| |
| [[image:751.24.3.7 pile footing.jpg|center|800px|thumb|
| |
| {| style="margin: 1em auto 1em auto"
| |
| |-
| |
| |'''(*)''' Alternate long and short bars at equal spaces.
| |
| |-
| |
| |'''(**)''' If collision forces are assumed, use #4 @ 12" cts. min. and extend at least development length into footing. (See [[751.5 Structural Detailing Guidelines#751.5.9.2.8.1 Development and Lap Splice General|EPG 751.5.9.2.8.1 Development and Lap Splice General]].)
| |
| |-
| |
| |'''(***)''' Theo. cut-off for bending + development length. (Wall height over 10' only.)
| |
| |-
| |
| |'''(****)''' Due to site constriction.
| |
| |}
| |
| ]]
| |
|
| |
| '''Cantilever Walls - L-Shaped'''
| |
|
| |
| [[image:751.24.3.7 L shaped.jpg|center|800px|thumb|
| |
| {| style="margin: 1em auto 1em auto"
| |
| |-
| |
| |'''(*)''' Do not splice stress bars in the fill face at top of footing.
| |
| |-
| |
| |'''(**)''' If collision forces are assumed, use #4 @ 12" cts. min. and extend at least development length into footing. (See [[751.5 Structural Detailing Guidelines#751.5.9.2.8.1 Development and Lap Splice General|EPG 751.5.9.2.8.1 Development and Lap Splice General]].)
| |
| |}
| |
| ]]
| |
|
| |
| '''Counterfort Walls'''
| |
| :'''Wall and Stem'''
| |
| [[image:751.24.3.7 counterfort.jpg|center|800px|thumb|
| |
| {| style="margin: 1em auto 1em auto"
| |
| |-
| |
| |<center>(For footing reinforcement, see the "Footing" diagram, below)</center>
| |
| |-
| |
| |'''(*)''' Use development length or standard hook in accordance with [[751.5 Structural Detailing Guidelines#751.5.9.2.8.1 Development and Lap Splice General|EPG 751.5.9.2.8.1 Development and Lap Splice General]].
| |
| |-
| |
| |'''(**)''' See lap splices Class B. (See [[751.5 Structural Detailing Guidelines#751.5.9.2.8.1 Development and Lap Splice General|EPG 751.5.9.2.8.1 Development and Lap Splice General]].)
| |
| |}
| |
| ]]
| |
|
| |
| :'''Footing'''
| |
| [[image:751.24.3.7 footing.jpg|center|800px|thumb|
| |
| {| style="margin: 1em auto 1em auto"
| |
| |-
| |
| |'''(*)''' By design for loads and footing pressures on section under consideration. (#5 @ 12" cts. is the minimum.)
| |
| |}
| |
| ]]
| |
|
| |
| '''Counterfort Walls - Sign-Board Type'''
| |
| :'''Wall and Stem'''
| |
| :Refer to "Counterfort Walls, Wall and Stem", above.
| |
|
| |
| :'''Spread Footing'''
| |
| [[image:751.24.3.7 sign board.jpg|center|800px]]
| |
|
| |
| :If the shear line is within the counterfort projected (longitudinally or transversely), the footing may be considered satisfactory for all conditions. If outside of the counterfort projected, the footing must be analyzed and reinforced for bending and checked for bond stress and for diagonal tension stress.
| |
|
| |
| [[image:751.24.3.7 sign board footing.jpg|center|800px]]
| |
|
| |
| ===751.24.3.8 Details===
| |
| '''Non-Keyed Joints'''
| |
|
| |
| Each section of wall shall be in increments of 4 ft. with a maximum length of 28'-0".
| |
| [[image:751.24.3.8 nonkeyed.jpg|center|800px]]
| |
| <center>See [[751.50 Standard Detailing Notes|EPG 751.50 Standard Detailing Notes]] for appropriate notes.</center>
| |
|
| |
| '''Keyed Joints'''
| |
| [[image:751.24.3.8 keyed.jpg|center|800px]]
| |
| <center>See [[751.50 Standard Detailing Notes|EPG 751.50 Standard Detailing Notes]] for appropriate notes.</center>
| |
|
| |
|
| |
| <div id="Rustication Recess"></div>
| |
| '''Rustication Recess'''
| |
| [[image:751.24.3.8 rustication.jpg|center|800px]]
| |
|
| |
|
| |
| '''Drains'''
| |
| [[image:751.24.3.8 drains.jpg|center|800px]]
| |
| <center>Note: French drains shall be used on all retaining walls, unless otherwise specified on the Design Layout.</center>
| |
|
| |
| [[image:751.24.3.8 drop inlet.jpg|center|800px]]
| |
|
| |
|
| |
| '''Construction Joint Keys:
| |
| :'''Cantilever Walls'''
| |
| [[image:751.24.3.8 cantilever.jpg|center|800px]]
| |
|
| |
|
| |
| :'''Counterfort Walls'''
| |
| [[image:751.24.3.8 counterfort.jpg|center|800px]]
| |
|
| |
|
| |
| ::Key length: Divide the length "A" into an odd number of spaces of equal lengths. Each space shall not exceed a length of 24 inches. Use as few spaces as possible with the minimum number of spaces equal to three (or one key).
| |
|
| |
| ::Key width = Counterfort width/3 (to the nearest inch)
| |
|
| |
| ::Key depth = 2" (nominal)
| |
|
| |
| :'''Sign-Board Walls'''
| |
| [[image:751.24.3.8 sign board.jpg|center|800px]]
| |
|
| |
| ::Key length = divide length "A" or "B" into an odd number of spaces of equal lengths. Each space length shall not exceed 24 inches. Use as few spaces as possible with the minimum number of spaces equal to three (or one key).
| |
|
| |
|
| |
|
| |
| -->
| |
| [[Category:751 LRFD Bridge Design Guidelines]] | | [[Category:751 LRFD Bridge Design Guidelines]] |
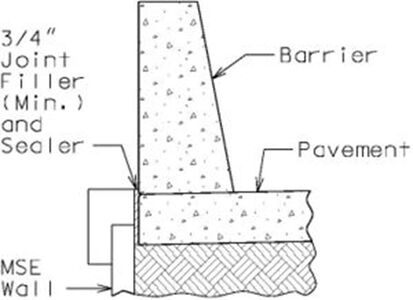 Barrier at Top of MSE Wall

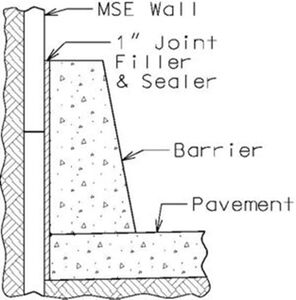 Barrier in Front of MSE Wall


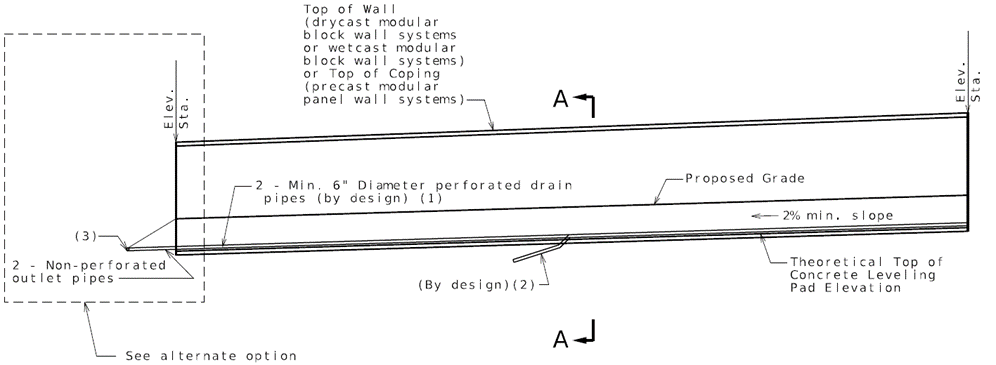 ELEVATION SHOWING DRAIN PIPE
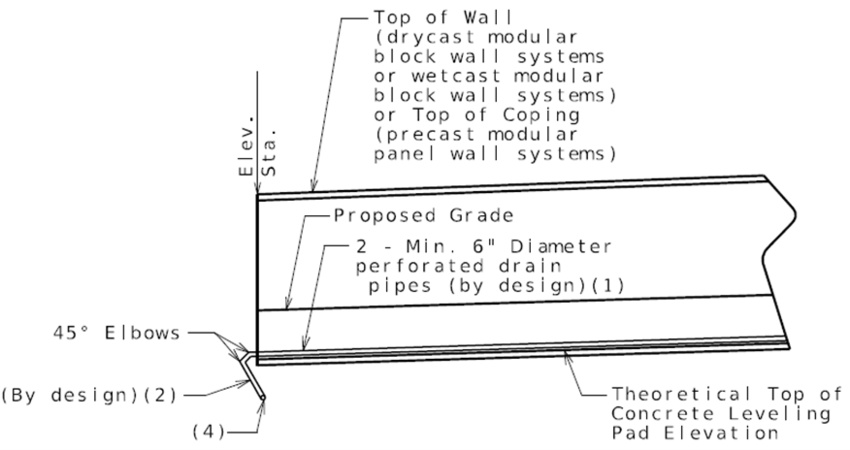 Alternate option


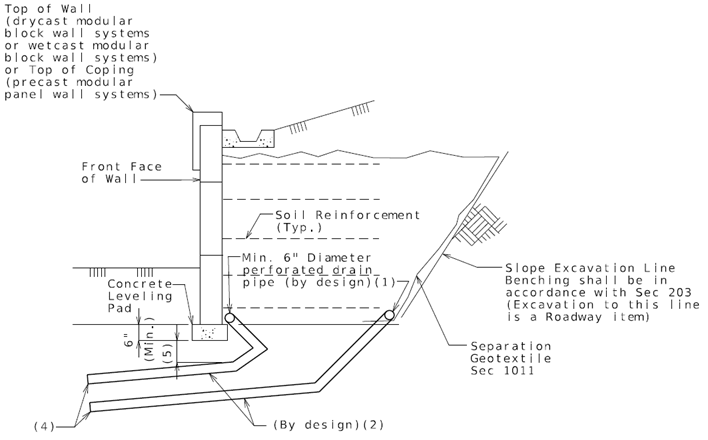 Section A-A

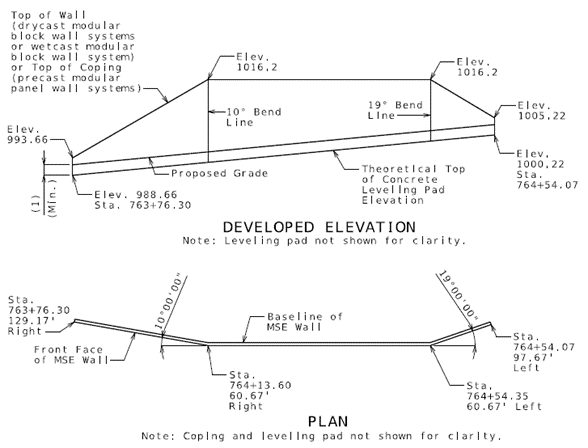 Fig. 751.24.2.3.1 MSE Wall Developed Elevation and Plan

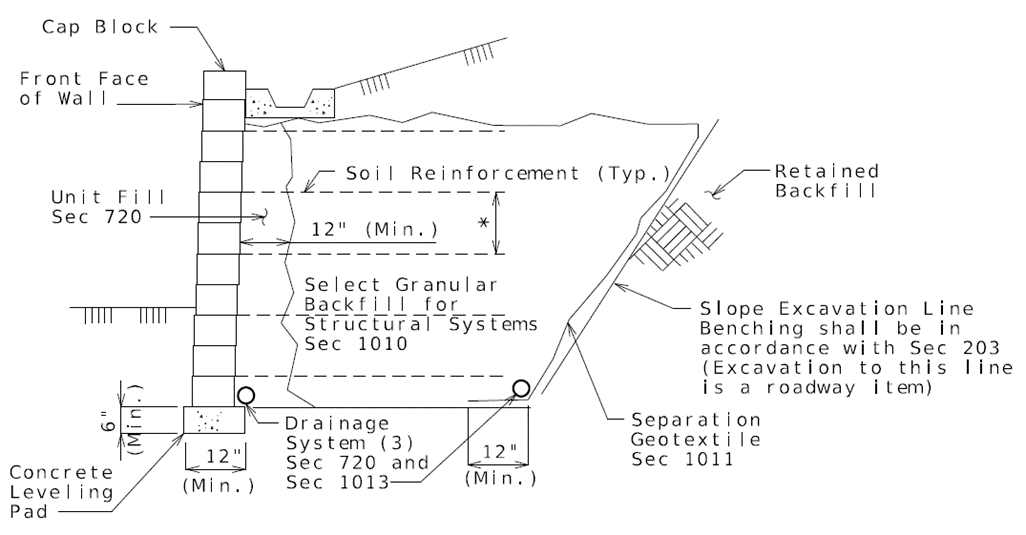 Fig. 751.24.2.3.2 Typical Section Through Generic Drycast Modular Block Wall (DMBW-MSE) System or Wetcast Modular Block Wall (WMBW-MSE) System

